Hello dear Amigurumi Followers
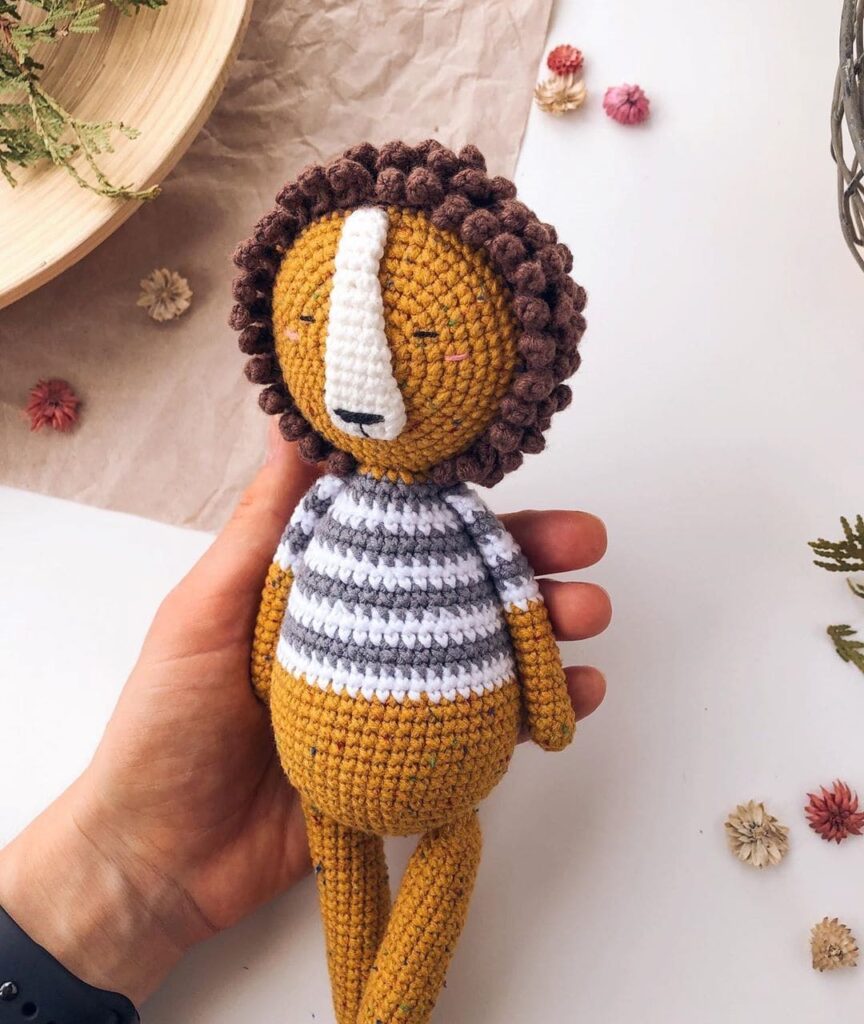
Today we share Amigurumi Cute Lion Free Pattern for you. As you know we share new free amigurumi pattern every day. The main crochets are gazelle, amigurumi bear, pola, crochet panda, penguin, giraffe, llama, pig, bunny, clown, lamb, bee, crochet unicorn, amigurumi doll, fox, penguin, dinosaur, crochet elephant, hippo, monkey, crochet cat, crochet dog and more …
Todays daily new amigurumi free crochet pattern is Amigurumi Cute Lion.
I want to give you some informations about this amigurumi free pattern ; Cute Lion.
This free amigurumi monkey pattern will help you make a cute little monkey with your own hands. The body and legs of the crochet monkey are made as one piece. Finished toy measures approximately 13 cm (5.1”).
Abbreviations:
R = row
mc = magic circle
ch = chain
st = stitch
sc = single crochet
inc = 2 sc in the next stitch
dec = single crochet 2 stitches together
F.o. = finish off
( ) = number of stitches you should have at the end of the round/row
( ) * 7 = repeat whatever is between the brackets the number of times stated
Amigurumi Cute Lion Free Pattern:
Head
R 1: 7 sc in mc (7)
R 2: (inc) * 7 (14)
R 3: (1 sc, inc) * 7 (21)
R 4: (2 sc, inc) * 7 (28)
R 5: (3 sc, inc) * 7 (35)
R 6: (4 sc, inc) * 7 (42)
R 7: (5 sc, inc) * 7 (49)
R 8-18: 49 sc (11 rows)
R 19: (5 sc, dec) * 7 (42)
R 20: (4 sc, dec) * 7 (35)
R 21: (3 sc, dec) * 7 (28)
R 22: (2 sc, dec) * 7 (21)
R 23: (5 sc, dec) * 3 (18)
F.o.
Muzzle
With beige yarn:
Make 9 ch.
Make an oval starting from the 2nd ch from hook, work on both sides of the chain.
R 1: From the 2nd ch from hook: inc, 6 sc, 4 sc in last st, turn and crochet on the opposite side of the chain: 6 sc, inc (20)
R 2: (4 sc, inc)*4 (24)
R 3: (5 sc, inc)*4 (28)
R 4-6: 28 sc (3 rows)
R 7: 11 sc, 1 turning chain
R 8: 9 sc, 1 turning chain
R 9: dec, 7 sc, 1 turning chain (8)
R 10: dec, 6 sc, 1 turning chain (7)
R 11: dec, 5 sc, 1 turning chain (6)
R 12: 6 sc
Make sc around edges of the muzzle.
Make sc around the detail one more time.
Pin the muzzle to the head and sew on (pic 1, 2).
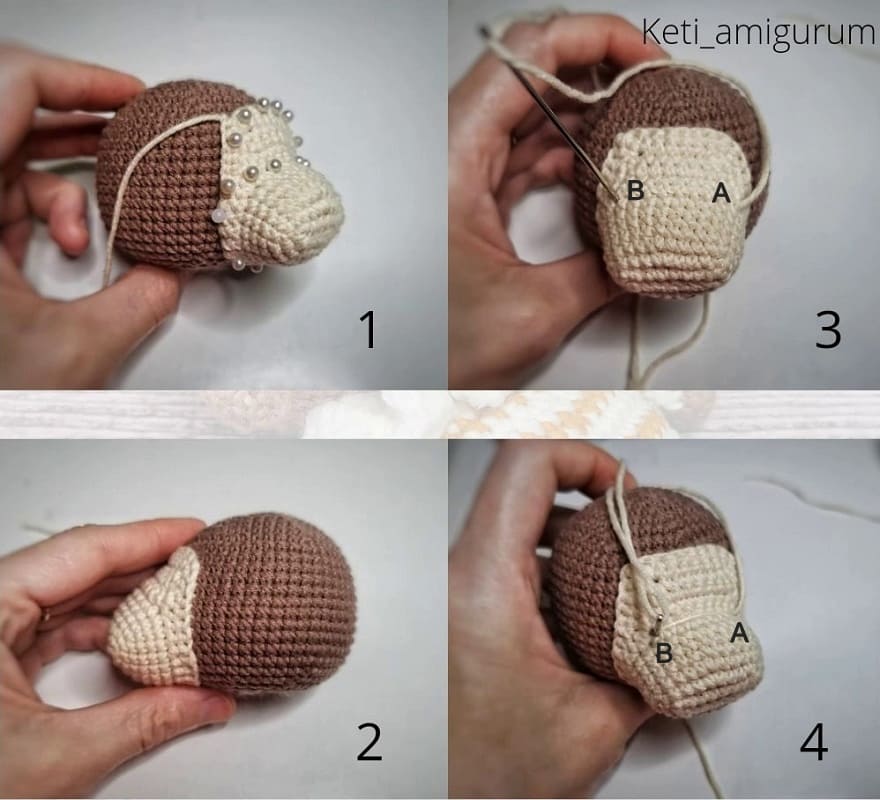
Take a long needle with beige thread, make a knot at the end of the thread. Start from the bottom of the head. Insert the needle and pull out in the point A (between R 6 and R 7). Pull in in the point B (pic 3, 4). Pull out in the point A. Pull slightly. Pull in in the point B.
F.o.
Insert safety eyes at the distance of 5 st from each other.
Arms (make 2)
R 1: 6 sc in mc (6)
R 2: (inc) * 6 (12)
R 3-4: 12 sc (2 rows)
R 5: 2 dec, 8 sc (10)
R 6-14: 10 sc (9 rows)
Stuff ½ full.
F.o. and leave a long tail for sewing.
Tail
R 1: 4 sc in mc (4)
R 2: (inc)*4 (8)
R 3-30: 8 sc (28 rows)
Fold top of tail flat and sc through both sides across.
F.o. and leave a long tail for sewing.
Ears
Beige part (2 детали)
WIth beige yarn:
R 1: 6 sc in mc (6)
R 2: (inc)*6 (12)
F.o.
Brown part (make 2)
With brown yarn:
R 1: 6 sc in mc (6)
R 2: (inc)*6 (12)
Don’t cut the yarn!
Put out beige ear and brown ear together with inner part (wrong side to wrong side) and through both parts 12 sc with brown yarn.
Crochet one more row around (12 sc).
F.o. and leave a long tail for sewing.
Legs and body
Legs (make 2)
R 1: 6 sc in mc (6)
R 2: (inc) * 6 (12)
R 3: (1 sc, inc) * 3, 6 sc (15)
R 4-7: 15 sc (4 rows)
F.o.
Don’t cut the yarn when you’ll finish the second leg!
From the second leg: 4 ch, join with the first leg (38)
Continue crocheting the body in the round:
R 1: 4 sc, inc, 2 sc, inc, 16 sc, inc, 2 sc, inc, 10 sc (42)
R 2-7: 42 sc (6 rows)
R 8: (5 sc, dec) * 6 (36)
R 9: 36 sc
Stuff with fiberfill.
R 10: (4 sc, dec) * 6 (30)
R 11-12: 30 sc (2 rows)
R 13: (3 sc, dec) * 6 (24)
R 14: 24 sc
R 15: (2 sc, dec) * 6 (18)
R 16: Attach arms on the sides of the body (crochet sc of the body together with sc of the arm) – 18 sc
R 17: 18 sc
F.o. and leave a long tail for sewing.
Belly
With beige yarn:
R 1: 7 sc in mc (7)
R 2: (inc)*7 (14)
R 3: (1 sc, inc)*7 (21)
R 4: (2 sc, inc)*7 (28)
F.o. and leave a long tail for sewing.
Assembly
Embroider eyebrows and eye lashes with black floss.
Sew the ears to the head.
Sew the head and the belly to the body.
Sew the tail on the back of the body (like at the picture).
More Amigurumi Lion Ideas:


