Hello dear Amigurumi Followers
Today we share Amigurumi Crochet Pig Claus Free Pattern for you. As you know we share new free amigurumi pattern every day. The main crochets are gazelle, amigurumi bear, pola, crochet panda, penguin, giraffe, llama, pig, bunny, clown, lamb, bee, crochet unicorn, amigurumi doll, fox, penguin, dinosaur, crochet elephant, hippo, monkey, crochet cat, crochet dog and more …
Todays daily new amigurumi free crochet pattern is Amigurumi Crochet Pig Claus.
I want to give you some informations about this amigurumi free pattern ; Crochet Pig Claus.
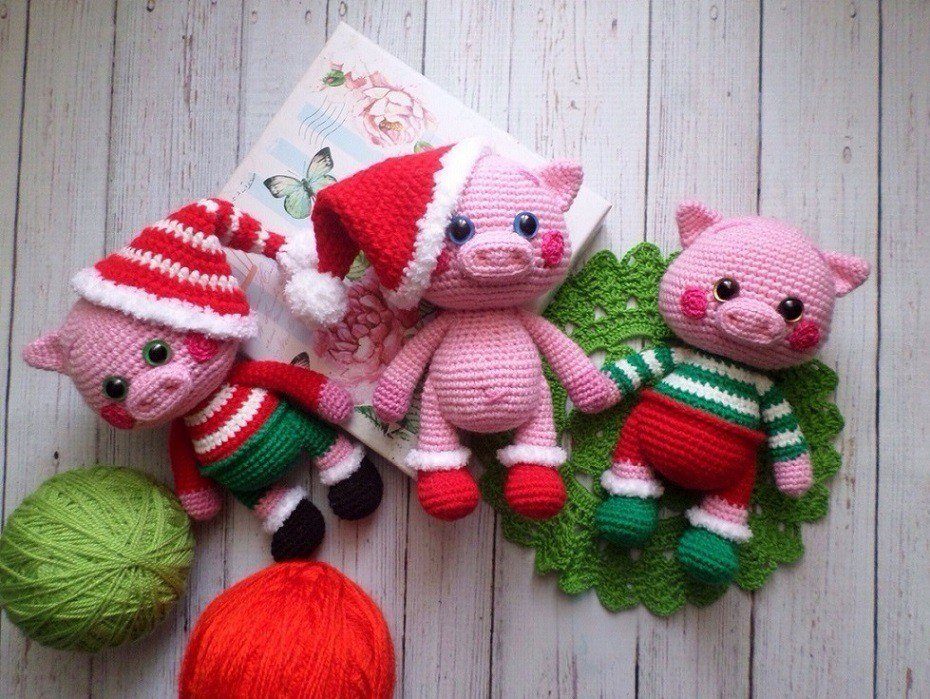
Knit a pink pig wearing a New Year’s hat and boots, or just clothes—either looks festive and beautiful. Use Softy yarn by Alize to create the fur trim on the hat and boots. The finished toy measures 15 cm.
Materials:
– Yarn Pekhorka “Children’s New” (pink, green and red), Pekhorka “Beaded” (white)
– Hook No. 2
– Thread cutting scissors
– Sewing needle
– Safety pins for pinning parts
– Filler
Legend:
КА — amigurumi ring
VP — chain stitch
SC — single crochet
INC — increase
dec — decrease
Amigurumi Crochet Pig Claus Free Pattern:
Head
Knit with pink yarn.
Insert eyes between rows 16 and 17 at a distance of 6 columns between them.
1. 6 sc in MC (6)
2. 6 inc (12)
3. (1 sc, inc) *6 (18)
4. (2 sc, inc) * 6 (24)
5. (3 sc, inc) * 6 (30)
6. (4 sc, inc) * 6 (36)
7. (5 sc, inc)* 6 (42)
8. (6 sc, inc)* 6 (48)
9. (15 sc, inc)* 3 (51)
10. 51 sc (51)
11. (16 sc, inc)* 3 (54)
12-15. 54 sc (54)
16. 12 sc, 3 inc, 24 sc, 3 inc, 12 sc (60)
17-21. 60 sc (60)
22. 12 sc, 3 dec, 24 sc, 3 dec, 12 sc (54)
23. 10 sc, 3 dec, 21 sc, 3 dec, 11 sc (48)
24. (4 sc, dec) * 8 (40)
25. (3 sc, dec) * 8 (32)
Start stuffing the head.
26. (2 sc, dec) * 8 (24)
27. (2 sc, dec) * 6 (18)
Cut the thread, hide the end.
Body (Option for a pig without clothes)
1. 6 sc in MC (6)
2. 6 inc (12)
3. (1 sc, inc) *6 (18)
4. (2 sc, inc) * 6 (24)
5. (3 sc, inc) * 6 (30)
6. (4 sc, inc) * 6 (36)
7. (5 sc, inc)* 6 (42)
8-13. 42 sc (42)
14. 8 sc (dec, 3 sc) *5, dec, 7 sc (36)
15. 36 sc (36)
16. 8 sc (dec, 2 sc) *5, dec, 6 sc (30)
17. 30 sc (30)
18. (dec, 3 sc)*6 (24)
19. 24 sc (24)
20. (dec, 2 sc)* 6 (18)
21. 18 sc
Leave the thread for sewing, cut.
Body (For those who knit a pig with clothes)
We start with yarn of any other color, for example, green.
1. 6 sc in MC (6)
2. 6 inc (12)
3. (1 sc, inc) * 6 (18)
4. (2 sc, inc) * 6 (24)
5. (3 sc, inc) * 6 (30)
6. (4 sc, inc) * 6 (36)
7. (5 sc, inc)* 6 (42)
8-12. 42 sc (42)
Change the yarn to white and knit through the back half loops.
13. 42 sc (42)
Do not cut the green thread, we will tie the pants with it through the front half loops.
We knit with green yarn through the front half loops, cut the thread and hide it.
Continue with white.
14. 8 sc (dec, 3 sc) *5, dec, 7 sc (36)
Change to red yarn (knit stripes).
15. 36 sc (36)
16. 8 sc (dec, 2 sc) *5, dec, 6 sc (30)
Change to white yarn.
17. 30 sc (30)
18. (dec, 3 sc)*6 (24)
Change to red yarn.
19. 24 sc (24)
20. (dec, 2 sc)* 6 (18)
Change to white yarn.
21. 18 sc
Leave the thread for sewing the body to the head, cut it off.
Legs (2 pieces)
Let’s start knitting the boots (you can knit plain legs without boots).
1. chain of 5 VP, in the 2nd from the hook: 1 INC, 2 SC, 3 SC in one loop, 3 SC (10)
2. 2 INC, 2 SC, 3 INC, 2 SC, 1 INC (16)
3. (1 SC, 1 INC) * 2, 2 SC, (1 INC, 1 SC) * 3, 3 SC, 1 INC (22)
4. (1 SC, 1 INC) * 2, 6 SC, (1 INC, 1 SC) * 3, 5 SC, 1 INC (28)
5-6. 28 sc (28)
7. 12 sc, (1 dec, 1 sc)* 4, 4 sc (24)
8. 10 sc, 6 dec, 2 sc (18)
9. 10 sc, 1 dec, 1 sc, 1 dec, 3 sc (16)
10. 16 sc (16)
Cut the thread, hide the end – the boot is ready.
Let’s move on to knitting the leg.
Knit through the back half-loop with yarn of the color of the pants.
11-14. 16 sc (16 )
Return to the remaining front half-loop, tie with white yarn. Cut the thread, hide the end.
Continue knitting the leg.
15. (2 sc, 1 dec) * 4 (12)
16-21. 12 sc (12)
22. (1 sc, 1 dec) * 4 (8)
Leave the thread for sewing, cut.
Handles (2 pieces)
If you are knitting a single-color piglet, then knit all rows with pink yarn.
We start with pink color (beginning of arms).
1. 6 sc in MC (6)
2. 6 inc (12)
3. (5 sc, 1 inc)* 2 (14)
4-5. 14 sc (14)
6. 1 dec, 12 sc (13)
7-8. 13 sc (13)
9. 1 dec, 11 sc (12)
For those who knit a pig in clothes, at this stage we cut the pink thread and start with the color of your blouse – we knit sleeves (through the back wall of the loop).
10. 12 sc (12)
We attach white yarn and knit through the front walls of the loop. Cut the white thread, hide the end.
We continue with yarn of the color of the sleeves.
11. 12 sc (12)
12. 1 dec, 10 sc (11)
13-14. 11 sc (11)
15. 1 dec, 9 sc (10)
16-17. 10 sc (10)
Stuff the handle.
18. 1 dec, 8 sc (9)
19-20. 9 sc (9)
21. (1 sc, dec)* 3 (6)
Leave the thread for sewing, cut.
Ears (2 pieces)
1. 6 sc in KA (6)
2. 6 inc (12)
3. 12 sc (12)
4. (3 sc, inc)* 3 (15)
5. 15 sc (15)
6. (4 sc, inc)* 3 (18)
Leave thread for sewing, cut.
Cheeks (2 pieces)
1. 6 sc in KA (6)
2. 6 inc (12)
Leave thread for sewing, cut.
Piglet
1. Cast on a chain of 6 VP, from the second loop from the hook: 3 SC in one loop, 3 SC, 3 SC in the last loop, turn: 3 SC (12)
2. 3 INC, 3 SC, 3 INC, 3 SC, SS (18)
Next, knit through the back half loops.
3. 18 SC
Now knit again through both walls of the loop.
4. 18 SC
Leave the thread for sewing, cut.
We assemble the piglet, decorate it to our taste and delight ourselves and our loved ones.
New Year’s cap
Description by: Lyudmila Orlova
The cap is crocheted in a spiral using double crochet stitches.
Each row begins with two turning chain stitches and ends with a slip stitch.
We begin knitting with a chain stitch. To get the required number, we try it on the toy’s head. Close it into a circle and knit in a spiral.
The first four rows are knitted without changes using double crochets.
Next, in each row, we begin making decreases as follows:
– we make the first decrease at the beginning of the row after changing colors (this will be the back of the cap), then we knit about half the row and make the second decrease (from the front);
– in the next row, we make one decrease on each side of the cap.
Next, alternate these two rows, continuing to decrease at the front and back, and on the next row, at the sides. Continue knitting this way until the end of the cap, embellishing it as desired: with a tassel, pompom, or bell.
More Amigurumi Pig Ideas:


