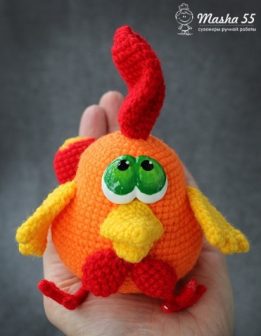
Hello dear Amigurumi Followers
Today we share Amigurumi Baby Cock Free Pattern for you. As you know we share new free amigurumi pattern every day. The main crochets are gazelle, amigurumi bear, pola, crochet panda, penguin, giraffe, llama, pig, bunny, clown, lamb, bee, crochet unicorn, amigurumi doll, fox, penguin, dinosaur, crochet elephant, hippo, monkey, crochet cat, crochet dog and more …
Todays daily new amigurumi free crochet pattern is Amigurumi Baby Cock.
I want to give you some informations about this amigurumi free pattern ; Baby Cock.

Necessary materials:
1. Threads of the main tone for the body (I have a Pekhorka Children’s novelty)
2. Threads for the beak and legs and threads for the tail, comb and earrings (I have a Pekhorka Children’s novelty)
3. I crochet hook, suitable for the selected thread, No. 2
4. Eyes
5. Filler
6. Glue (I use Moment crystal)7. Wire for feet8. Needle for stitching.
Abbreviations:
vp – air loop
ss – connecting column
sbn – single crochet
ub – 2 columns together (decrease)
pr – 2 columns in 1 loop (increase)
Amigurumi Baby Cock Free Pattern
Head-body
(We start knitting with orange yarn)
1. 6 sc in amigurumi ring (6)
2.6 ave (12)
3. (sbn, pr) * 6 (18)
4. (2 sbn, pr) * 6 (24)
5. (3 sbn, pr) * 6 (30)
6. (4 PRS, D) * 6 (36)
7. (5 PRS, D) * 6 (42)
8 – 12. unchanged (5 rows) (42)
13 . (6 PRS, D) * 6 (48)
14 – 16. unchanged (3 rows) (48)
17 . 6 sbn, (1 sbn, pr) * 6, 12 sbn, (pr, 1sbn) * 6, 6 sbn (60)
18 – 19. unchanged (60)
20 . 6 sc, (2 sc, pr) * 6, 12 sc, (pr, 2 sc) * 6, 6 sc (72)
21 – 22. unchanged (72)
23 . 6 sc, (2 sc, dec) * 6, 12 sc, (ub, 2 sc) * 6, 6 sc (60)
24 – 25 . unchanged (60)
26. 6 sc, (1 sc, K) * 6 12 sc, (ub, 1sbn) * 6 6 sc (48)
27. No change (48)
28. (6 PRS, UB) * 6 (42)
29. (5 PRS, UB) * 6 (36)
30. (4 PRS, UB) * 6 (30)
31. (3 PRS, UB) * 6 (24)
32. (2 sbn, ub) * 6 (18)
33. (sbn, ub) * 6 (12)
34. (12, ub) * 6 (6)
Stuff the body with filler. Pull the hole, cut the thread and fasten.
Beak
(We start knitting with yellow yarn )
1. 6 sc in ring amigurumi
2. (1 sbn, pr) * 3 times (9)
3. (2 PRS, D) * 3 times (12)
4. (3 PRS, D) * 3 times (15)
5. (4 PRS, D) * 3 times (18)
6. 5 sc, etc., 2 sc, 2np, 2 sc, etc., sc 5 (22)
7. 5 sc, etc., 4 sc, 2np, 4 sc, etc., sc 5 (26)
Fold in half and again in half, form a beak and sew.
Lower beak
(Start knitting yarn yellow)
1. Z sc in amigurumi ring (3)
2. 3pr (6)
3 (1sbn, etc.) * 3 times (9)
4. (2sbn, etc.) * 3 times (12)
Fold in half and sew.

Earrings (2 parts)
(We start knitting with red yarn)
1. 6 sc in amigurumi ring (6)
2.6 ave (12)
3-4. unchanged (12)
5. (1 sbn, ub) * 4 (8)
6. unchanged (8)
7. ub * 4 (4)
Fasten the thread, cut, leaving a long end for sewing.

Scallop
(We start knitting with red yarn)
1. 6 sc in amigurumi ring (6)
2. 6 pr (12)
3. (sc, pr) * 6 (18)
4. (2sc, pr) * 6 times (24)
5. (3sc, pr) * 6 times (30)
6-10. unchanged (30)
11. (3 sc, dec) * 6 (24)
12. unchanged (24)
13. (2 sc, dec) * 6 (18)
14. unchanged (18)
15. (1 sc , ub) * 6 (12)
16. unchanged (12)
Insert the wire.
Tail
1. 6 sc in amigurumi ring (6)
2. 6 etc. (12)
3 (sc, etc.) * 6 (18)
4 (2sbn, etc.) * 6 times (24)
5-10. unchanged (24)
11. (2 sc, dec) * 6 (18)
12. unchanged (18)
13. (1 sc, dec) * 6 (12)
14-17. unchanged (12)
18 6 K (6)
Assign the two parts together
19. 3 sc on the first component, 6 parts by sc, sc 1 3 parts (12)
20. unchanged (12)
21 6 K (6 )
Pull off the hole.
Wings
1. 6 sc in amigurumi ring (6)
2-3. no changes (6)
We tie 3 parts together
4.3 sbn of 1 part, 3 sbn of 2 parts, 6 sbn of 3 parts, 3 sbn of 2 parts, 3 sbn of 1 part (18)
5-6 . unchanged (18)
7. ub, 7 sc, UB, sc 7 (16)
8. UB, 6 sc, UB, sc 6 (14)
9. UB, 5 sc, UB, sc 5 (12)
10. UB, 4 sc, UB, sc 4 (10)
11. UB, 3 sc, UB, sc 3 (8)
Pull off the hole, leave the thread for sewing. The 2nd wing is knit as well.
Paws
We take the wire and twist it in the shape of legs as shown in the photo, then wrap the legs with thread, grabbing it with glue.
Assembly
We sew all the details to the body of the cock, I glue the eyes and legs.
The baby cockerel is ready!
You can dispose of the finished toy as you want, without restrictions. Just do not forget to include the name of the author – Masha55.

