Hello dear Amigurumi Followers
Today we share Amigurumi Christmas Tree Car Ornament Free Pattern for you. As you know we share new free amigurumi pattern every day. The main crochets are gazelle, amigurumi bear, pola, crochet panda, penguin, giraffe, llama, pig, bunny, clown, lamb, bee, crochet unicorn, amigurumi doll, fox, penguin, dinosaur, crochet elephant, hippo, monkey, crochet cat, crochet dog and more …
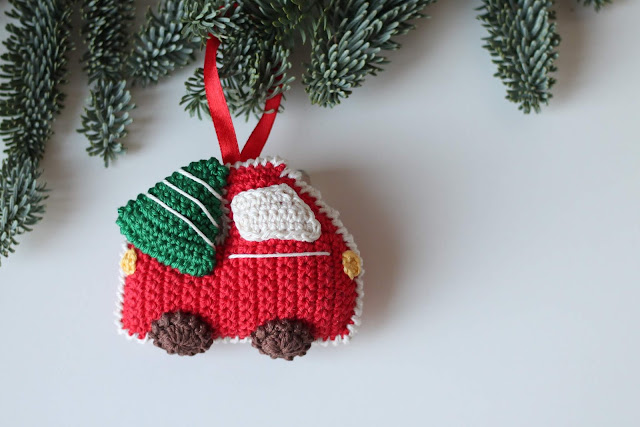
Todays daily new amigurumi free crochet pattern is Amigurumi Christmas Tree Car Ornament.
I want to give you some informations about this amigurumi free pattern ; Christmas Tree Car Ornament.
YOU WILL NEED
↠ sport weight yarn in red, cream, yellow, green and brown colors
(for this project I used Yarn and Colors Must-Have yarn in 032 pepper, 002 cream, 014 sunflower, 087 amazon, and 027 brunet colors);
↠ crochet hook 2.0 mm;
↠ stuffing;
↠ scissors;
↠ sewing needle.
The size of the toy is 3 inches tall with indicated materials.
The size may vary if you choose another weight of yarn and crochet hook number.
ABBREVIATIONS
The pattern is written in English, using US terminology.
ch – chain
sl st – slip stitch
sc – single crochet
hdc – half double crochet
dc – double crochet
rsc – reverse single crochet
inc – increase
You should know how to crochet: chain, slip stitch, single crochet, increase, reverse single crochet, crochet in rows and rounds.
Amigurumi Christmas Tree Car Ornament Free Pattern
MAIN DETAIL
Crochet in red yarn.
Ch 12.
ROW 1: start crochet in a second ch from a hook(pic.1), sc in next 11 ch (pic.2) [11]
ROW 2-24: ch 1 (pic.3), turn the detail(pic.4), sc in next 11 st (pic.5-6) [11]


ROW 25: ch 1, turn the detail, sl st in next st, sc in next st, hdc in next st, dc in next 5 st, hdc in next st, sc in next st, sl st in next st (pic.7) [11]
ROW 26: sc in next 13 st, follow the loops of the near side row, see pic.8-9! [13]

ROW 27: ch 1, turn the detail, sc in next 12 st (by the loops of row 26) [12]
ROW 28: ch 1, turn the detail, dec, sc in next 10 st (by the loops of row 27) [11]
ROW 29: ch 1, turn the detail, sc in next 10 st (by the loops of row 28) [10]
ROW 30: ch 1, turn the detail, dec, sc in next 8 st (by the loops of row 29) [9]
ROW 31: ch 1, turn the detail, sc in next 8 st (by the loops of row 30) [8]
ROW 32: ch 1, turn the detail, dec, sc in next 6 st (by the loops of row 31) [7]
ROW 33: ch 1, turn the detail, sc in next 6 st (by the loops of row 32) (pic.10) [6]
Fasten off, weave in yarn ends.
Make 2 p. (pic.11)
Place both details together, matching up all sides.
Begin attaching details together with reverse sc around, using cream color yarn. (pic.12-18)


Stop in the middle of the last side, stuff the detail (pic.19). Continue crochet rsc and close with rsc in first st and tie off, weave in yarn ends. (pic.20)
WINDOW
Crochet with cream yarn.
Ch 11.
ROW 1: start crochet in the second ch from a hook, sc in next 10 st [10]
ROW 2: ch 1, turn the detail, dec, sc in next 8 st [9]
ROW 3: ch 1, turn the detail, sc in next 8 st [8]
ROW 4: ch 1, turn the detail, dec, sc in next 6 st [7]
ROW 5: ch 1, turn the detail, sc in next 6 st (pic.21) [6]

Crochet sl st in every st around the details (pic.22-25). Fasten off, leave a long tail for sewing.

Sew the window to the main detail (pic.26).
Embroider the stripe under the window with cream yarn (pic.26).
LIGHTS
Headlight
Crochet with yellow yarn.
Ch 2 (pic.27), 4 sc in second ch from a hook (pic.28). Fasten off, leave a long tail for sewing.

Taillight
Crochet with yellow yarn.
Ch 3. Start crochet in the second ch from a hook (pic.29), sc in next 2 st (pic.30). Fasten off, leave a long tail for sewing.

Sew the lights to the main detail. (pic.31)
CHRISTMAS TREE
Crochet with green yarn.
Ch 2.
ROW 1: 2 sc in second ch from a hook (pic.32-33) [2]


ROW 2: ch 1 (pic.34), turn the detail (pic.35), sc in next 2 st (pic.36) [2]
ROW 3: ch 1, turn the detail, inc in next 2 st (pic.37) [4]
ROW 4: ch 1, turn the detail, sc in next 4 st [4]
ROW 5: ch 1, turn the detail, inc in next st, sc in next 2 st, inc in next st [6]
ROW 6: ch 1, turn the detail, sc in next 6 st [6]
ROW 7: ch 1, turn the detail, inc in next st, sc in next 4 st, inc in next st [8]
ROW 8: ch 1, turn the detail, sc in next 8 st [8]
ROW 9: ch 1, turn the detail, inc in next st, sc in next 6 st, inc in next st [10]
ROW 10: ch 1, turn the detail, sc in next 10 st [10]
ROW 11: ch 1, turn the detail, inc in next st, sc in next 8 st, inc in next st [12]
Fasten off, weave in yarn ends.
Make 2 p. (pic.38)
Place both details together, matching up all sides.
Begin attaching details together with reverse sc around, using green color yarn.
Stop in the middle of the last side, stuff the detail (pic.39)

Continue crochet rsc and close with rsc in first st and tie off, weave in yarn ends. (pic.40)
Embroider the stripes on the tree with cream yarn (pic.41).
Sew the tree to the main detail (pic.42).

WHEELS
Crochet with brown yarn.
Ch 4.
11 dc in fourth ch from a hook (pic.43). Stop with sl st (pic.44).
Make 4 p. (pic.45)

Work with 2 details. Attaching them to each other with reverse sc (pic.46-47).
Repeat for other two details.
Sew the wheels to the main detail. (pic.48)

More Amigurumi Ornament Ideas:
