Hello dear Amigurumi Followers
Today we share Amigurumi Fofo The Bull Free Pattern for you. As you know we share new free amigurumi pattern every day. The main crochets are gazelle, amigurumi bear, pola, crochet panda, penguin, giraffe, llama, pig, bunny, clown, lamb, bee, crochet unicorn, amigurumi doll, fox, penguin, dinosaur, crochet elephant, hippo, monkey, crochet cat, crochet dog and more …
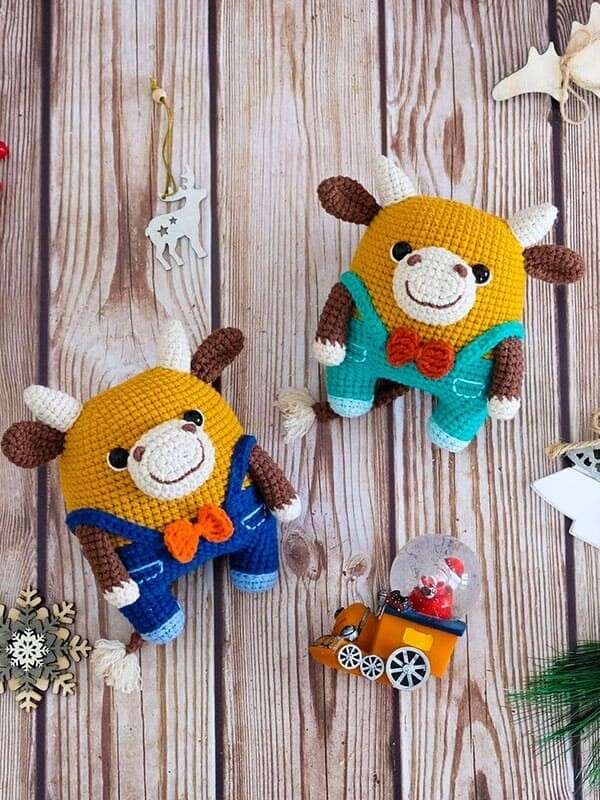
Todays daily new amigurumi free crochet pattern is Amigurumi Fofo The Bull.
I want to give you some informations about this amigurumi free pattern ; Fofo The Bull.
Abbreviations (US)
mr– magic ring
st– stitch
ch– chain
sl st– slip stitch
sc– single crochet
dc– double crochet
inc– increase (crochet 2 stitches in one stitch)
dec– decrease (crochet 2 stitches together)
dtr– double treble crochet
BLO– back loops only
(sc, inc) x n– repeat those in brackets n times
You will need
1. Sport 5 ply semi-cotton yarn. I used Alize Cotton Gold
– mustard #2
– brown #493
– beige #67
– color options for pants: blue #279, green #126, emerald #610
– color options for bow-tie: terracotta #36, orange #37, red #56
2. Crochet hook 2 mm. (2.25 mm B/1)
3. Stuffing- hollofayber
4. Flat black half pearls 10 mm
5. Superglue to slue the eyes
6. Some white thread for eye embroidery
7. The tapestry needle
Size of the toy and notes
The height of ready toy is approx 15 cm. All details are crocheted in a spiral. Skill level is medium
Let’s start making our fofo the bull amigurumi pattern.
Main Detail (Head, Body, Legs)


From top to bottom
Begin with mustard color
Crochet 13 ch.
Rnd 1. begin crocheting from the 2nd loop from the hook: inc, 10 sc, 4 sc in the last loop of the chain. Further crochet along the other side of the chain 10 sc, inc (28)
Rnd 2. 2 inc, 10 sc, 4 inc, 10 sc, 2 inc (36)
Rnd 3. 1 sc in each st around (36)
Rnd 4. (1 sc, inc) x 2, 10 sc, (inc, 1 sc) x 2, (1 sc, inc) x 2, 10 sc, (inc, 1 sc) x 2 (44)
Rnd 5. (2 sc, inc) x 2, 10 sc, (inc, 2 sc) x 2, (2 sc, inc) x 2, 10 sc, (inc, 2 sc) x 2 (52)
Rnd 6-8. 3 rows-1 sc in each st around (52)
Rnd 9. (3 sc, inc) x 2, 10 sc, (inc, 3 sc) x 2, (3 sc, inc) x 2, 10 sc, (inc, 3 sc) x 2 (60)
Rnd 10-21. 12 rows-1 sc in each st around (60)
Change the color to the pants one (green)
Rnd 22. 1 sl st in each st around (60)
Rnd 23. insert hook into the back green loops and into the mustard stitches of 21 st row-1 sc in each st around (60)
Rnd 24. BLO-1 sc in each st around (60)
Rnd 25-28. 4 rows- 1 sc in each st around (60)- you can increase the number of these of rows to make a taller toy.
Rnd 29. (3 sc, dec) x 2, 10 sc, (dec, 3 sc) x 2, (3 sc, dec) x 2, 10 sc, (dec, 3 sc) x 2 (52)
Rnd 30-33. 4 rows – 1 sc in each around (52)
Fold the piece in half.
Count 16 stitches for each leg on the sides.
Through the 1 st and 16 th loops, insert a contrasting color of thread. It helps you don’t lose leg loops. Crochet several sc from open loop to the thread (yellow on the photo) There will be the beginning of the leg row.
After completing the body part of the amigurumi pattern, let’s crochet the legs.
Legs


Rnd 1-4. 4 rows-1 sc in each st around (16)
Change the color to beige to beige (or shoes one)
Rnd 5. sl st 1 sc in each st around (16)
Rnd 6. insert hook into the BLO and green stitches of the 4 th row – 1 sc in each st around (16)
Rnd 7. 1 sc in each st around (16)
Rnd 8. BLO – 8 dec (8)
Close the opening, tightening the stitches.
Advice. Start to crochet the second leg as soon as the green thread is free. Begin to stuff the detail after making legs halfway.
Add more stuffing in needed. Using the tapestry needle close the stitches between the legs.
After completing the legs of the free pattern, let’s crochet the mouth of the Amigurumi bull.
Muzzle
Beige color
Crochet 5 ch.
Rnd 1. begin crocheting from the 2nd loop from the hook: inc, 2 sc, 4 sc in the last of the chain. Further crochet along the other side of the chain 2 sc, inc (12)
Rnd 2. 2 inc, 2 sc, 4 inc, 2 sc, 2 inc (20)
Rnd 3. (1 sc, inc) x 2, 2 sc, (inc, 1 sc) x 2, (1 sc, inc) x 2, 2 sc, (inc, 1 sc) x 2 (28)
Rnd 4-7. 4 rows- 1 sc in each st around (28)
Leave a thread enough for sewing.
We have completed the mouth of the amigurumi toy with crochet. Now let’s crochet the arms and ears.
Arms (2 pcs)
Start in beige. Stuff in the course of crocheting.
Rnd 1. 9 sc in the MR (9)
Rnd 2. BLO- 1 sc in each st around (9)
Rnd 3. 1 sc in each st around (9)
Change the color to brown one
Rnd 4-12. 9 rows- 1 sc in each st around (9)
Fold the arms in half and crochet 4 sc grasping both edges.
Leave a thread enough for sewing.
Ears (2 pcs)
Brown color. Don’t stuff.
Rnd 1. 6 sc in the MR (6)
Rnd 2. (1 sc, inc) x 3 (9)
Rnd 3. (2 sc, inc) x 3 (12)
Rnd 4-6. 3 rows- 1 sc in each st around (12)
Rnd 7. (2 sc, dec) x 3 (9)
Rnd 8. 1 sc in each st around (9)
Rnd 9. (1 sc, dec) x 3 (6)
Fold the ear in half and crochet 2 sc grasping both edges.
Leave a thread enough for sewing.
We continue to complete the head part of the amigurumi fofo. Now let’s make the horns.
Horns ( 2 pcs)
Beige color.
Rnd 1. 6 sc in the MR (6)
Rnd 2. 1 sc in each st around
Rnd 3. (1 sc, inc) x 3 (9)
Rnd 4. 1 sc in each st around (9)
Rnd 5. (2 sc, inc) x 3 (12)
Rnd 6-8. 3 rows- 1 sc in each st around (12)
Leave a thread enough for sewing. Put a little bit of stuffing.
Tail

Brown color.
Rnd 1. 5 sc in the MR (5)
Rnd 2-18. 17 rows- 1 sc in the each st around (5)
Leave a thread enough for sewing.
Wind the beige thread around three fingers (8 turns). Bind the winding in the middle. Fold in half and sew to the tail. Bring the thread out from the other end of the tail. Cut an extra length.
We have completed the head part of the amigurumi toy. Now let’s crochet the tail part.
Let’s crochet the clothing accessories of the amigurumi toy
Bow-tie
In the MR: ch 4, 3 dtr, ch 4, sl st, ch 4, 3 dtr, ch 4, sl st.
Tighten the ring. Leave a thread enough for sewing.
Straps (2 pcs)
Crochet 23 ch + 1 ch lifting. Crochet 23 sc along the chain.
Leave a thread enough for sewing.
Assembly and decoration
1. Sew the muzzle 4 rows above the pants

2. Sew on the horns, then the ears. USe the thread from the ears to sew the nostrils. Embroider nostrils with Rococo stitch (8-9 needle windings)

3. Glue the eyes. Place them between rows 10 and 11, space between them is 11 stitches.

4. Sew on the arms. Use this thread to embroider the mouth.
5. Sew on the tail, straps and bow-tie.
6. Embroider pockets and white arches around the eyes.

Congratulations, your Fofo the bull amigurumi toy is ready.
More Amigurumi Bull Ideas:


