Hello dear Amigurumi Followers
Today we share Amigurumi Owl Throw Pillow Free Pattern for you. As you know we share new free amigurumi pattern every day. The main crochets are gazelle, amigurumi bear, pola, crochet panda, penguin, giraffe, llama, pig, bunny, clown, lamb, bee, crochet unicorn, amigurumi doll, fox, penguin, dinosaur, crochet elephant, hippo, monkey, crochet cat, crochet dog and more …
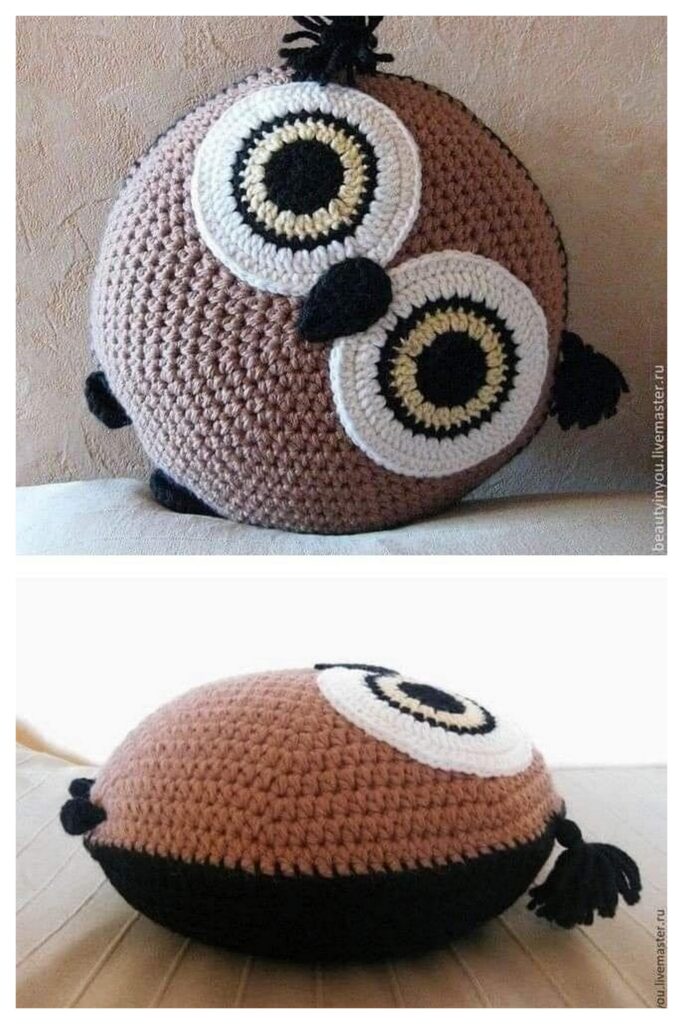
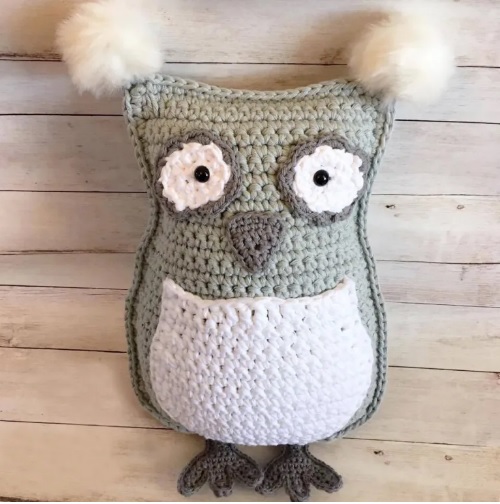
Todays daily new amigurumi free crochet pattern is Amigurumi Owl Throw Pillow.
I want to give you some informations about this amigurumi free pattern ; Owl Throw Pillow.
Let’s get started. Here’s what I used:
-5.5mm hook for main ;
– 4.00mm hook for beak, feet and trim around the eyes;
– Bernat Handicrafter Chunky in Gray (400g/1 skein);
– Bernat Handicrafter Chunky in White (I used less than half of one 400g skein);
– Bernat Handicrafter (worsted weight) in Overcast for eyes, beak and feet (less than 50g);
– 12mm safety eyes (or buttons or thread);
– Two medium sized faux-fur pompoms (optional);
– Stuffing;
– Tapestry needle.
*Ch 1 and turn at the end of each row*
Body (make 2 panels) in Gray:
Row 1: Ch 19, sc along (18 sts)
Row 2: Inc, sc 16, inc (20 sts)
Row 3: Inc, sc 18, inc (22 sts)
Row 4: Inc, sc 20, inc (24 sts)
Row 5: Inc, sc 22, inc (26 sts)
Rows 6-18: Sc along (26 sts)
Row 19: Dec, sc 22, dec (24 sts)
Rows 20-23: Sc along (24 sts)
Row 24: Dec, sc 20, dec (22 sts)
Row 25: Sc along (22 sts)
Row 26: Dec, sc 18, dec (20 sts)
Rows 27-38: Sc along (20 sts)
Tie off. Repeat for second panel. Put these aside for assembly later.
Belly Patch in White:
Row 1: Ch 11, sc along (10 sts)
Row 2: Inc, sc 8, inc (12 sts)
Row 3: Sc along (12 sts)
Row 4: Inc, sc 10, inc (14 sts)
Row 5: Sc along (14 sts)
Row 6: Inc, sc 12, inc (16 sts)
Row 7: Inc, sc 14, inc (18 sts)
Rows 8-12: Sc along (18 sts)
Row 13: Dec, sc 14, dec (16 sts)
Row 14: Sc along (16 sts)
Row 15: Dec, sc 12, dec (14 sts)
Rows 16-17: Sc along (14 sts)
Row 18: Sc 4, hdc, dc, tr 2, dc, hdc, sc 4.
**TR = Treble Crochet: Yarn over 2 times, insert hook into st, pull up a loop (four loops on hook). Yarn over and draw through 2 loops (3 loops on hook). Yarn over and draw through two loops (2 loops on hooks). Yarn over and draw through last two loops.**
Do not tie off. Ch 1 and sc around 3 sides of the piece (the sides and the bottom – do not sc around the top). Tie off. Set aside for assembly later.
Eyes in White:
Row 1: Ch 4, starting in second ch from hook: sc 2, sc 3 in last ch, continue on opposite side of chain, sc 1,
sc 2 in last ch (8 sts)
Row 2: Inc around (16 sts)
Join to first st with slst. Tie off, leaving a long tail about 30 cm (12 inches) for sewing onto the owl
later. Repeat rows 1-2 for second eye.
Trim around eyes with Overcast yarn and 4.00mm hook:
In BLO, attach yarn in any stitch around the eye to start. Ch 1, sc 5 in the same st, skip 1 st. Repeat single crocheting 5 in one st and skipping one stitch around (you will have 8 shell sts). Slst to first ch to finish and tie off. Repeat for second eye.
Beak in Overcast and 4.00mm hook:
Row 1: Ch 7, sc along (6 sts)
Row 2: Dec, sc 2, dec (4 sts)
Row 3: Dec 2 times (2 sts)
Row 4: Dec ( 1 st)
Do not tie off. Ch 1 and sc around the entire piece. (Sc, ch, sc) in each corner. Slst to beginning st to finish. Tie off.
Feet (make 4 panels in twos as explained below) in Overcast with 4.00mm hook:
Row 1: Ch 4, sc along (3 sts)
Rows 2-5: Sc along (3 sts)
Row 6: Inc, sc, inc (5 sts)
Row 7: Inc, sc 3, inc (7 sts)
Row 8: Inc, sc 5, inc (9 sts)
Row 9: Sc along (9 sts)
Now we will start the first toe and come back to do the other toes later.
Rows 10-12: Sc 3 (3 sts)
Row 13: Dec, sc (2 sts)
Row 14: Dec (1 st)
Tie off. Now, go back to the remaining sts of row 9 and repeat rows 10-14 for the second and third toe. Repeat rows 1-14 for second panel. Do not tie off second panel. Instead, place both panels together, matching up all sides, ch 1, and single crochet around the entire piece. Sc 3 at the tip of each toe. Stuff lightly after crocheting halfway around the second toe. Join with a slst to first st to close. Repeat for second foot.
Assembly:
Step 1: Eyes, Belly and Beak
First, insert your 12mm safety eyes into the eye panels. I inserted mine slightly off-centre, between the first and second round of the white part.
Next, lay out all of your pieces on one of the body panels to get an idea of where you want your pieces to go.
I placed the top of the eyes about four rows down from the top of the body panel and left about 4 sts between them (at the widest part above the beak…at the narrowest part in the middle there is 3 sts between the eyes). Tilt the eyes slightly so that the ovals are not perfectly straight, but rather, pointing slightly up and inward toward each other.
Place the beak between the eyes. The top (flat) part of the beak will be on the same row as the bottom trim of the eyes.
Centre the belly patch on the body panel. The top of the belly patch will be about two rows beneath the bottom (pointy part) of the beak. The bottom of the belly patch will come right down to the second last row at the bottom of the body panel.
Now, appliqué all the pieces in place. For the eyes, I used the White bulky yarn to appliqué around the white part of the eye, leaving the Overcast trim to remain free, as seen in the below image.

Step 2: Body and Feet
Cut off two lengths of Overcast coloured yarn about 30 cms (12 inches) long. Put them aside for later.
Place the two body panels together, matching up all sides.
**Make sure the face of your Owl is facing you as you crochet around the outside of the piece.**
Starting in the top left hand corner, begin attaching the panels together by chaining one and single crocheting around the outside of the panels.
Stop when you get to the bottom of the first side. Now, with your tapestry needle and a length of yarn that you set aside earlier, place the feet between the panels and attach them by sewing through all three pieces; the top panel, the foot, and the bottom panel. I placed each foot about 3 stitches in from each side. When finished, tie a knot to secure and hide the tails between the panels of the body.
Now, picking up where you left off, continue single crocheting around the outside of the body. When you get to each foot, simply sc in the stitches of the front panel only; since this portion is already sewn shut, it’s for aesthetics only. Once you are past each foot, continue single crocheting both panels together as normal.
Stop when you’ve crocheted about half-way up the third side. Stuff.
Continue crocheting around. (Sc, ch, sc) when you reach the top corner of the head and then stop. Finish stuffing.
Now, picking up where you left off, continue single crocheting across the top. Continue to top up stuffing if necessary. (Sc, ch, Sc) in other corner. Close with a slst to first st. Tie off. With your tapestry needle, poke the yarn tail back inside the piece.
Step 3: Finishing Touches
Add your pompoms! The ones I used were keychains that I bought at Michael’s. There was an assortment of colours and sizes. I chose the medium size in white. I simply removed them from the jump-ring, threaded some yarn through the elastic and attached them securely to each corner of the head in the chain space.
Alternatively, instead of using the faux fur pompoms, you could make your own yarn pompoms!
You could also totally make this owl plushie smaller using worsted weight yarn! Just substitute worsted weight and a 3.5mm hook wherever the Handicrafter Chunky is called for, and use light weight yarn and a 2.75mm hook wherever worsted weight is called for (the beak, feet and eye trim).
That’s it! Enjoy!
More Amigurumş Pillow Ideas:
