Hello dear Amigurumi Followers
Today we share Amigurumi Rainbow Sea Slug Free Pattern for you. As you know we share new free amigurumi pattern every day. The main crochets are gazelle, amigurumi bear, pola, crochet panda, penguin, giraffe, llama, pig, bunny, clown, lamb, bee, crochet unicorn, amigurumi doll, fox, penguin, dinosaur, crochet elephant, hippo, monkey, crochet cat, crochet dog and more …
Todays daily new amigurumi free crochet pattern is Amigurumi Rainbow Sea Slug.
I want to give you some informations about this amigurumi free pattern ; Rainbow Sea Slug.

Size:
10 inches long from back to front with weight 4 yarn and a 3.25 mm hook
Skill Level Needed:
Intermediate- suitable for novice crocheters, requires patience and precisions when assembling
the sea slug and basic crochet skills.
Materials Needed:
Yarn: Worsted Weight #4, approximately 100g of main color, 50-75g of accent colors
Color A: variegated yarn, Color B: White, Color C: Orange
21 mm safety eyes
Hook Size: D Hook or 3.25 mm
Scissors, sewing needle, stitch marker, fiberfill stuffing, pipe cleaners(Optional)
Abbreviations:
mr= magic ring- crochet single crochet stitches in to the adjustable loop
BLO= back loops only
ch= chain stitch
F/O= Fasten off
sc= single crochet stitch
hdc= half double crochet
sl= slip stitch
FLO= front loops only
dc= double crochet stitch
inc3= 3 sc in the same stitch
inc= increase- make two single crochet stitches in the same stitch
dec=decrease- crochet two stitches together using the decrease method (4 sc, inc) x 6= repeat the pattern between parentheses 6 times
Notes:
• Do not join rounds unless stated, work in a continuous spiral
• Use a stitch marker to mark the beginning of each round
• All stitches are worked in both loops unless stated otherwise in the pattern
Amigurumi Rainbow Sea Slug Free Pattern
Head and Body:
Crocheted from top of body to bottom
With Color A:
Ch 36
1. sc in 2nd ch from hook, 33 sc, inc3 in last chain, working on the opposite side of the chain: 33 sc, inc= 72
2. inc, 33 sc, inc x 3, 33 sc, inc x 2= 78
3. sc, inc, 33 sc, (sc, inc) x 3, 33 sc, (sc, inc) x 2= 84
4-6. sc in each st around
7. 2 sc, inc, 33 sc, (2 sc, inc) x 3, 33 sc, (2 sc, inc) x 2= 90
8-12. sc in each st around
Place eyes between rounds 7 and 8, leaving 15 holes between them. Making sure they are in the front of the body. Look to pictures below for help. If you want the sunken eye look, do not place the backs of the eyes on until round 21. TIP! You may have to adjust the eye placement depending on yarn and hook size you use.
13. 2 sc, dec, 33 sc, (2 sc, dec) x 3, 33 sc, (2 sc, dec) x 2= 84
14. sc, dec, 33 sc, (sc, dec) x 3, 33 sc, (sc, dec) x 2= 78
Change to Color B:
15. BLO (11 sc, dec) x 6= 72
16. (10 sc, dec) x 6= 66
17. (9 sc, dec) x 6= 60
18. (8 sc, dec) x 6= 54
19. (7 sc, dec) x 6= 48
20. (6 sc, dec) x 6= 42
21. (5 sc, dec) x 6= 36
Start stuffing the body firmly
Now for the eyes. Stuff the body well. Cut a long piece of yarn and remove the eyes. Place the needle in the hole where the first eye was and thread the needle into a hole next to the eye hole. Go back and forth between each eye hole repeating the process from the first eye. Pull slightly on the yarn after going through each hole. Do this about 3 times on each side until you reach the look you want. To place the backs of the eyes you will need to remove most of the stuffing to place the washers on the eyes then re stuff it.
22. (4 sc, dec) x 6= 30
23. (3 sc, dec) x 6= 24
24. (2 sc, dec) x 6= 18
25. (sc, dec) x 6= 12
26. dec x 6= 6
F/O and sew the hole closed


Edging of body:
With Color B:
Attach yarn with a sl st to round 15 of the body
1. Ch 2, dc-inc in each st around, join with a sl st to the top of the 1st dc
2. Ch 2, (dc-inc, dc) in each st around, join with a sl st to the top of the 1st dc
F/O and weave in the yarn tails

Antennaes(Make 2):
With Color C:
1. Make 4 sc into a magic ring= 4
2. (sc, inc) x 2= 6
3-11. sc in each st around
I do not stuff my antennaes, I use a pipe cleaner instead. Cut a pipe cleaner in half and fold it in half and twist it. Insert the pipe cleaner into the antennae. Cut off any excess. Fold the antennae in half and sc the opening closed.


Back Gills:
With Color C:
Ch 8
1. sl st in 1st ch to make a ring= 8
2. sc in each st around= 8
3. (ch 8, sc in 2nd ch and across, sl st in next st) x 8
F/O and leave a long tail for sewing

Assembly
Head and Body:
1. For the sleepy eye look: Cut a long strand of blue or teal yarn. Thread your needle and insert into a hole in between the eyes. Bring the needle up to a higher corner on the eye. Bring the needle around the top of the eye and insert the needle into a hole on the side of the eye. Repeat this around 4 more times to create that look. Repeat for the 2nd eye and weave in any yarn tails.
2. Cut a long strand of white yarn. Thread your needle and insert the needle into a hole on the head. Bring the needle up to a hole beneath the sleepy eye. Wrap the yarn around the bottom of the eye. Insert the needle into a hole on the opposite side and repeat for the 2nd eye. Weave in any yarn tails.
3. Cut a long strand of green yarn. Right in between the eyes, embroider a green nostril. Insert the needle into a hole on the head. Wrap the yarn around 2 stitches, in a slant. Repeat for the 2nd nostril. Weave in the yarn tails.


Antennaes and smile:
1. Cut a strand of black thread. Insert the needle into a hole on the side of the face. Make a cheeky smile.
2. Pin the antennaes on the top of the head above the eyes.
3. Sew the antennaes onto the head.

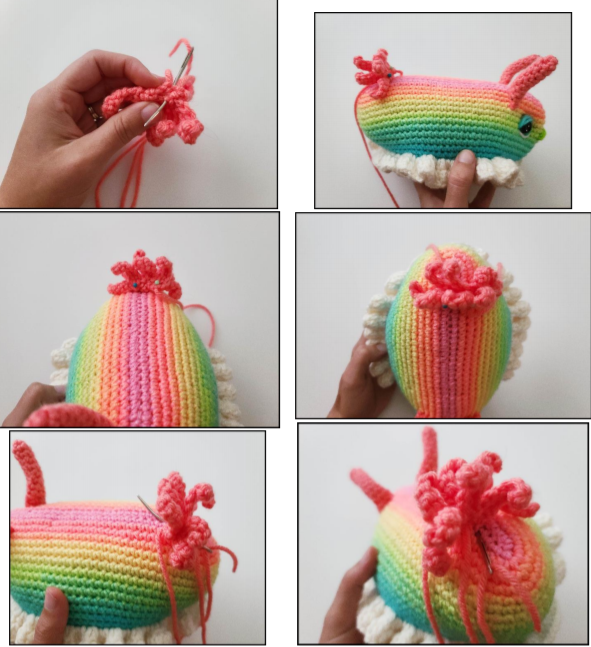
Back Gills:
1. Sew your gills together into a ring shape. Pin the gills onto the back of the body.
2. Sew the gills onto the body.
Additional Information:
Exact Colors and Brand of Yarn Used:
1. Variegated yarn: Red Heart Retro Stripes
2. White: I love this yarn White
3. Orange: I love this yarn Mango
You can use different eye and nose sizes. You might have to adjust the placements if you change the sizes. You can use different hook sizes and weights of yarn. It will just change the size of your slug and you might need to adjust eye and nose placement. How you stuff matters! The type of stuffing you use, how you stuff, all this matters on how your slug turns out. I prefer Polyfil stuffing but you can use other types.
More Amigurumi Sea Slug Ideas:


