Hello dear Amigurumi Followers
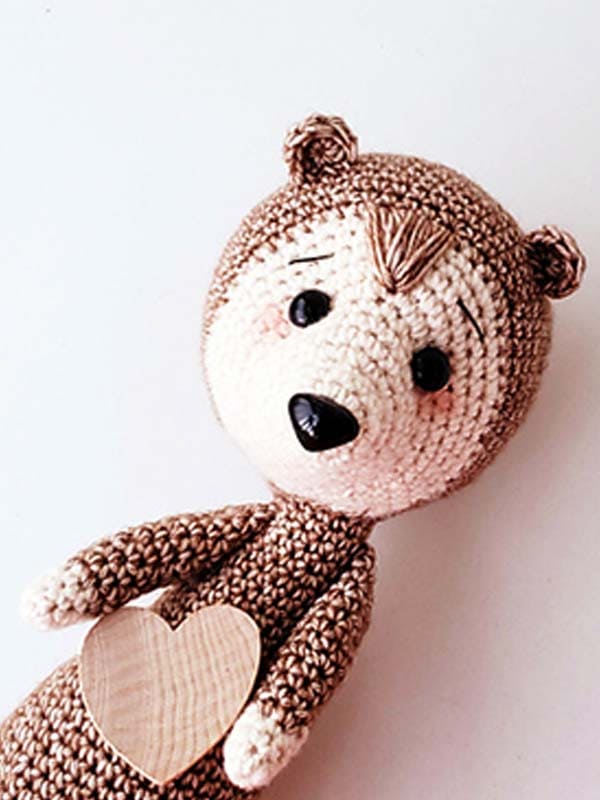
Today we share Amigurumi Speedy the Ferret Free Pattern for you. As you know we share new free amigurumi pattern every day. The main crochets are gazelle, amigurumi bear, pola, crochet panda, penguin, giraffe, llama, pig, bunny, clown, lamb, bee, crochet unicorn, amigurumi doll, fox, penguin, dinosaur, crochet elephant, hippo, monkey, crochet cat, crochet dog and more …
Todays daily new amigurumi free crochet pattern is Amigurumi Speedy the Ferret.
I want to give you some informations about this amigurumi free pattern ; Speedy the Ferret.

Pattern Details
Size: 10 inches from bottom of foot to top of head with weight 4 yarn and a 3.25 mm hook
Skill Level Needed: Intermediate- suitable for novice crocheters, requires patience and precisions when assembling the hippo and basic crochet skills.
Materials Needed:
• Yarn: worsted weight #4
• Color A: cream, Color B: Brown
• Hook Size: D Hook or 3.25 mm
• 12 mm safety eyes, 18 mm safety nose
• Scissors, sewing needle, stitch marker, fiberfill stuffing
Abbreviations:
mr= magic ring- crochet single crochet stitches in to the adjustable loop
BLO= back loops only
ch= chain stitch
inc3= 3 sc in the same stitch
sc= single crochet stitch
sl= slip stitch
dc= double crochet stitch
inc= increase- make two single crochet stitches in the same stitch
dec=decrease- crochet two stitches together using the decrease method
Notes:
• Do not join rounds unless stated, work in a continuous spiral
• Use a stitch marker to mark the beginning of each round
• All stitches are worked in both loops unless stated otherwise in the pattern
Head:
Crocheted from front of nose to back of head
Starting with Color A:
1. Make 6 sc into a magic ring= 6
2. Increase in each st around= 12
3-4. sc in each st around
5. sc, inc x 10, sc= 22
6-8. sc in each st around
9. 3 sc, inc x 18, sc= 40
10-12. sc in each st around
13. 7 sc, (inc, 3 sc) x 8, sc= 48
Change to Color B:
14. sc in each st around
15. 12 sc, (inc, 4 sc) x 6, 6 sc= 54
16-23. sc in each st around
Place nose in the middle of the magic ring. Place eyes between rows 9 and 10, Leaving 11 holes between them. 1st Eye is placed after the 2nd increase Between rows 9 and 10, 2nd eye Is placed after the 4th increase. If you want the Sunken eye look, do not place the backs until row 26
24. (7 sc, dec) x 6= 48
25. (6 sc, dec) x 6= 42
26. (5 sc, dec) x 6= 36
Now for the eyes. Stuff the head well. Cut a long piece of yarn and remove the eyes. Place the needle in the holes where the eyes were. Now thread the needle and in a hole next to the eye Hole, go back and forth between the two eye holes. Pull slightly on the yarn after going through each hole. Do this about 3 times on each side until you reach the look You want. To place the backs of the eyes you will need to remove most of the stuffing, then re stuff it after. Follow the pictures for help.
27. (4 sc, dec) x 6= 30
28. (3 sc, dec) x 6= 24
29. (2 sc, dec) x 6= 18
30. (sc, dec) x 6= 12
31. Dec x 6= 6
F/O and sew the hole closed


Body:
With Color B:
Chain 15, sl st to the first chain to
Make a ring
2-5. sc in each st around
6. (4 sc, inc) x 3= 18
7-10. sc in each st around
11. (2 sc, inc) x 6= 24
12-14. sc in each st around
15. (3 sc, inc) x 6= 30
16-18. sc in each st around
19. (4 sc, inc) x 6= 36
20-30. sc in each st around
31. (4 sc, dec) x 6= 30
32. sc in each st around
33. (3 sc, dec) x 6= 24
34. (2 sc, dec) x 6= 18
35. (sc, dec) x 6= 12
36. dec x 6= 6
F/O and sew the hole closed.
Arms (Make 2):
Starting with Color A:
1. Make 6 sc into a magic ring= 6
2-4. Sc in each st around
Change to Color B:
5. Inc, 5 sc= 7
Stuff the arms as you work
6-9. Sc in each st around
10. Sc, inc x 2, 2 sc, dec= 8
11-17. Sc in each st around
F/O and leave a long tail for sewing
Legs(Make 2):
Starting with Color A:
1. Make 5 sc into a magic ring= 5
2. inc x 4, sc= 9
3. sc, inc x 6, 2 sc= 15
4. sc in each st around
Change to Color B:
5-6. sc in each st around
7. 7 sc, dec, 4 sc, dec= 13
8. 6 sc, dec, 3 sc, dec= 11
9-11. sc in each st around
F/O and leave a long tail for sewing
Tail:
Starting with Color A:
1. Make 6 sc into a magic ring= 6
2-4. Sc in each st around
Change to Color B:
5. Inc, sc, inc, 3 sc= 8
6-10. Sc in each st around
11. 2 sc, inc, 3 sc, inc, sc= 10
12-23. Sc in each st around
F/O and leave a long tail for sewing
Ears:
With Color B:
1. Make 6 sc into a magic ring= 6
2. Starting from the 2nd stitch, inc, hdc, dc-inc, hdc-inc=8
F/O and leave a long tail for sewing
Assembly
Head and Body:
1. Pin the head onto the body for extra support. You may need to add more stuffing as you sew.
2. sew the head onto the body.

Arms:
1. Pin the arm in a forward facing angle. There are no particular rows I place them on as it depends on how you stuff, shape, etc. its just better to judge how you want them.
2. Sew the arm onto the body.

Legs:
1. Turn the body upside down with the nose facing away from you.
2. Pin the legs onto the bottom of the body.
There are no special rows for this, just depends on the look you would like. I don’t place mine in between any special rows. I just judge based on how the individual doll looks.
3. Sew the legs onto the body.

Ears:
1. Pin the ears onto the top of the head. I do not have certain rows I place these on. Since these are handmade, I never am able to stuff the head the same exact way twice. I just place the ears where they look best on the head above the eyes judged on each individual doll.
2. Sew the ears onto the head.

Embellishments:
1. embroider some eyebrows with black thread.
2. Add some blush to the cheeks if wanted.

More Amigurumi Ferret Ideas:


