Hello dear Amigurumi Followers
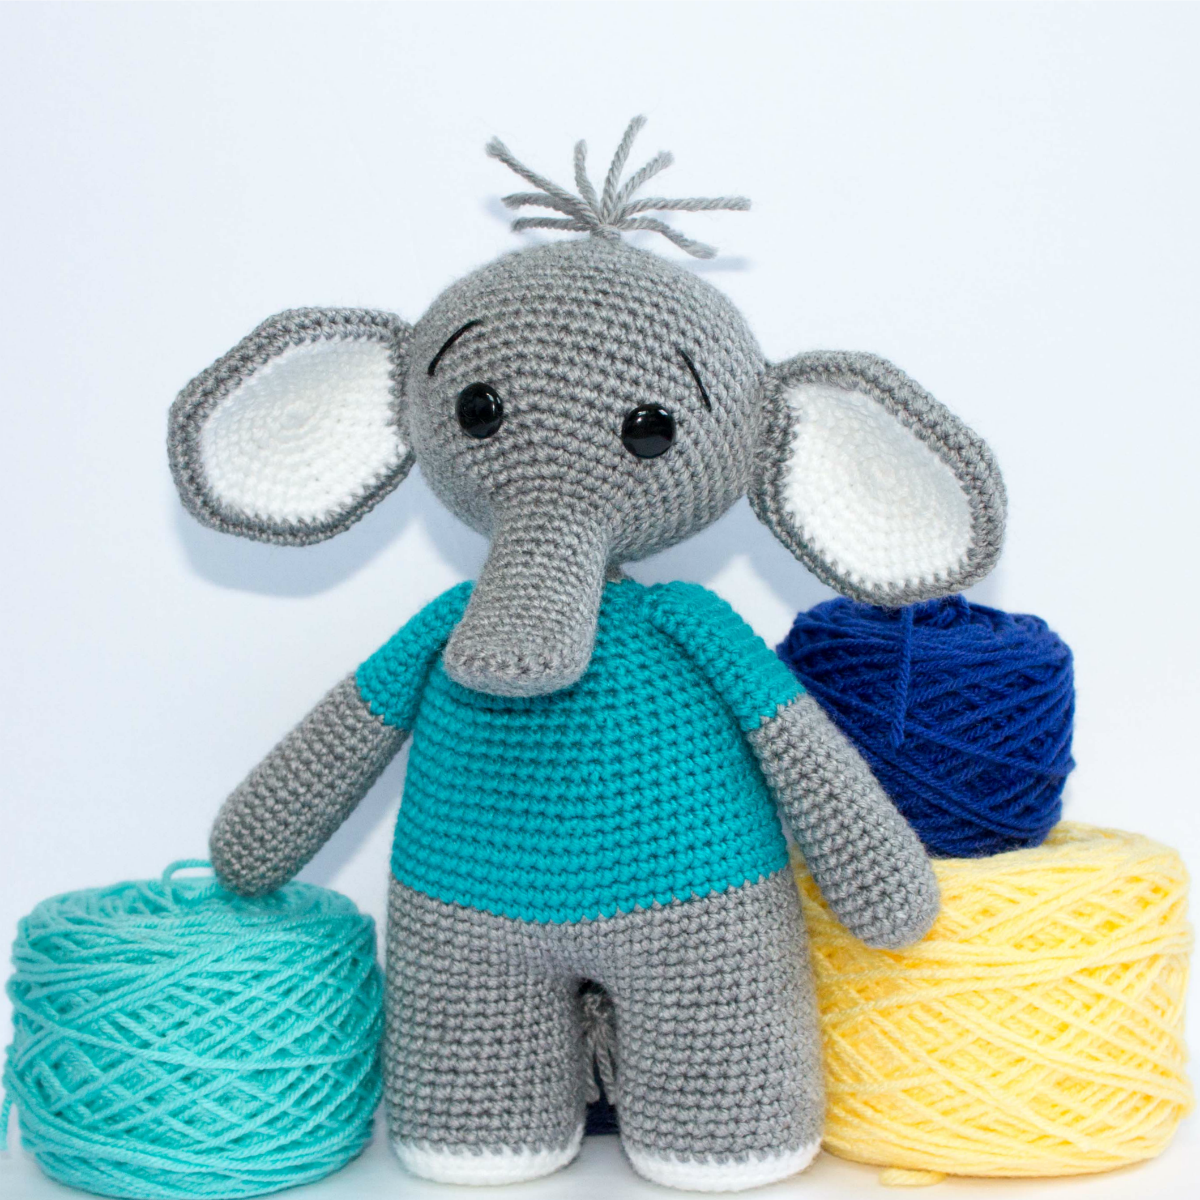
Today we share Amigurumi The Friendly Elephant Free Pattern for you. As you know we share new free amigurumi pattern every day. The main crochets are gazelle, amigurumi bear, pola, crochet panda, penguin, giraffe, llama, pig, bunny, clown, lamb, bee, crochet unicorn, amigurumi doll, fox, penguin, dinosaur, crochet elephant, hippo, monkey, crochet cat, crochet dog and more …
Todays daily new amigurumi free crochet pattern is Amigurumi Amelia Doll.
I want to give you some informations about this amigurumi free pattern ; The Friendly Elephant.
To make your Friendly Elephant you will need:
Worsted Size 4 Yarn in Gray (about 125g) (I used I Love this Yarn in Gray)
Scrap yarn in white
Black embroidery thread (for eyelashes)
Crochet Hook in Size 3.5
Yarn Needle
Polyfil (this is the brand I HIGHLY recommend)
15mm safety eyes
stitch marker (I love these ones for amigurumi)
This post contains affiliate links. For more information see my policies page.
You will need to know these abbreviations and stitches:
SC- single crochet
SC INC- single crochet increase (2 SC in each stitch)
INV DEC- Invisible decrease (put hook through the FRONT LOOP ONLY of two consecutive stitches [two loops on hook] Yarn over pull through both loops. [two loops on hook] Yarn over pull through two loops)
Magic Circle- Make a loop, leaving a long tail to work with. Insert hook in center of loop, yarn over and draw up a loop. Yarn over, pull through to make the first chain (this does not count as a stitch!). Continue to crochet over the loop and tail with the number of stitches called for. (If you need 6 SC, then crochet 6 SC inside the ring.) Pull the tail to close the circle.
Crocheting in the round
For most amigurumi projects, you crochet in the round. That means you don’t connect the rounds with a slip stitch. You just continue on. To make sure you keep your place use stitch markers. They are a necessity. I place mine in the last stitch of the round and move it up every time! These are my absolute favorite because they don’t fall out!
Don’t be a rebel.
Crocheting in the back loops only
See how the bottom of the legs are flat, where the white is? That is created by crocheting in the back loop only. So, instead of crocheting through the entire top of the stitch, you split the stitch and crochet in the back loop. That makes the bottom lie flat. Nothing else is different about the stitch.close
Changing colors
On the last stitch before you want to change to a different color, do the stitch as you normally would but don’t finish the last loop. Instead, pull the new color through finishing the stitch. In the next stitch, instead of a SC, slip stitch (lightly! Don’t pull too tight.) Continue on as normal. The slip stitch just makes it look a little less jagged.
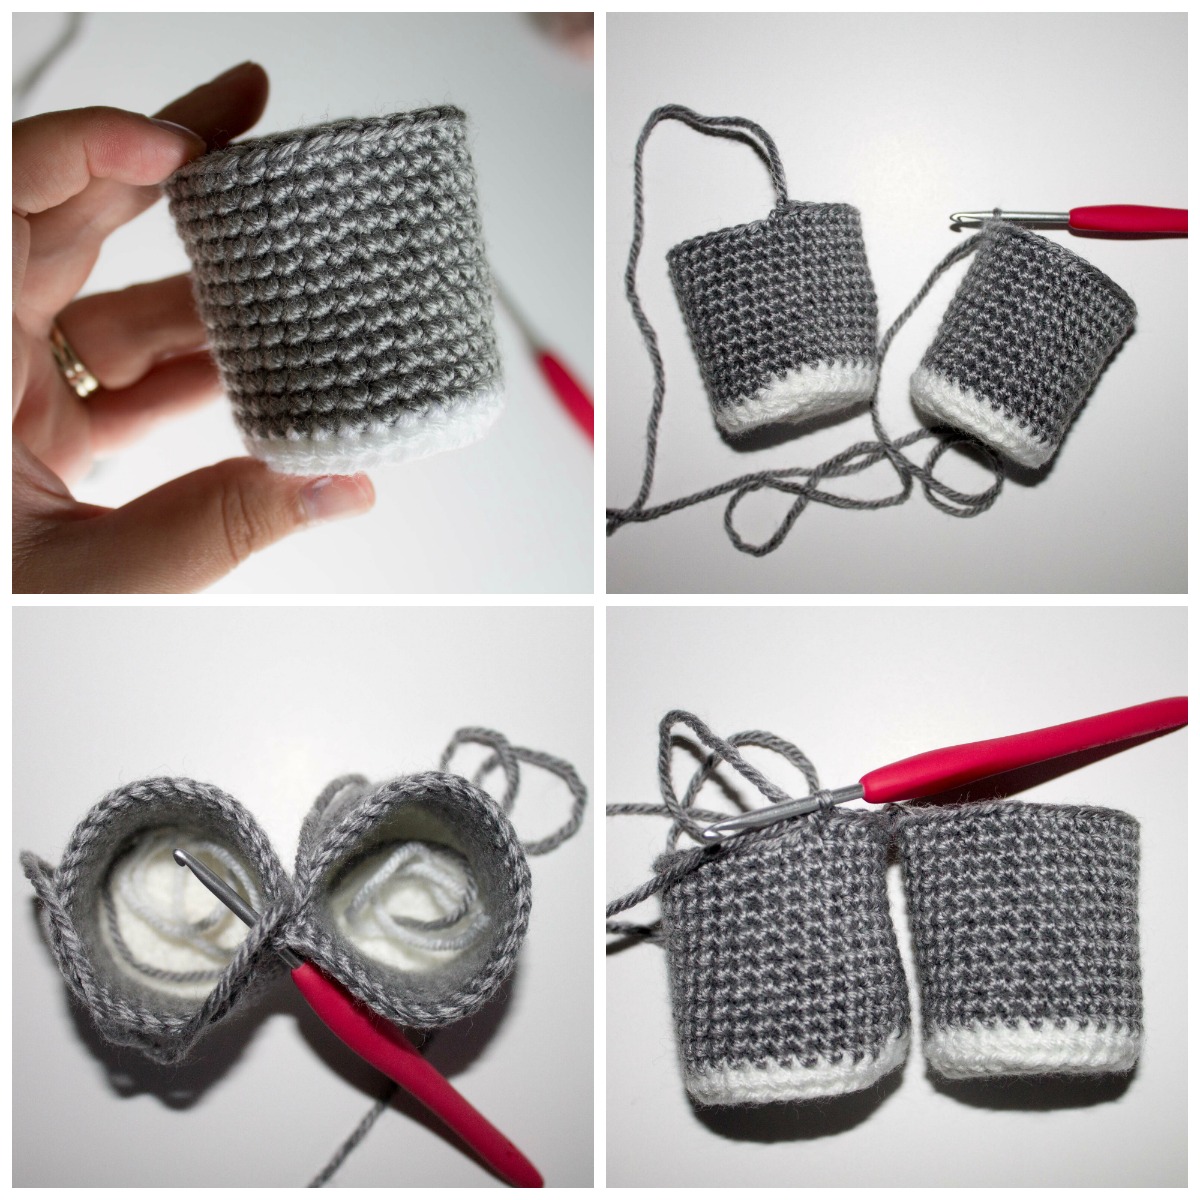
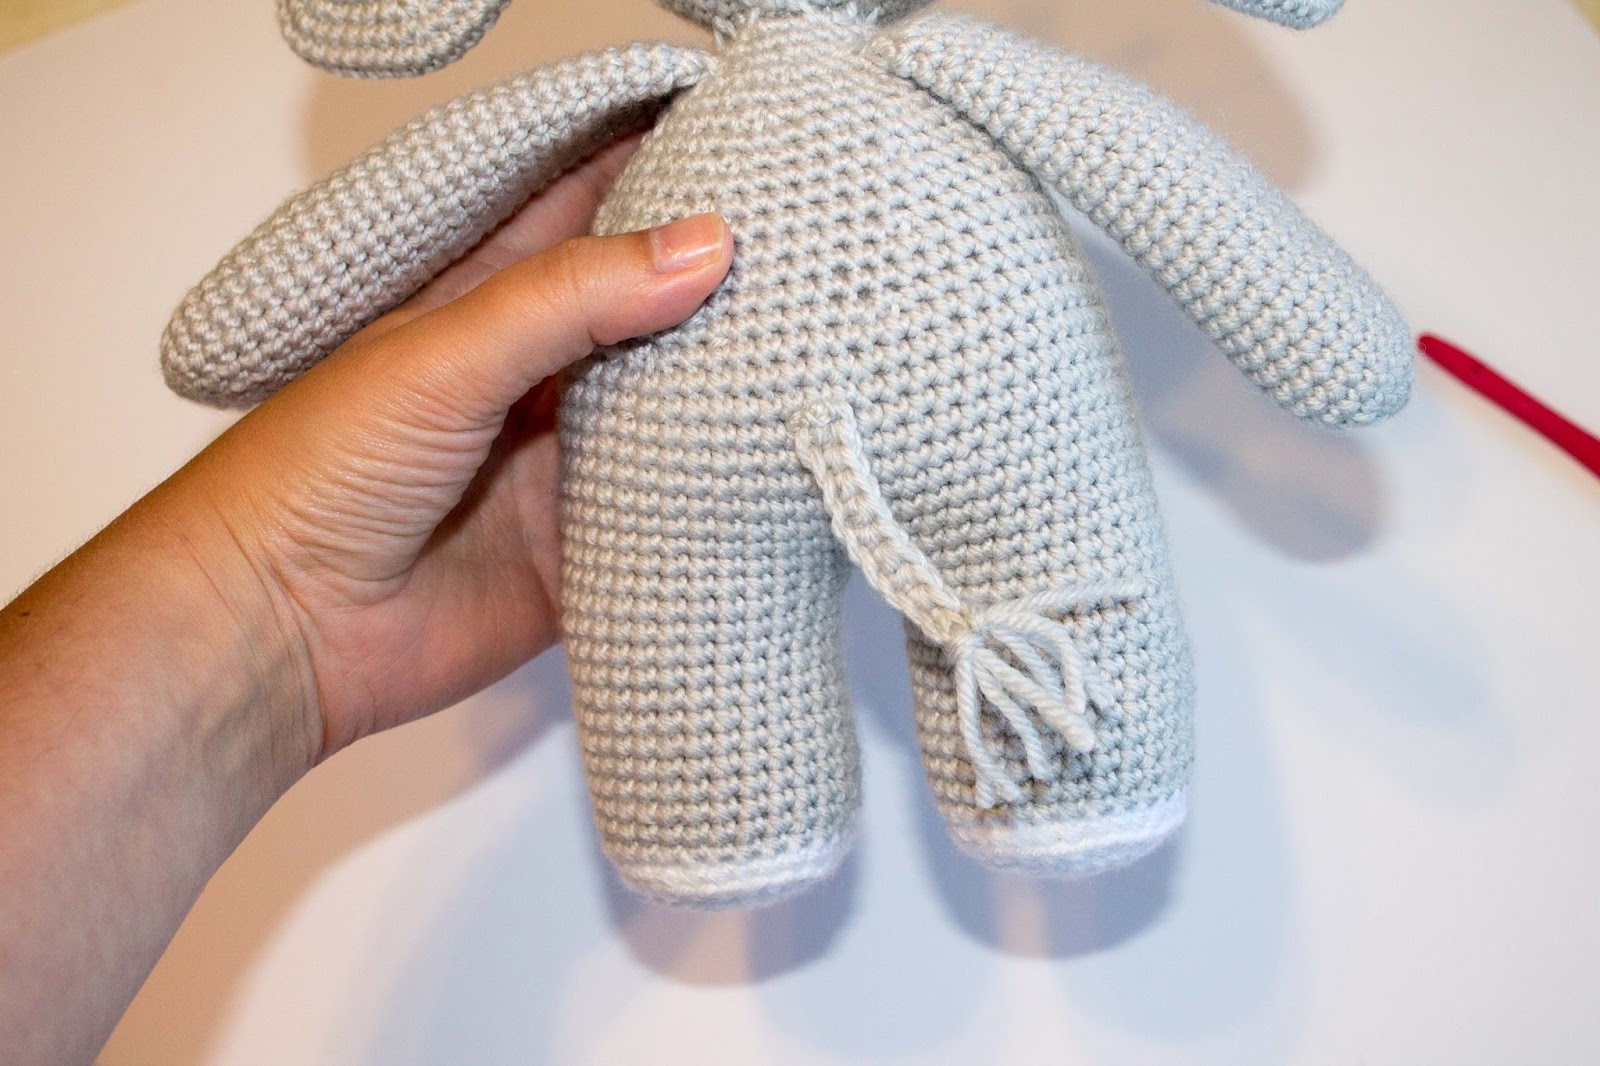
Joining the legs
The legs may seem tricky but it is pretty simple once you break it down. You connect with a SC and crochet around the entire leg. Once you come back to the start, SC around the other leg. There are 30 stitches in each leg so you will end up with 60 total! Be sure to check out the pictures!
Stuffing
You want to stuff very firmly. I don’t push the stuffing too hard on the bottom of the feet (because I want them to be mostly flat) but every where else I stuff as fully as I can. Make sure to stuff as you go, and really stuff the neck as well as you can so it can hold the head. This is my favorite kind of stuffing for amigurumi, it is the best if you want less “lumps!”
Here is a Facebook Live that answers some of the questions and shares some tips!
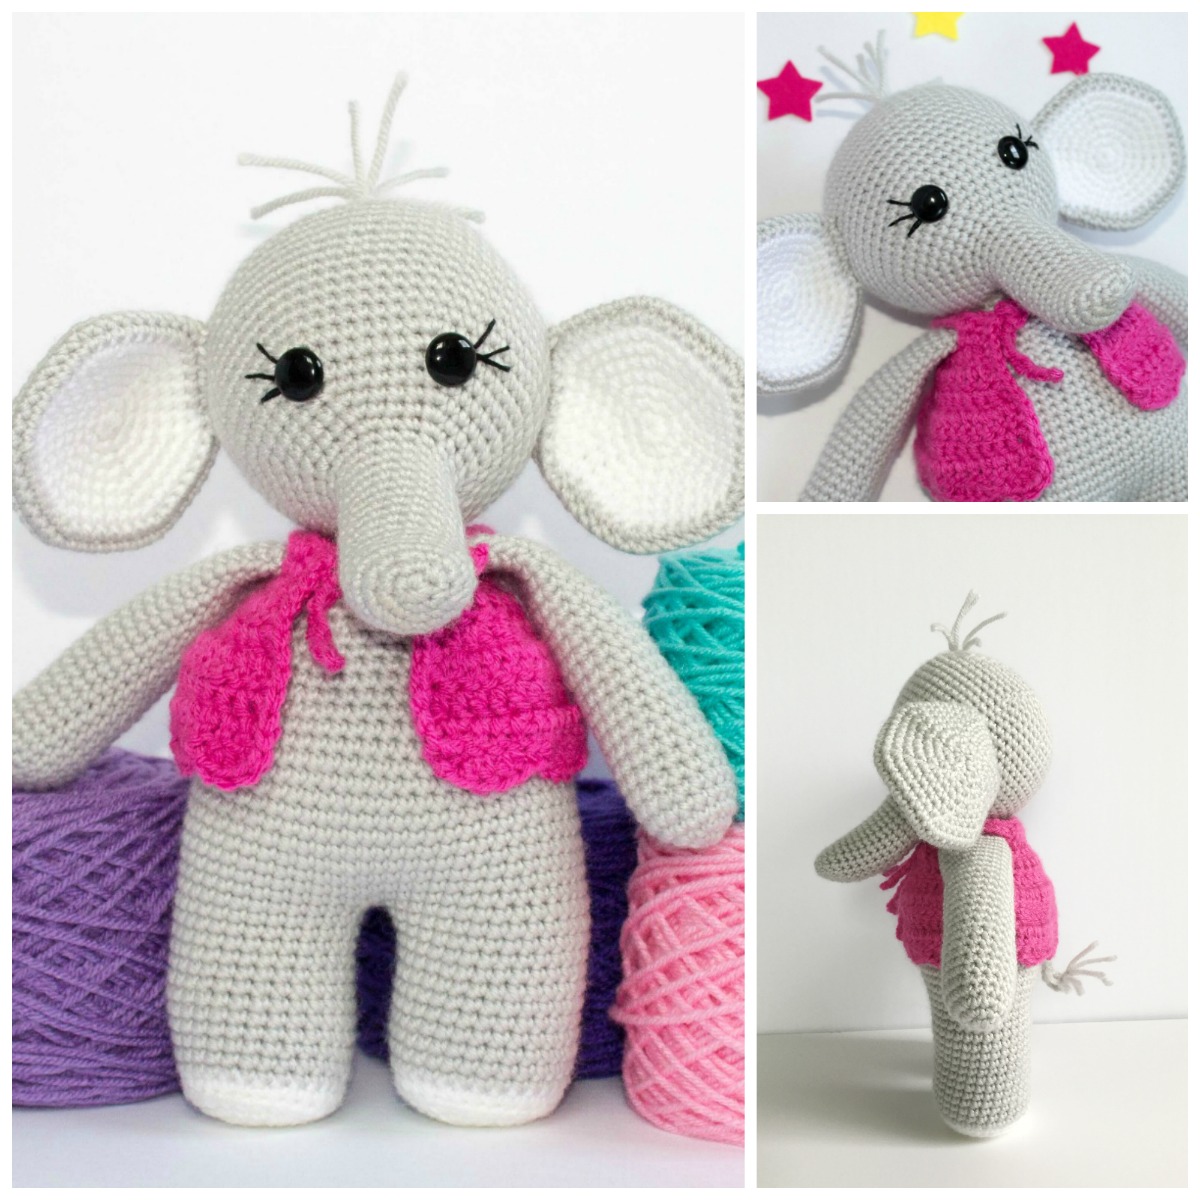
Amigurumi The Friendly Elephant Free Pattern
Legs and Body
Start with white:
Round 1: In a magic circle, 6 SC.
Round 2: SC INC in each around. (12)
Round 3: SC in first, SC INC in next. Repeat around. (18)
Round 4: SC in first 2, SC INC in next. Repeat around. (24)
Round 5: SC in first 3, SC INC in next. Repeat around. (30)
Round 6: In back loops only, SC in each around. (30)
*Change to gray*
Rounds 7-18: SC in each around. (30)
Fasten off. Repeat, but on the second one do not fasten off. Slip stitch once (you will not use this stitch for anything- it just makes less of a gap when you attach it). Attach it to the other leg with a SC in the stitch next to the fastened off tail. Crochet over the tail for a few stitches. SC around the next leg (30) then back around the next leg (another 30 stitches) for a total of 60 stitches. This is round 19. Now we will crochet the body.
Round 20-30: SC in each stitch around. (60) [if you are doing the shirt, change to shirt color at round 25]
Round 31: SC in the first 8, INV DEC in the next. Repeat around. (54)
Round 32-33: SC in each around. (54)
Round 34: SC in the first 7, INV DEC in the next. Repeat around. (48)
Round 35-36: SC in each around. (48)
Round 37: SC in the first 6, INV DEC in the next. Repeat around. (42)
Round 38-39: SC in each around. (42)
Round 40: SC in the first 5, INV DEC in the next. Repeat around. (36)
Round 41: SC in each around. (36)
Round 42: SC in the first 4, INV DEC in the next. Repeat around. (30)
Round 43: SC in each around. (30)
Round 44: SC in the first 3, INV DEC in the next. Repeat around. (24)
Round 45: SC in the first 2, INV DEC in the next. Repeat around. (18)
Round 46: SC in the first, INV DEC in the next. Repeat around. (12)
[if doing shirt, change back to gray here]
Round 47: SC in each around. (12)
Fasten off and leave a long tail to sew on the head.
Trunk
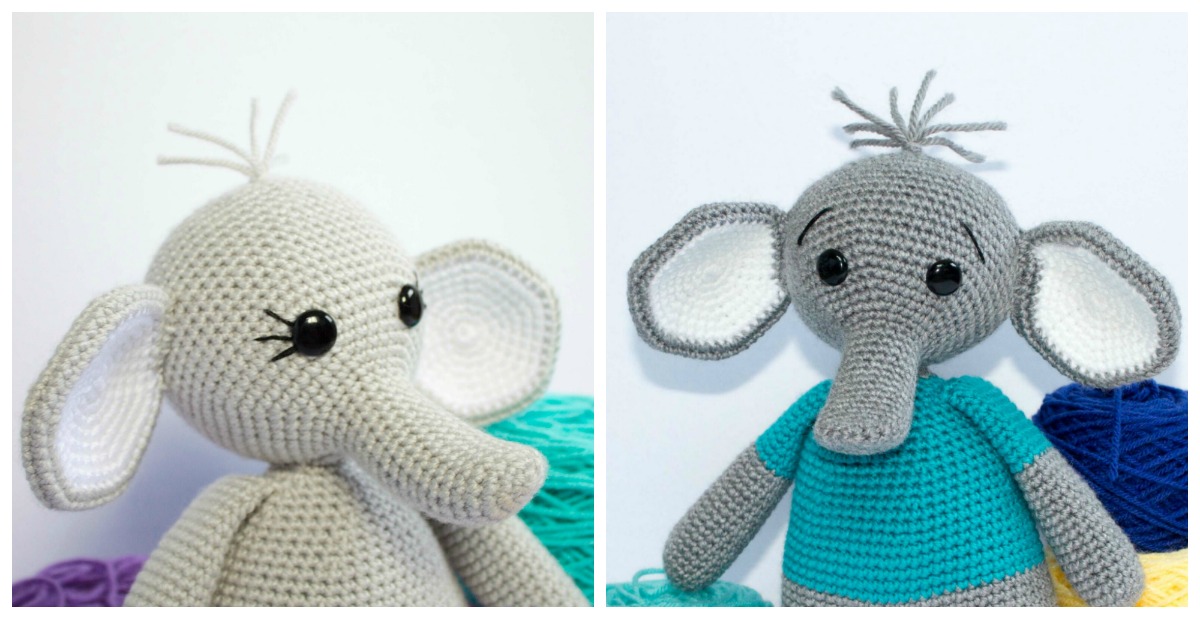
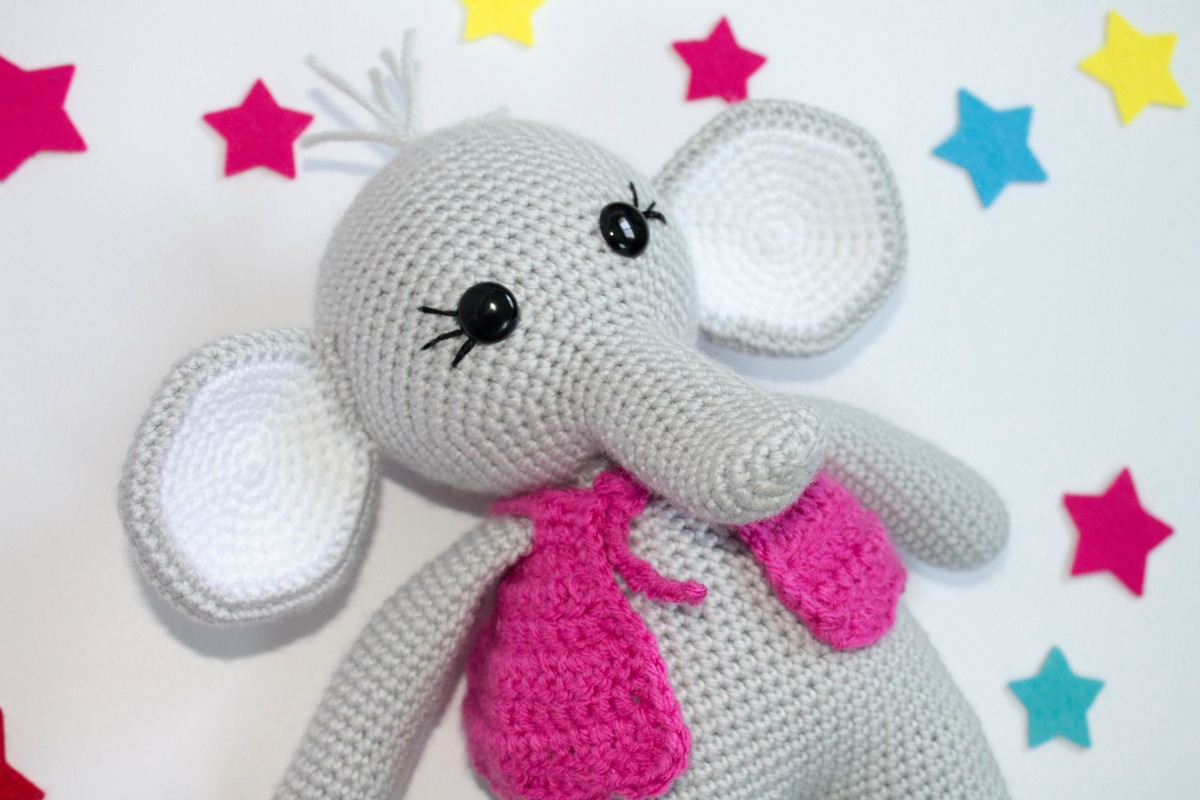
You start at the trunk when you make the head. Make sure that you don’t over stuff it. I personally like to under stuff it a little and then shape it by pinching the end and curving up slightly. That is what I did with the Girly Elephant. For the Boy Elephant, I sewed a few stitches at the end to keep it flat. Both are cute, so it is mainly a personal preference!
Eyes
If you are new to safety eyes, this post is great to teach you the basics! Also, with the larger eyes like I am using for this project, I recommend using your hook (or your stuffing stick if you have one!) to widen the stitches a little bit more before you insert the eyes. Be sure to add eye lashes before you attach the back. It can be done either way, but it is a lot easier without them!
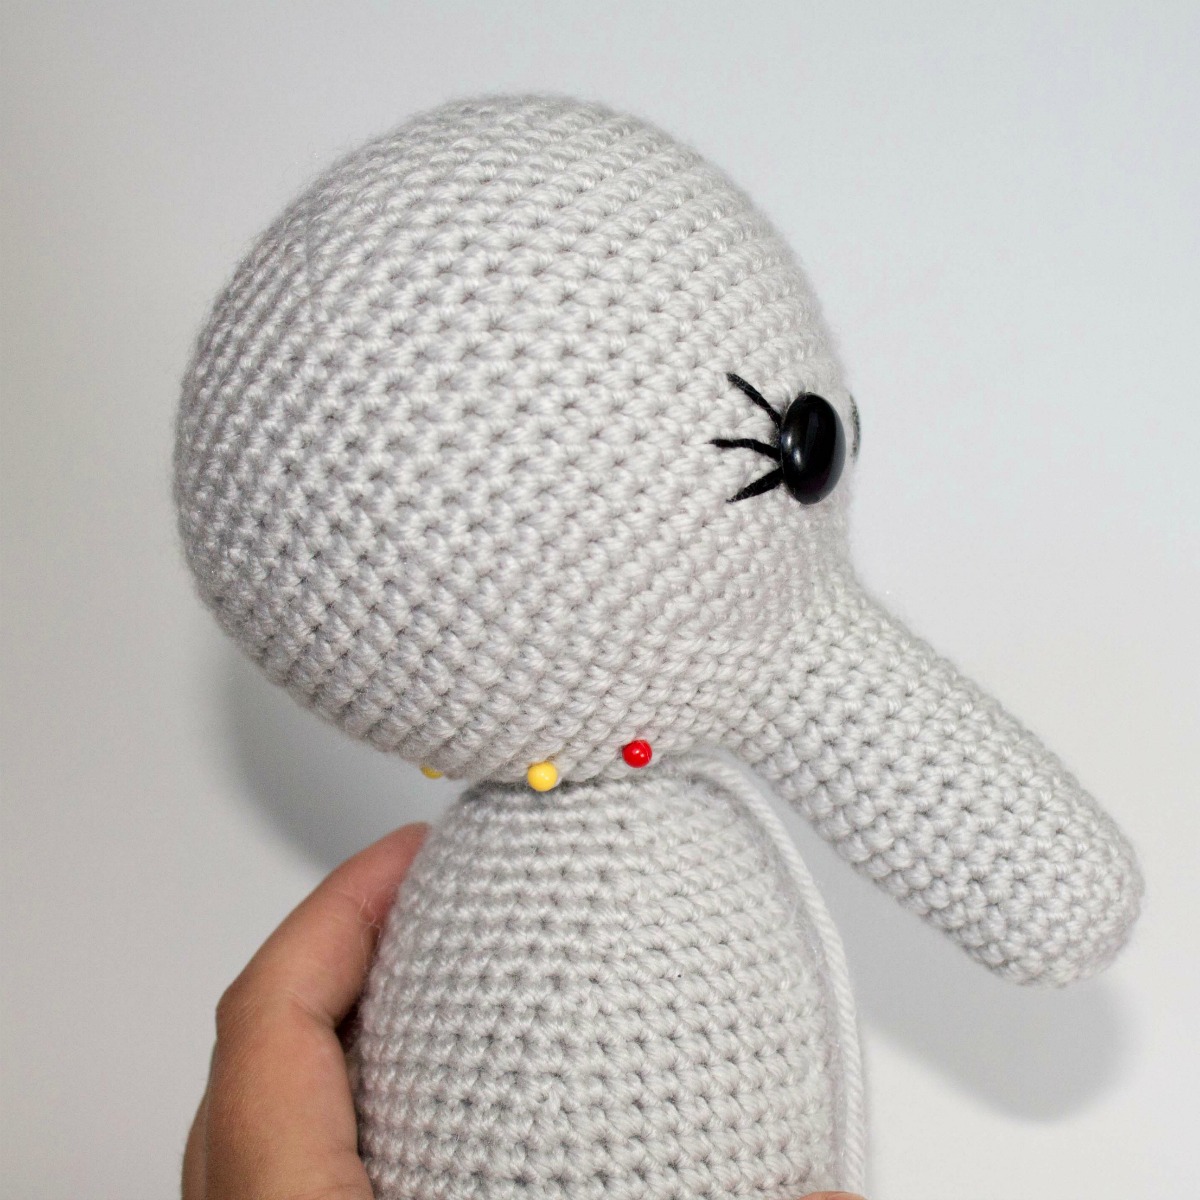
Sewing on the Head
My biggest advice for sewing things like heads and limbs is: take your time. It doesn’t take too long, but if you rush it you may not love the results. My second piece of advice? Use pins! It helps so much to have it in place, exactly how you like it, before you permanently attach it and realize that the head is off center. This will be helpful for the ears and the head! (you can see the pictures below!)Ready to finally get crocheting?? Let’s get started!
Head
Starting at the nose
Round 1: 6 SC in a magic circle.
Round 2: INC in each around. (12)
Round 3: SC in the first, SC INC in the next. (18)
Rounds 4-18: SC in each around. (18)
(To get the “tilt” at the end of the nose, you can just manually pinch it or with a piece of the same color of yarn, sew a few stitches at the end to keep the top flat. I just pinched mine and it stays remarkable well. Do not over stuff the nose!! In fact, understuff a little. The head you want to stuff very well, but not the nose!)
Round 19: SC in the first 2, SC INC in the next. Repeat around. (24)
Round 20: SC in first 3, SC INC in next. Repeat around. (30)
Round 21: SC in first 4, SC INC in the next. Repeat around. (36)
Round 22: SC in first 5, SC INC in next. Repeat around. (42)
Round 23: SC in first 6, SC INC in next. Repeat around. (48)
Round 24: SC in first 7, SC INC in next. Repeat around. (54)
Round 25: SC in first 8, SC INC in next. Repeat around. (60)
Rounds 26-35: SC in each around. (60)
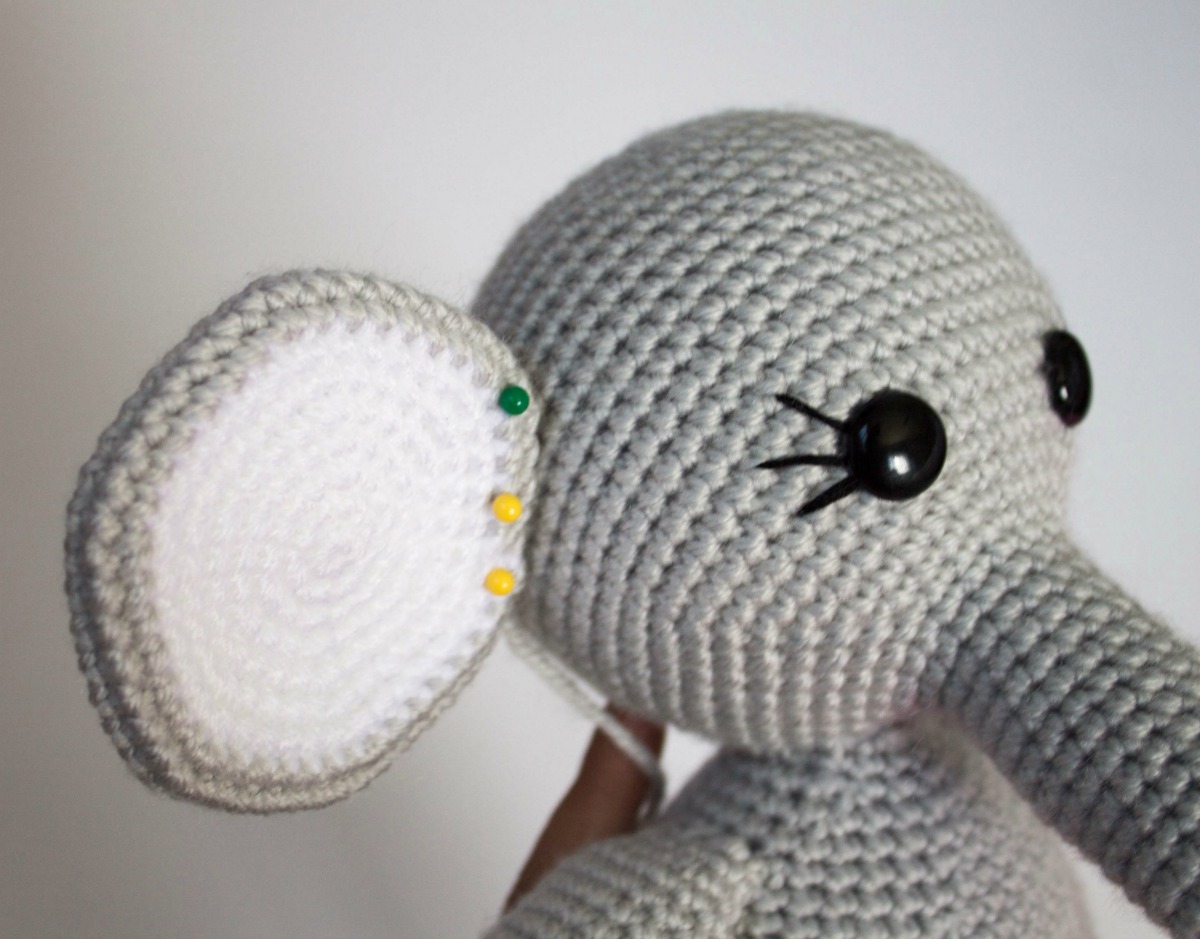
Place the eyes between rows 24 and 25, 8 stitches apart. The eyes should be on each side of the trunk. The larger size eye may be hard to insert if you have a very tight stitch. Stretching the stitch out with you hook or another utensil may help! Add the eyelashes or eyebrow now, before you attach the backs.
Round 36: SC in the first 8, INV DEC in the next. Repeat around. (54)
Round 37: SC in first 7, INV DEC in next. Repeat around. (48)
Round 38: SC in first 6, INV DEC in next. Repeat around. (42)
Round 39: SC in first 5, INV DEC in next. Repeat around. (36)
Round 40: SC in first 4, INV DEC in next. Repeat around. (30)
Round 41: SC in first 3, INV DEC in next. Repeat around. (24)
Round 42: SC in first 2, INV DEC in next. Repeat around. (18)
Round 43: SC in the first, INV DEC in next. Repeat around. (12)
Round 44: INV DEC in each around. (6)
Fasten off and leave a tail. Weave in the ends to close the remaining gap and secure the ends. When you attach the head it will be angled down so that the trunk is closer to the body. Make sure that the eyes are level and everything centered then pin it to the body so it stays put while you are sewing. I go around multiple times, then make a connected “star” shape and I pass through the bottom of the head multiple times. Weave in ends.close
Ears (make 2)
This is a circle that widens and then decreases into a pancake.
With white:
Round 1: 6 SC in a magic circle.
Round 2: INC in each around. (12)
Round 3: SC in the first, SC INC in the next. (18)
Round 4: SC in the first 2, SC INC in the next. Repeat around. (24)
Round 5: SC in first 3, SC INC in next. Repeat around. (30)
Round 6: SC in first 4, SC INC in the next. Repeat around. (36)
Round 7: SC in first 5, SC INC in next. Repeat around. (42)
Change to gray.
Round 8: SC in first 6, SC INC in next. Repeat around. (48)
Round 9-10 : SC in each around. (48)
Round 11: SC in first 6, INV DEC in next. Repeat around. (42)
Round 12: SC in first 5, INV DEC in next. Repeat around. (36)
Round 13: SC in first 4, INV DEC in next. Repeat around. (30)
Round 14: SC in first 3, INV DEC in next. Repeat around. (24)
Round 15: SC in first 2, INV DEC in next. Repeat around. (18)
Round 16: SC in the first, INV DEC in next. Repeat around. (12)
Round 17: INV DEC in each around. (6)
Fasten off and leave a long tail to sew on. Sew the small gap closed then weave the tail to the edge of the ear. It will have a little bit of a hexagonal shape. Choose a corner and pull it out there. Pin the ears to the head so they are matching. I made them slightly downward. Sew them on.
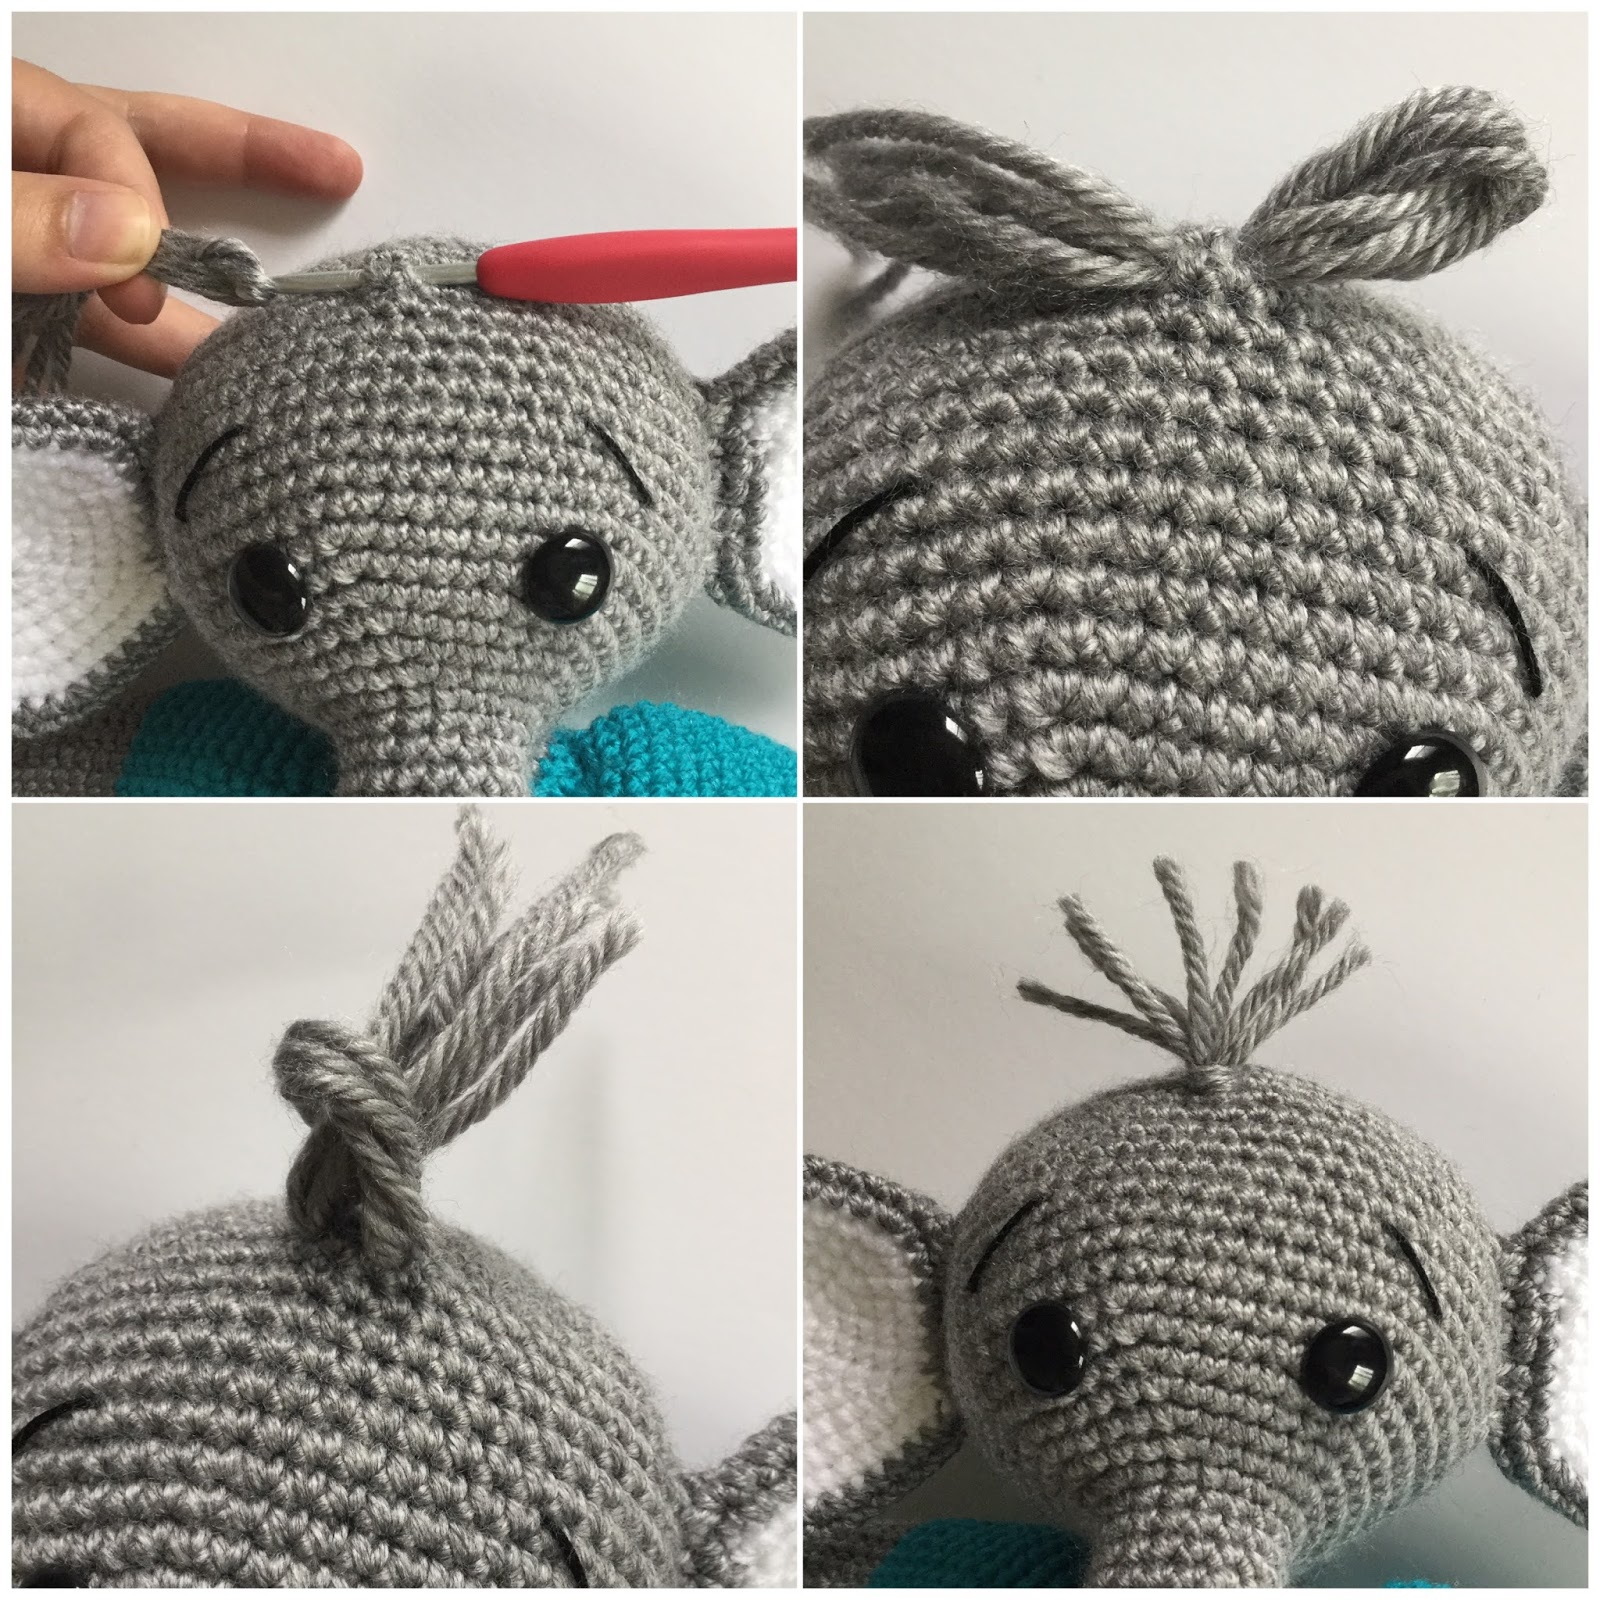
Now you can add the cute little hair fuzz! I cut about 6 pieces of yarn about 6 inches long. Using your hook pull the yarn through. Pull the ends through the loop made when you pulled through. Pull tight! I attached them about 7 rows from the back. Center them however you think is best!
There! Cute as can be! Get ready for next week as we finish up the Elephant (you are so close!!)
Arms
*I only stuff the very bottom and very lightly. Then not at all through the top half.*
Round 1: SC 6 in a magic ring.
Round 2: SC INC in each around. (12)
Round 3: SC in first, SC INC in the next. Repeat around. (18)
Rounds 4-28: SC in each around.(18) [if changing color for shirt change at round 20]
Round 29: SC in the first, INV DEC in the next. Repeat in next.
Fasten off and leave a tail long enough to sew on. Attach the arms between rows 44 and 45 on the body.
Tail
Chain 12
In the second chain from the hook, HDC. HDC in the remaining chains for a total of 10.
Fasten off. Cut 4 pieces of yarn to attach to the end of the tail. Fold in half and pull through using the hook. Pull the ends through the loop and pull tight. (similar to attaching the hair fuzzies in part two!)
Vest
Chain 30
Row 1: In 3rd chain from the hook DC. DC to the end of the chain. Chain 2 and turn. (28)
Rows 2-3: DC in each across.Chain 2 and turn (28)
Row 4: DC in the first, DC INC in the next. Repeat to end of row. Chain 2 and turn(42)
Row 5: DC in first two, DC INC in next. Repeat to end of row.Chain 2 and turn (56)
Row 6: DC in each across. Chain 2 and turn(56)
Row 7: DC in each across. Chain 1 and turn. (56)
Row 8: Skip one stitch and DC INC in the next. DC INC in the next stitch, skip one and slip stitch to the next. This will be your scallop. Repeat to the end of the row.
On the last stitch, slip stitch to the side of the vest. SC up the vest until the top.
SC in the first 3 chains on the top of the vest. Chain 10, skip 6 stitches and attach with a SC to the 6th stitch. SC in the next 10. Chain 10, skip 6 stitches and attach with a SC to the 6th stitch. SC in the remaining 3.
Fasten off and weave in ends.
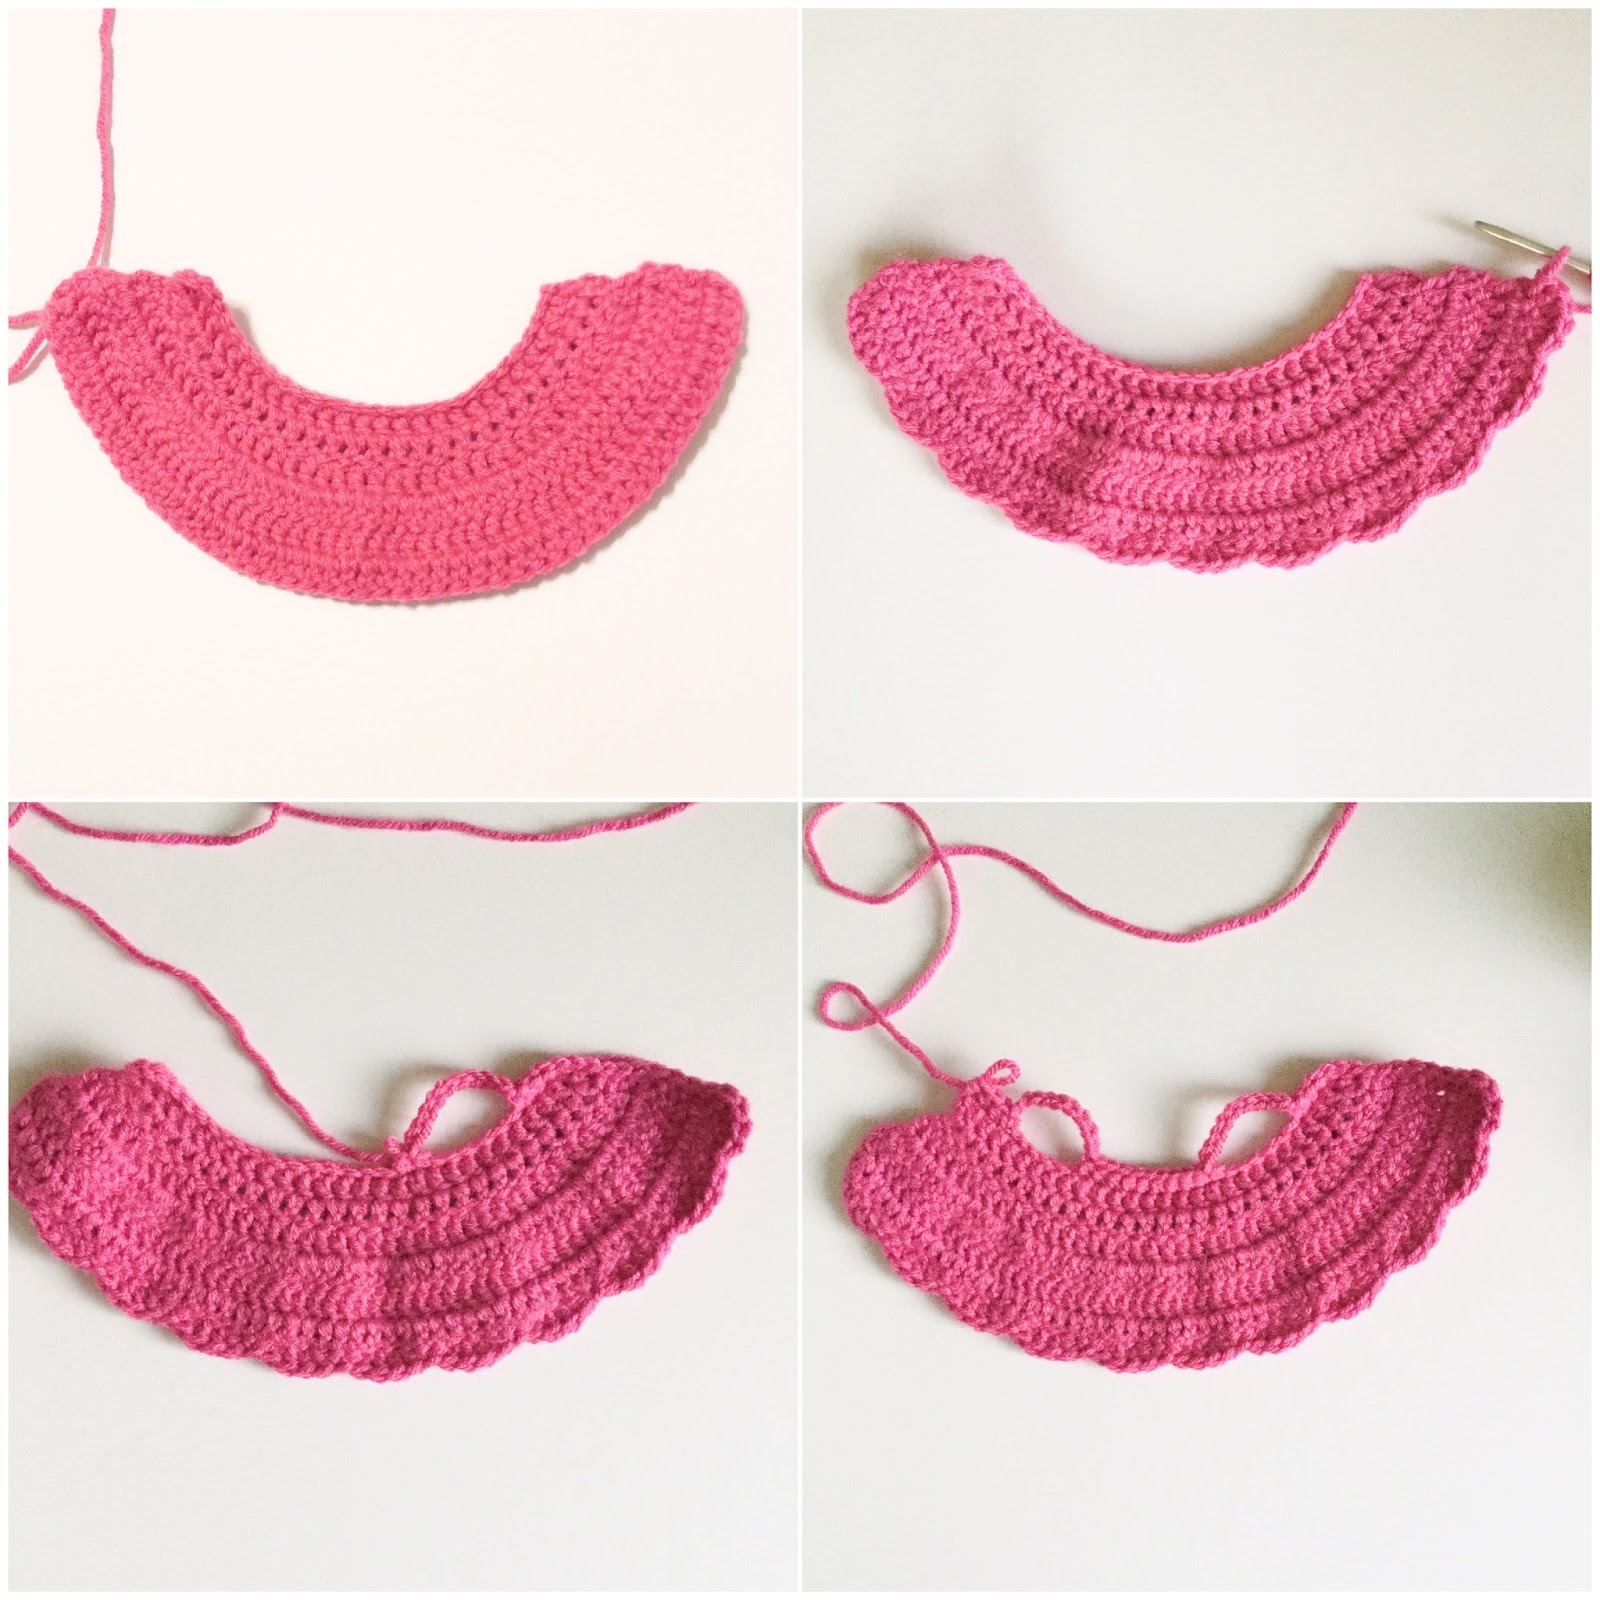
Then chain 15 (this will be the string!). Attach to the top first stitch. SC in each across until you reach the end. Then chain 15 more for the other string. Weave the ends through the chains.
More Amigurumi Elephant Ideas:


