Hello dear Amigurumi Followers
Today we share Amigurumi Wizard Duck Leo Free Pattern for you. As you know we share new free amigurumi pattern every day. The main crochets are gazelle, amigurumi bear, pola, crochet panda, penguin, giraffe, llama, pig, bunny, clown, lamb, bee, crochet unicorn, amigurumi doll, fox, penguin, dinosaur, crochet elephant, hippo, monkey, crochet cat, crochet dog and more …
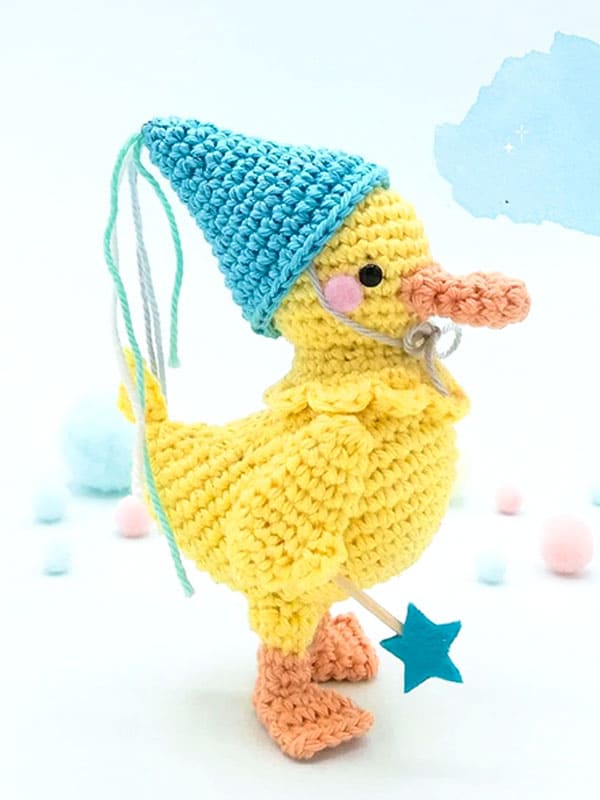
Todays daily new amigurumi free crochet pattern is Amigurumi Wizard Duck Leo.
I want to give you some informations about this amigurumi free pattern ; Wizard Duck Leo.
Abbreviations
Sc- single crochet stitch
Hdc- half double crochet stitch
Dc- double crochet stitch
Inc- single crochet increase
Dec- single crochet decrease
Slst- slip stitch
Ch- chain stitch
FLO- front loop only
BLO- back loop only
(…) – total amount of stitches made in current round
*..* – Work the instructions between * in the same stitch
Material
• Crochet hook, I use a crochet hook size 2 mm, but you can use another size depending on your yarn. Use a smaller hook if you crochet loosely
• A tepestry needle
• A pair of scissors
• A pair of 4,5 mm safety eyes
• Stitch markers
• Polyester fiberfill stuffing
• A stick to help you stuff small pieces
• Pins
• Pink and Blue felt
• Textile glue to glue felt
• A small piece of wood, like a toothpick
Amigurumi Wizard Duck Leo Free Pattern:

Head
With yellow yarn
Rnd 1. 6 sc in a magic ring (6)
Rnd 2. 6 inc (12)
Rnd 3. (1 sc, 1 inc) x6 (18)
Rnd 4. 1 sc, 1 inc, (2 sc, 1 inc) x5, 1 sc (24)
Rnd 5. (3 sc, 1 inc) x6 (30)
Rnd 6-8. 30 sc (30)
Mark the 10th and 19th stitch (photo 1)
Rnd 9-10. (2rnds) 30 sc (30)
Rnd 11. (3 sc, 1 dec) x6 (24)
Place and attach the eyes in the marked stitches of round 8 (photo 2)
Rnd 12. 1 sc, 1 dec, (2 sc, 1 dec) x5, 1 sc (18)
Rnd 13. 18 slst (18)
Rnd 14. Work this round through FLO, 18 sc (18)
Rnd 15. (1 sc, 1 inc) x9 (27)
Rnd 16. 12 sc, 1 hdc, 2 dc, *3dc*, 2dc, 1hdc, 7sc, 1inc (30)
Rnd 17. Work this round through FLO, (*3hdc*, 2slst) x10 (50) (photo 3)
Fasten off, leaving a long tail for sewing. Stuff the head firmly.
We have completed the head part of the Amigurumi duck. Now let’s crochet the beak part.
Beak
Use orange yarn
Rnd 1. 7 sc in a magic ring (7)
Rnd 2. 7 inc (14)
Rnd 3. 14 sc (14)
Rnd 4. (1 sc, 1 dec, 2 sc, 1 dec) x2 (10)
Rnd 5. (3 sc, 1 dec) x2 (8)
Rnd 6. 2 sc, *1 sc FLO, 1hdc FLO, 1 sc FLO*, 3 sc, *1 sc FLO, 1hdc FLO, 1 sc FLO*, 1 sc (12)
1 slst in 1st sc
Fasten off, leaving a long tail for sewing.
Flatten the beak, the hdc’s must be pn the sides (photo 4)
Body
Use yellow yarn to make a foundation chain of 6 ch:
Rnd 1. Start in the 2nd stitch from hook, 4 sc, 1 inc, now crochet along the other side of the ch and work the loose end in as you go (photo 5), 4 sc, 1 inc (12)
Rnd 2. (1 sc, 1 inc) x6 (18)
Rnd 3. 1 sc, 1 inc, (2 sc, 1 inc) x5, 1 sc (24)
Rnd 4. (3 sc, 1 inc) x6 (30)
Rnd 5. 2 sc, 1 inc, (4 sc, 1 inc) x5, 2 sc (36)
Rnd 6. 36 sc (36)


Rnd 7. (5 sc, 1 inc) x6 (42)
Rnd 8-9. (2rnds) 42 sc (42)
Rnd 10. 3 sc, 1 inc, (6 sc, 1 inc) x5, 3 sc (48)
Rnd 11. 10 sc, place a marker in the last stitch, continue with 30 sc, place a marker in the last stitch, continue with 8 sc (48) (photo 07)
Do not break yarn, continue with the tail.
Tail
Rnd 12. 9sc, 6ch, 1 sc in the stitch with marker #2 (photo 08), continue crocheting through unworked stitches of round 11, 8 sc (24)
Rnd 13. 9 sc, 6 sc along the ch (photo 09), 9 sc (24)
Rnd 14. 6 sc, 6 dec, 6 sc (18)
Rnd 15. 3 sc, 6 dec, 3 sc (12)
Rnd 16. 12 sc (12)
Rnd 17. 6 dec (6)
Break yarn and close remaining stitches through front loops, weave in the end.

Body End
Rnd 12. Join yellow yarn in the stitch with marker #1 (photo 10), 1 sc in same stitch, 29 sc, 1 sc crocheting at the same time through the space between rounds 12 and 13 of the tail and through the back og the 1st ch (photo11), 4 sc along the ch (photo12), 1 sc crocheting at the same time through the back of the last ch and through the space between rounds 12 and 13 of the tail (photo 13) (36)
Rnd 13. 1 sc, 1 dec, (2 sc, 1 dec) x8, 1 sc (27)
Rnd 14. (1 sc, 1 dec) x9 (18)
Stuff the tail and the body firmly
Rnd 15. 9 dec (9)
Finish stuffing body, break yarn and close remaining stitches through front loops, weave in the end.

Wings x 2
Use yellow yarn:
Rnd 1. 5 sc in a magic ring (5)
Rnd 2. 5 inc (10)
Rnd 3-4. (2rnds) 10 sc (10)
Rnd 5. *4dc*, 9 sc (13)
Rnd 6. 2 dec, 9 sc (11)
Rnd 7. 1 dec, 9 sc (10)
Rnd 8. 10 sc (10)
Rnd 9. (3 sc, 1 dec) x 2 (8)
Rnd 10. 8 sc (8)
Flatten the wing, the little bump must be on the side. Break yarn, leaving a long tail for sewing and close remaining stitches through front loops, bring out the yarn tail between rounds 6 and 7.


Legs x 2
Top
Use yellow yarn:
Rnd 1. 6 sc in a magic ring (6)
Rnd 2. Work this round through BLO, (1 sc, 1 inc) x3 (9)
Rnd 3 left leg. 1 sc, 3 hdc, 5 sc (9)
Rnd 3 right leg. 5 sc, 3 hdc, 1 sc (9)
Fasten off, leaving a long tail for sewing.
Stuff the top leg and the bottom leg.
Bottom
Turn the leg over
Use orange yarn:
Rnd 1. Work this round through FLO. Join yarn through 1st front loop of round 1 of the top leg (photo 15), 6 sc (6)
Rnd 2. 6 sc (6) (photo 16)
Fasten off, leaving a long tail for sewing.
Feet x 2
Use orange yarn
Rnd 1. 6 sc in a magic ring (6)
Rnd 2. 6 sc (6)
Rnd 3. (1 sc, 1 inc) x 3 (9)
Rnd 4. 9 sc (9)
Rnd 5. 3 sc, 1 inc, 4 sc, 1 inc (11)
Rnd 6. 11 sc (11)
To close the foot flatten the top and 5 sc through both layers (photo 17) (5)
Fasten off, weave in the yarn end.

Feather
Use yellow yarn to make a foundation chain of 5 ch
Rnd 1. Start in the 2nd stitch from hook, 2sc, 2slst, 1ch, now crochet along the
other side of the ch and work the loose in and as you go, 2 slst, 1 sc, 1 inc, 1 slst in 1 st stitch of the round.
Fasten off, leaving a long tail for sewing.


Fairy Hat
Use blue yarn and shiny thread:
Rnd 1. 4 sc in a magic ring (4)
Rnd 2. 4 inc (8)
Rnd 3. 8 sc (8)
Rnd 4. (3 sc, 1 inc) x2 (10)
Rnd 5. 2 sc, 1 inc, 4 sc, 1 inc, 2 sc (12)
Rnd 6. (5 sc, 1 inc) x2 (14)
Rnd 7. 3 sc, 1 inc, 6 sc, 1 inc, 3 sc (16)
Rnd 8. (7 sc, 1 inc) x2 (18)
Rnd 9. (5 sc, 1 inc) x3 (21)
Rnd 10. 3 sc, 1 inc, (6 sc, 1 inc) x2, 3 sc (24)
Rnd 11. (7 sc, 1 inc) x3 (27)
Rnd 12. 4 sc, 1 inc, (8 sc, 1 inc) x2, 4 sc (30)
Rnd 13. (9 sc, 1 inc) x 3 (33)
Rnd 14. 33 sc (33)
Break yarn, then fasten off in the invisible way. To make the laces, cut two pieces of gray yarn about 15 cm long. Attach them inside the hat (photo 18) Choose assorted yarn and cut five pieces of different lengths, ranging from 7 to 12 cm. On each piece, tie a knot at one end. Using a needle, draw them through the magic ring of the hat, from the inside to the outside.
Wand
For the handle, cut a wooden pick (a toothpick for example) about 3,5 cm long. Cut two stars from a felt sheet in the color of your choice and glue them to the handle (photo 20) You can use the small star bellow as a template.

Assembly
Beak: Sew the beak between rounds 8 and 11 of the head, make sure it is centered between the two eyes (photo 21)
Head: You will place four pins that will serve as markers to place the head. First visualize the midline of your duckling’s body. Place the 1st pin on this line between the last two rounds of the body. Place the 2nd pin on the midline again between rounds 10 and 11 of the body. Place the last two pins on the flanks between rounds 12 and 13 of the body equidistant from the first two pins. Pin the head to the body using these four markers. You will need to pull a little to get everything to match. Sew the head using the front loops of round 17 of the head.


Wings: Ping the wings to the body. The two ends should fall approximately at the same level of the eye and the back of the head. Sew following the dotted line, only sew on the inside of the wing, so that these stitches are not see on the outside.
Legs: Sew the bottom legs to the feet between rounds 1 and 14, make sure that the hdc are oriented on the left or right side of the feet. Pin the legs under the body at the level of round 2, pay attention to put the correct leg on the left and on the right (the hdc are towards the outside). The feet must be “splayfooted”, meaning that
they must be toes out (photo 27 abd 28). Before sewing check that your duckling can stand on his own, the feet should be parallel to the beak. If necessary adjust the position. Sew the legs.

Feather: Sew the feather on the tip of the tail (photo 29)
To finish:
• Cut two small rounds of pink felt (approximately 7 mm in diameter). Glue them underneath the eyes (photo 30).
• Put the hat on the head and tie the laces, cut the extra tails.
• Glue the wand under the wing.
More Amigurumi Duck Ideas:


