Hello dear Amigurumi Followers
Today we share Vespa Motorcycle Amigurumi Free Crochet Pattern for you. As you know we share new free amigurumi pattern every day. The main crochets are gazelle, amigurumi bear, pola, crochet panda, penguin, giraffe, llama, pig, bunny, clown, lamb, bee, crochet unicorn, amigurumi doll, fox, penguin, dinosaur, crochet elephant, hippo, monkey, crochet cat, crochet dog and more …
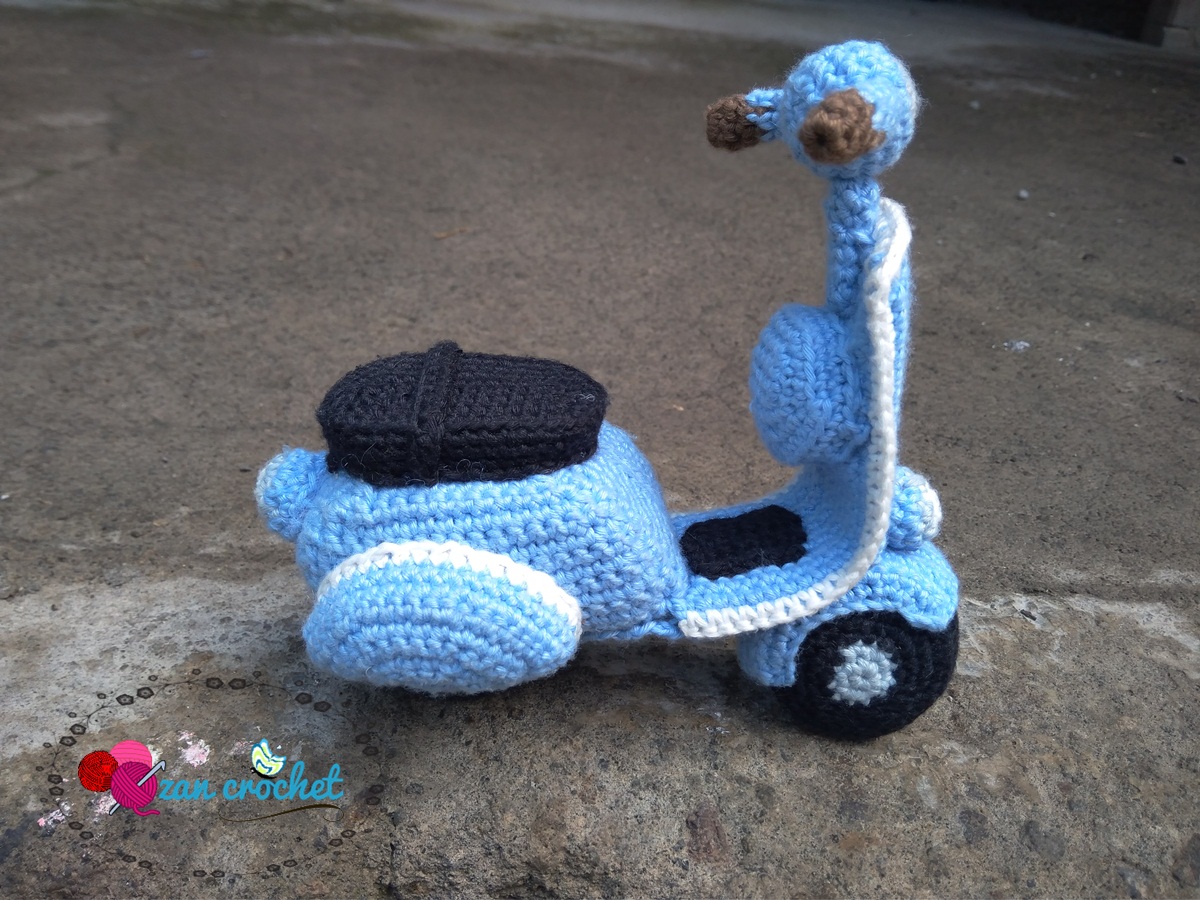
Todays daily new amigurumi free crochet pattern is Amigurumi Vespa Motorcycle.
I want to give you some informations about this amigurumi free pattern ; Vespa Motorcycle.

Abbreviations:
sc: single crochet
ch: chain
St: Stitch
inc : increase
dec: decrease
MR: magic ring
sl st : slip stitch
F/O: Fasten off
R: Round/Row
Materials:
2.25 mm crochet hook
yarn light blue, white, black and grey
Needle for sewing
Stuff
Scissors
milk box/carton
small wire
Note:Work in continuous round/spiral
Vespa Motorcycle Amigurumi Free Crochet Pattern
Body:
Use light blue

Ch 21
R1: starting from 2nd chain from hook, sc in each sts (20)
R2-7: ch 1, turn, sc in each sts (20)
R8: ch 1, turn, dec, 16 sc, dec (18)
R9: ch 1, turn, dec, 14 sc, dec (16)
R10: ch 1, turn, dec, 12 sc, dec (14)
R11: ch 1, turn, dec, 10 sc, dec (12)
R12: ch 1, turn, dec, 8 sc, dec (10)
R13-16: ch 1, turn, working around this piece, 10 sc (upper side), 11 sc (left side), 20 sc (bottom side), 11 sc ( right side) (52)
F/O
Repeat R1-16 to make another piece.
Side Bumps (make 2):
Use light blue

R1: ch 2, starting from second chain from hook 3 sc (3)
R2: ch 1, turn, inc, rep 3x (6)
R3: ch1, turn, sc, inc, rep 3x (9)
R4: ch1, turn, 2 sc, inc, rep 3x (12)
R5: ch1, turn, 3 sc, inc, rep 3x (15)
R6: ch1, turn, 4 sc, inc, rep3x (18)
R7: ch1, turn, 5 sc, inc, rep 3x (21)
R8: ch1, turn, working around this piece, 21 sc (curve side), 13 sc (bottom side) (34)
R9: sc around
R10: CC to white sc around (34)
F/O leaving a long tail for sewing
Front Part:
Use light blue yarn, ch 55

Row1: starting from 2nd chain from hook, sc in each sts (54)
Row2-11: ch 1, turn, sc in each sts (54)Fold it. By using white yarn join both sides, sc in each 3 side sts. Insert the piece of cartoon before you join them completely.
Front Bump:
Use light blue yarn, ch 6
R1: starting from second chain from hook, 4 sc, 3 sc in the last st, continue work on the other side of chain, 3 sc, inc (12)
R2: inc, 3 sc, (inc = 3x), 3 sc, (inc = 2x) (18)
R3: 2 sc, inc, rep 6x (24)

R4: 3 sc, inc, rrep 6x (30)
R5: work in BLO, sc around
R6: sc around
F/O leaving a long tail for sewing
Tube:
Use light blue, leave a long tail before you start making MR. Don’t tighten the magic ring.
R1: MR, 6 sc (6)
R2-6: sc around
F/O leaving along tail for sewing
Handle (make 2):
R1: Use brown, ch 2, starting from second chain from hook 6 sc
R2-3: sc around
R4-7: CC to light blue, sc around
F/O leaving a long tail for sewing
Wheels:
Front wheel
Part 1:
Use grey
R1: ch 2, starting from second chain from hook 6 sc
R2: inc, rep 6x (12)
R3: CC to black, sc, inc, rep 6x (18)
R4: sc, inc, [2 sc, inc = rep 5x], sc (24)
R5: 3 sc, inc, rep 6x (30)
R6: 2 sc, inc, [4 sc, inc = rep 5x], 2 sc (36)
F/O

Part 2:
Use grey
R1: ch 2, starting from second chain from hook 6 sc
R2: inc, rep 6x (12)
R3: CC to black, sc, inc, rep 6x (18)
R4: sc, inc, [2 sc, inc = rep 5x], sc (24)
R5: 3 sc, inc, rep 6x (30)
R6: 2 sc, inc, [4 sc, inc = rep 5x], 2 sc (36)
R7: work in BLO, sc around
R8-12: sc around
F/O leaving a long tail for sewing
Back Wheel:
Part1:
R1: use grey, ch 2, starting from second chain from hook, 3 sc (3)
R2: ch 1, turn, inc, rep 3x (6)
R3: CC to black, ch 1, turn, sc, inc, rep 3x (9)
R4: ch 1, turn, 2 sc, inc, rep 3x (12)
R5: ch 1, turn, 3 sc, inc, rep 3x (15)

R6: ch 1, turn, 4 sc, inc, rep 3x (18)
R7: ch 1, turn, 5 sc, inc, rep 3x (21)
F/O
Part2:
R1: use grey, ch 2, starting from second chain from hook, 3 sc (3)
R2: ch 1, turn, inc, rep 3x (6)
R3: CC to black, ch 1, turn, sc, inc, rep 3x (9)
R4: ch 1, turn, 2 sc, inc, rep 3x (12)
R5: ch 1, turn, 3 sc, inc, rep 3x (15)
R6: ch 1, turn, 4 sc, inc, rep 3x (18)
R7: ch 1, turn, 5 sc, inc, rep 3x (21)
R8: ch 1, turn, work in BLO, sc in each sts (21)
R9-13: ch 1, turn, sc in each sts
F/O leaving a long tail for sewing
Mud Guard:
Use light blue
Ch 13
Row1: starting from second chain from hook, 3 sc, inc, rep 3x (15)
Row2: ch 1, turn, (4 sc, inc = 2x), 5 sc (17)
Row3: ch 1, turn, (5 sc, inc = 2x), 5 sc (19)
Row4-7: ch 1, turn, sc in each sts (19)
Row8: ch 1, turn, (5 sc, dec = 2x), 5 sc (17)
Row9: ch 1, turn, (4 sc, dec = 2x), 5 sc (15)
Row10: 3 sc, dec, rep 3x (12)
F/O
Lights:
Large Light (front):
R1: Use white, ch 2, starting from second chain from hook 6 sc
R2: CC to grey, inc, rep 6x (12)
R3: CC to light blue, sc, inc, rep 6x (18)
R4-5: sc around
R6: 4 sc, dec, rep 3x (15)
R7: sc, dec, rep 6x (12)
Stuff
R8: dec, rep 6x (6)
F/O

Small Light (front):
R1: Use white, ch 2, starting from second chain from hook 5 sc
R2: CC to grey, inc, rep 5x (10)
R3: CC to light blue, sc, inc, rep 5x (15)
R4: sc around
R5: sc, dec, rep 5x (10)
stuff
R6: dec, rep 5x (5)
F/O leaving a long tail for sewing
Back Light:
R1: Use white, ch 2, starting from second chain from hook 5 sc
R2: CC to grey, inc, rep 5x (10)
R3: CC to light blue, sc, inc, rep 5x (15)
R4: sc around
F/O leaving a long for sewing
Seat:
Use black

Ch 12
R1: starting from second chain from hook, 10 sc, 3 sc in the last st, work on the other side of the chain, 9 sc, inc (24)
R2: inc, 9 sc, ( inc = 3x), 9 sc, (inc=2x) (30)
R3: inc, 10 sc, (inc, sc = 2x), inc, 10 sc, (inc, sc = 2x) (36)
R4: inc, 11 sc, (inc, 2 sc = 2x), inc, 11 sc, (inc, 2 sc = 2x) (42)
R5: work in BLO, sc around
R6-7: sc around
F/O leaving a long tail for sewing
Seat Strap:
Use black, ch 16, starting from second chain from hook, sc in each sts.
F/O leaving a long tail for sewing
Mat:
Use black,
R1: Ch 8, starting from second chain from hook, sc in each sts (7)
R2-5: ch 1, turn, sc in each sts (7)
F/O leaving a long tail for sewing
Base:
R1: ch 10, starting from second chain from hook, sc in each sts (9)
R2-11: ch 1, turn, sc in each sts
F/O leaving a long tail for sewing
Finishing:
- Cut two piece of carton (i used milk box) to shape the body of Vespa. Insert the cartons and join the pieces by sewing them together. Stuff it before it close completely.

- Stuff the side bumps and sew them on side of body.

- Insert a piece carton in the seat, stuff, then sew on the body. Sew the strap on the seat.

- Hook the wire to the large light, insert wire in the tube, tighten MR and sew it to large light. Insert wire to back side of front part, then sew the tube. Insert the rest of wire into body, then sew the front to body. Sew the mat near on front near body. Stuff the front bump and sew it on front beside the tube. Sew the handles on both side of light. Bend the front part to shape the vespa. ( see picture as a guide)

- Put round carton in part 2 of front wheel, then sew it to part 1. When it already in halfway, insert one more round carton to another side of wheel, stuff and sew it completely. Sew both piece of back wheel together. Sew the mud guard on front wheel then sew on the bottom side of front. Stuff the back wheel and sew to bottom of body.

- Sew the small light on the mud guard and sew the back light on back side of body. Cut a piece of carton for base of vespa. Put it on the bottom side, between both wheels and cover it with base. Sew it nicely.

Congratulation!! You have finished your vespa.

More Amigurumi Transportation Ideas :


