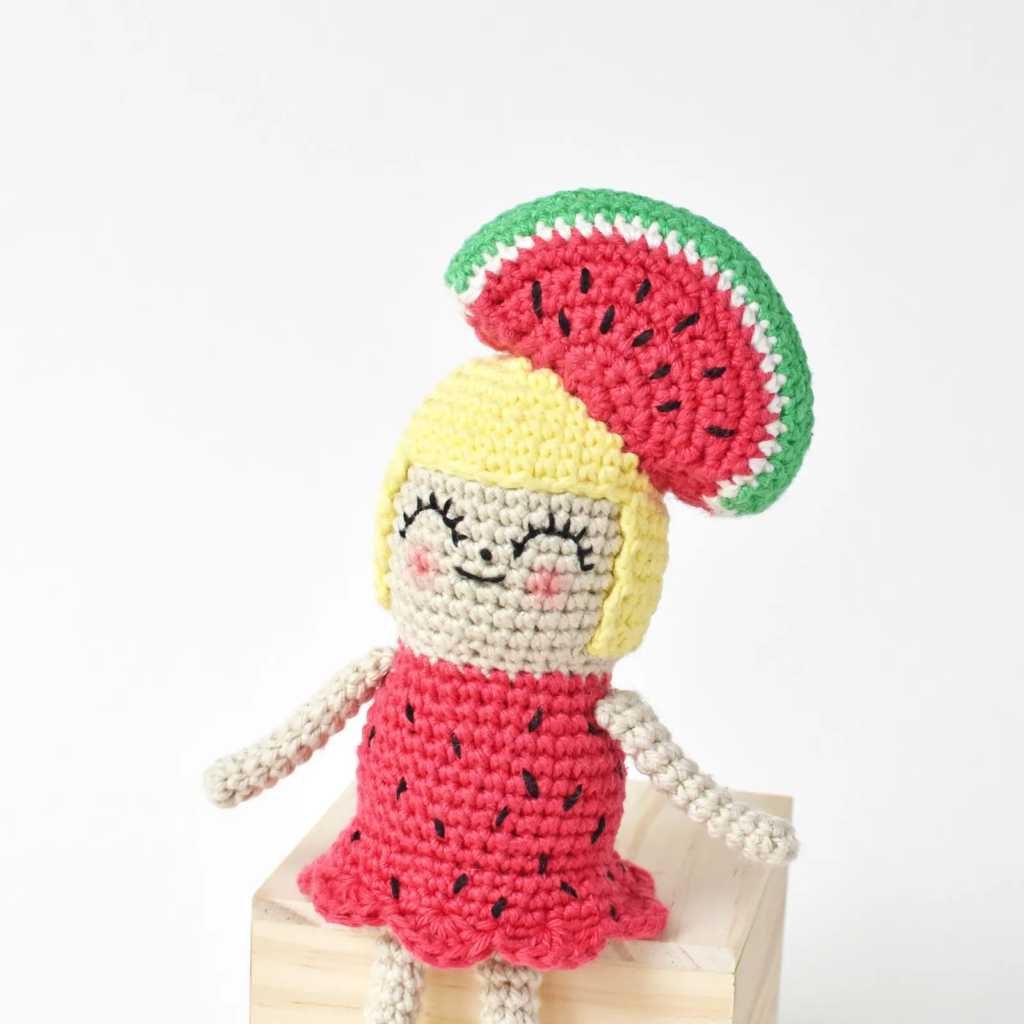
Hello dear Amigurumi Followers
Today we share Amigurumi Crochet Fruit Girls Free Pattern for you. As you know we share new free amigurumi pattern every day. The main crochets are gazelle, amigurumi bear, pola, crochet panda, penguin, giraffe, llama, pig, bunny, clown, lamb, bee, crochet unicorn, amigurumi doll, fox, penguin, dinosaur, crochet elephant, hippo, monkey, crochet cat, crochet dog and more …
Todays daily new amigurumi free crochet pattern is Amigurumi Crochet Fruit Girls.
I want to give you some informations about this amigurumi free pattern ; Crochet Fruit Girls.
MATERIALS (WHAT I RECOMMEND IN PARENTHESES)
- Yarn: Lightweight yarn (light worsted, DK weight, or 8-ply) (Watermelon Girl made with Paintbox Yarns Cotton DK, Lemon Girl & Pineapple Girl made with Rico Ricorumi Cotton DK yarn)
- Color A: Hair
- Color B: Head, arm, and leg
- Color C: Dress & fruit hat
- Color D: Shoe & alternate fruit hat
- Color E: Alternate fruit hat
- Hook: 2.75mm (C) hook (Clover Amour)
- Toy stuffing (Fairfield Poly-Fil)
- Stitch markers (Clover Quick Locking Stitch Markers Small – I LOVE these, they don’t leave big holes in your work!)
- Embroidery floss in black for face (DMC Embroidery Floss in black)
- Embroidery needle (DMC Embroidery Needles)
- Tapestry needle (DMC Tapestry Needle Size 16)
- Scissors (Gingher Stork Scissors)
- Optional: water soluble marking pen for drawing on your face before embroidering (Wrights Water Soluble Marking Pen)
- Optional: pink blush and brush or cotton bud for cheeks
FINISHED SIZES
The finished height of Watermelon Girl & Lemon Girl is 7.5 inches. The finished height of Pineapple Girl is 8.5 inches. Keep your tension tight and consistent to avoid stuffing showing through.
STITCHES & ABBREVIATIONS
US TERMINOLOGY
BLO – back loop only
ch – chain
dc – double crochet
FLO – front loop only
hdc – half double crochet
inc – increase
inv dec – invisible decrease
rnd(s) – round(s)
rs – right side
sc – single crochet
sl st – slip stitch
sm – stitch marker
st(s) – stitch(es)
tr – treble crochet
x – times (indicates number of times to repeat)
* * – stitches between asterisks all in next stitch
[ ] – repeat steps between brackets for the specified number of times
( ) – the number of stitches you should have at the end of each round
SPECIAL TECHNIQUES
- Changing color – Take the last yarn over of previous stitch with new color. Continue working with new color.
- Embroidering on crochet
- Finish off
- Invisible decrease
- Magic ring
- Standing sc – Start with a slipknot on your hook. Insert hook into stitch and make a single crochet as normal.
- Surface crochet
NOTES
- Pattern may switch between rounds and rows. Pay attention to whether you’re starting a rnd or a row.
- Sections in the round are made in a continuous spiral.
- Mark the beginning of each round with a stitch marker.
- All stitches are written in US terminology.
- Demonstration photos are shown using right-handed crochet.
- Watermelon Girl & Lemon Girl use the same pattern with some customizing of colors and finishing. The Pineapple Girl pattern is separate and can be found below the Watermelon & Lemon Girl pattern.
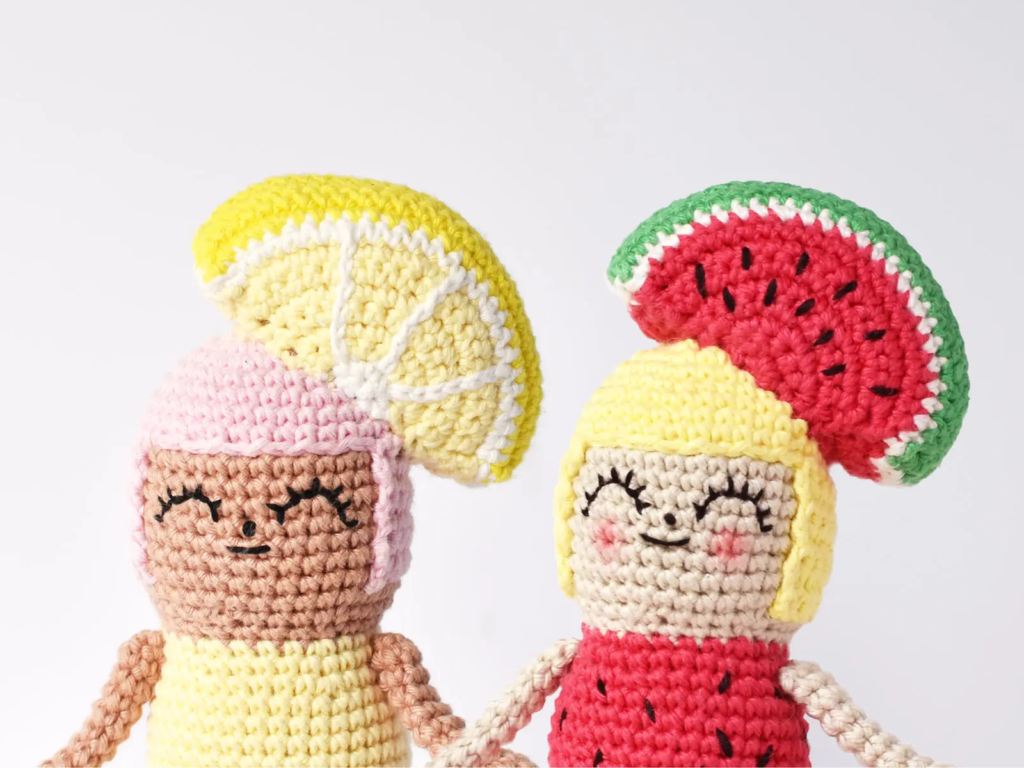
Amigurumi Crochet Fruit Girls
HAIR
rnd 1: with color A, sc 6 into a magic ring (6 sts)
rnd 2: inc 6 (12 sts)
rnd 3: [sc 1, inc 1] 6x (18 sts)
rnd 4: [sc 1, inc 1, sc 1] 6x (24 sts)
rnd 5: [sc 3, inc 1] 6x (30 sts)
rnd 6: sc around (30 sts)
rnd 7: [sc 4, inc 1] 6x (36 sts)
rnds 8-9: sc around (36 sts for 2 rnds)
••• The following will be crocheted in rows •••
rows 10-17: sc 25, ch 1, turn (25 sts for 8 rows)
Fasten off, leaving a 22-inch tail for attaching. Weave in beginning yarn tail. Set aside.
HEAD
rnd 1: with color B, sc 6 into a magic ring (6 sts)
rnd 2: inc 6 (12 sts)
rnd 3: [sc 1, inc 1] 6x (18 sts)
rnd 4: [sc 1, inc 1, sc 1] 6x (24 sts)
rnd 5: sc around (30 sts)
rnd 6: [sc 3, inc 1] 6x (30 sts)
rnd 7: [sc 2, inc 1, sc 2] 6x (36 sts)
rnds 8-16: sc around (36 sts for 9 rnds)
rnd 17: [sc 4, inv dec 1] 6x (30 sts)
rnd 18: [sc 3, inv dec 1] 6x (24 sts).
Sl st 1 into next st. Fasten off and cut yarn. Weave in ends.
ATTACHING HAIR & EMBROIDERING FACE
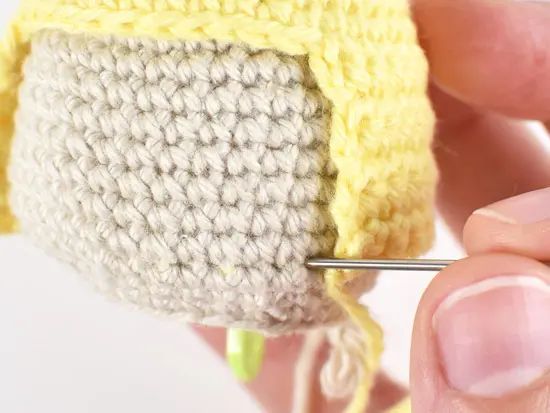
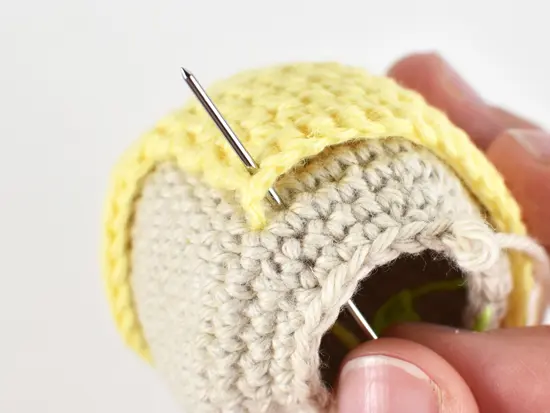
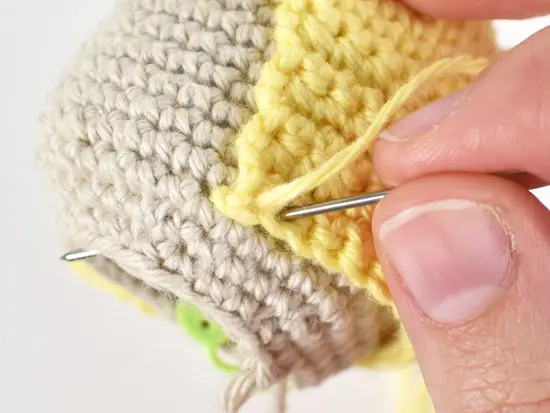

To embroider face, thread embroidery needle with 6 strands of embroidery floss. Make a French knot for nose at center of rnd 12, a backstitch with some slack for smile on rnd 13, and backstitches to make upturned eyes 4 sts wide over rnds 10-12. After you finish the face, take your needle and gently pull on the mouth to create slack for the smile.
DRESS (CONTINUED FROM HEAD)
rnd 1: in color C, make a standing sc (see special techniques) in last rnd of head, sc 2, inc 1, [sc 3, inc 1] 5x (30 sts)
rnd 2: sc around (30 sts)
rnd 3: [sc 4, inc 1] 6x (36 sts)
rnds 4-9: sc around (36 sts for 6 rnds)
rnd 10: [sc 17, inc 1] 2x (38 sts)
rnd 11: in FLO, [sc 5, inc 1] 6x, sc 2 (44 sts)
rnd 12: sc around (44 sts)
rnd 13: [sc 6, inc 1] 6x, sc 2 (50 sts)
rnd 14: [sl st 1, skip 2 sts, dc 5 into next st, skip 2 sts] 8x, skip 1 st, sl st 1 (makes 8 scallops)
Fasten off and weave in ends.
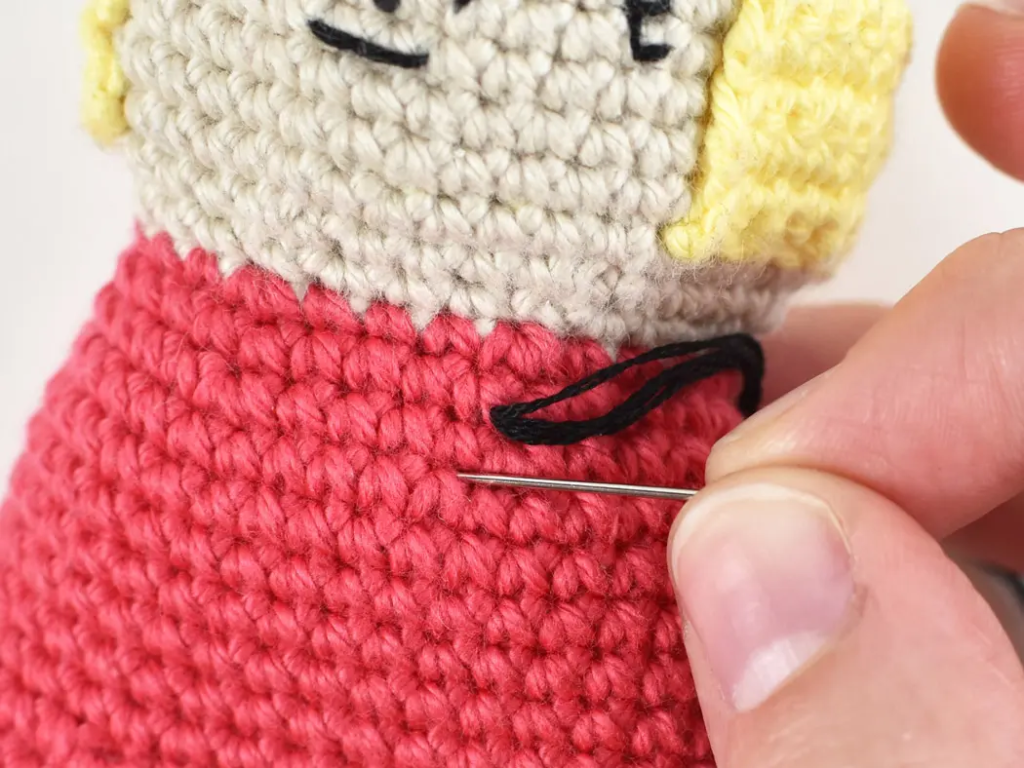
EMBROIDER WATERMELON SEEDS
• FOR WATERMELON GIRL ONLY •
BOTTOM
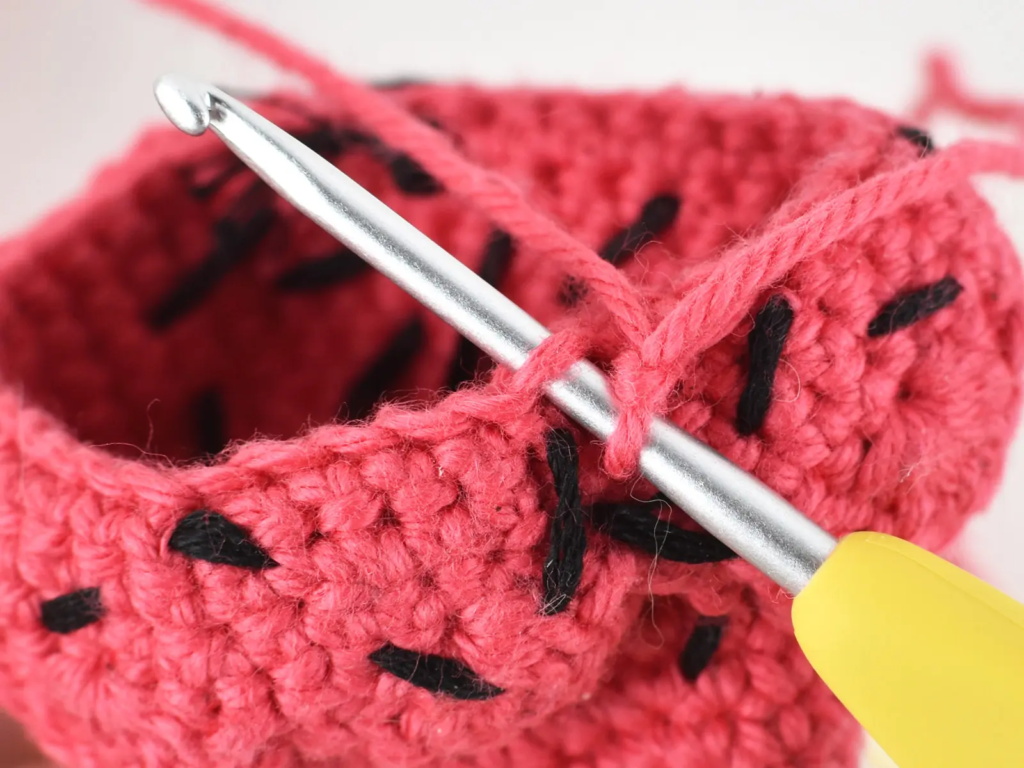
rnd 1: with color C, in BLO of rnd 10, make a standing sc. Sc around (38 sts)
rnd 2: [sc 4, inv dec 1] 6x, inv dec 1 (31 sts)
••• Begin stuffing now and continue stuffing until closed. •••
rnd 3: [sc 3, inv dec 1] 5x, sc 2, inv dec 2 (24 sts)
rnd 4: [sc 2, inv dec 1] 6x (18 sts)
rnd 5: [sc 1, inv dec 1] 6x (12 sts)
rnd 6: inv dec 6 (6 sts)
Sl st 1 in next st. Fasten off and finish off. Weave in ends.
LEG (MAKE 2)
rnd 1: with color D, sc 6 into a magic ring (6 sts)
rnd 2: inc 1, sc 6 (7 sts)
rnd 3: sc around (7 sts)
rnds 4-14: change to color B, sc around (7 sts for 11 rnds)
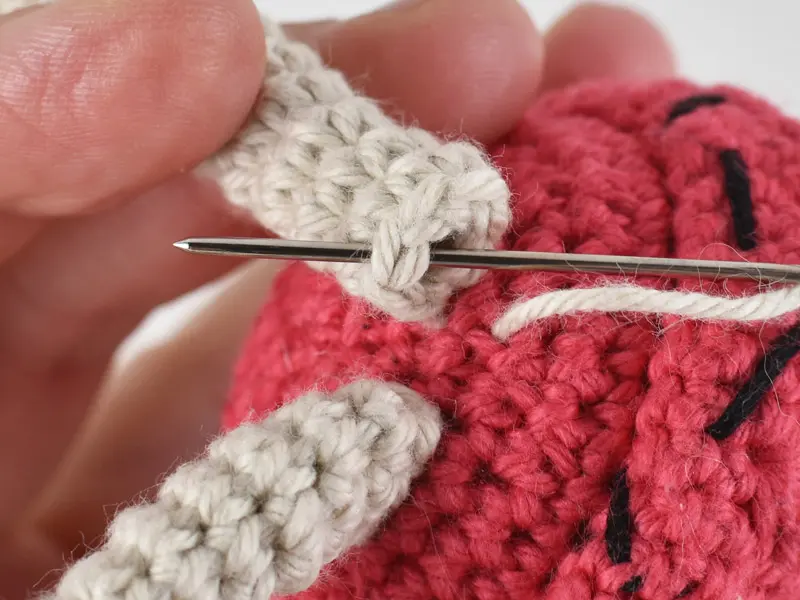
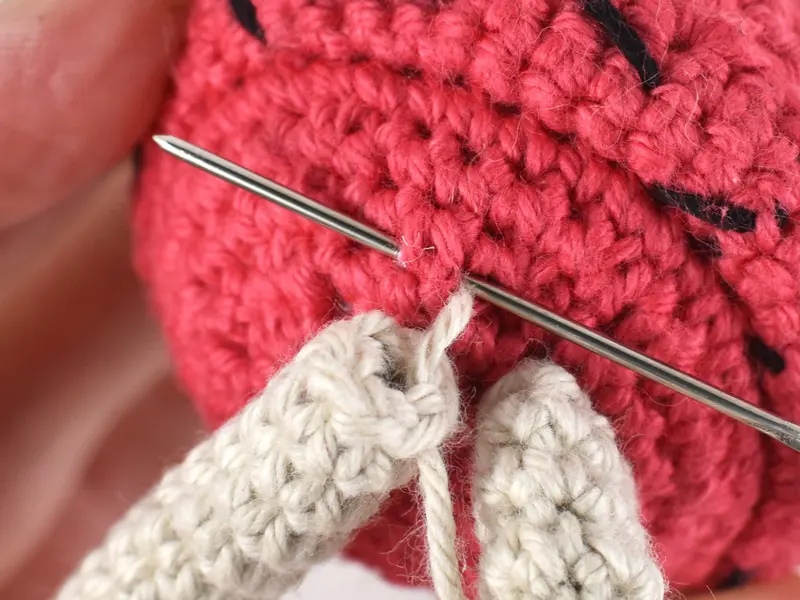
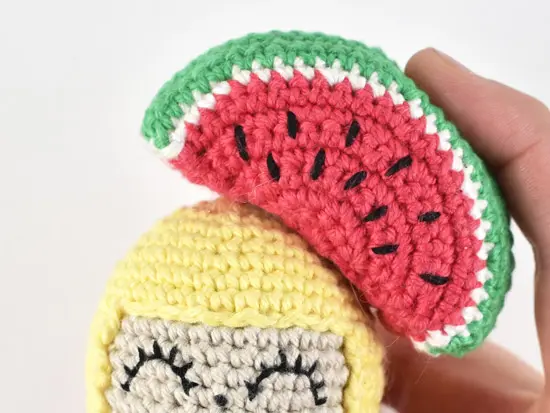
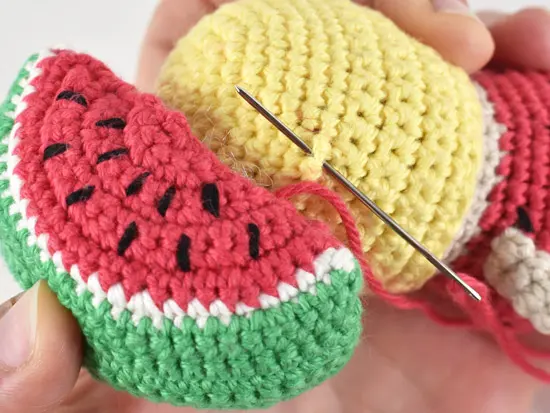
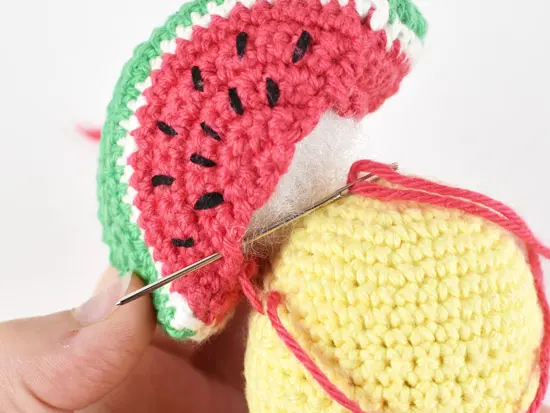
Sl st 1 into next st. Fasten off, leaving a 12-inch tail for attaching. Don’t stuff. Attach legs to bottom of doll over rnds 3 and 4. Space legs 1 stitch apart. See attaching photos below.
ATTACHING LEGS
ARM (MAKE 2)
rnd 1: with color B, sc 6 into a magic ring (6 sts)
rnds 2-11: sc around (6 sts for 10 rnds)
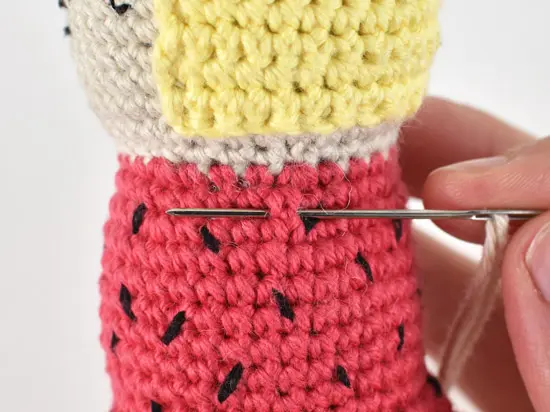
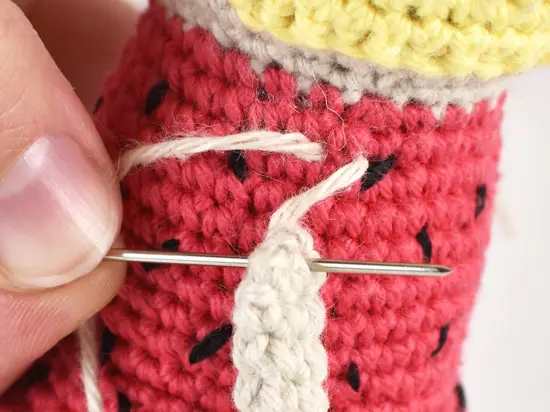
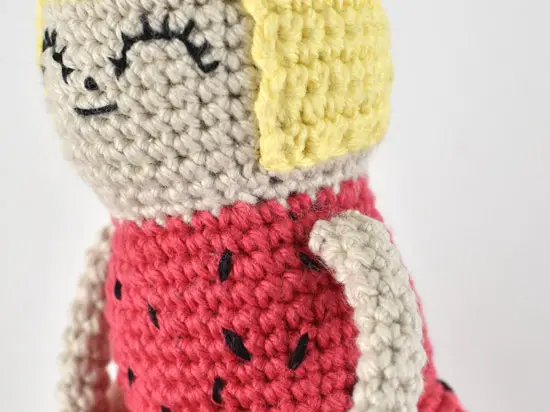
Fasten off, leaving a 12-inch tail. Don’t stuff. Weave yarn tail through sts of last rnd to sew closed (like finishing off) and leave tail for attaching. Attach arms to left and right side of dress between rnds 2 and 3. See attaching images below.
ATTACHING ARMS
HAT (WORKED IN ROWS)
SIDE A
row 1 (RS): in color C (color E for Lemon Girl), sc 3 into a magic ring, ch 1, turn (3 sts)
row 2: inc 3, (change to color C for Lemon Girl) ch 1, turn (6 sts)
row 3: [inc 1, sc 1] 3x, ch 1, turn (9 sts)
row 4: [inc 1, sc 2] 3x, ch 1, turn (12 sts)
row 5: [sc 3, inc 1] 3x, ch 1, turn (15 sts)
row 6: [sc 2, inc 1, sc 2] 3x, ch 1, turn (18 sts)
row 7: [inc 1, sc 5] 3x, ch 1, turn (21 sts)
row 8: [sc 3, inc 1, sc 3] 3x, change to color E, ch 1, turn (24 sts)
row 9: [sc 7, inc 1] 3x, change to color D, ch 1, turn (27 sts)
row 10: [sc 4, inc 1, sc 4] 3x (30 sts)
Fasten off and weave in ends. Set aside.
SIDE B
rows 1-9: repeat rows 1-9 from side A above.
row 10: [sc 4, inc 1, sc 4] 3x, ch 1, turn (30 sts)
rows 11-15: sc across, ch 1, turn (30 sts for 5 rows)
Fasten off, leaving a 22-inch tail for assembling.
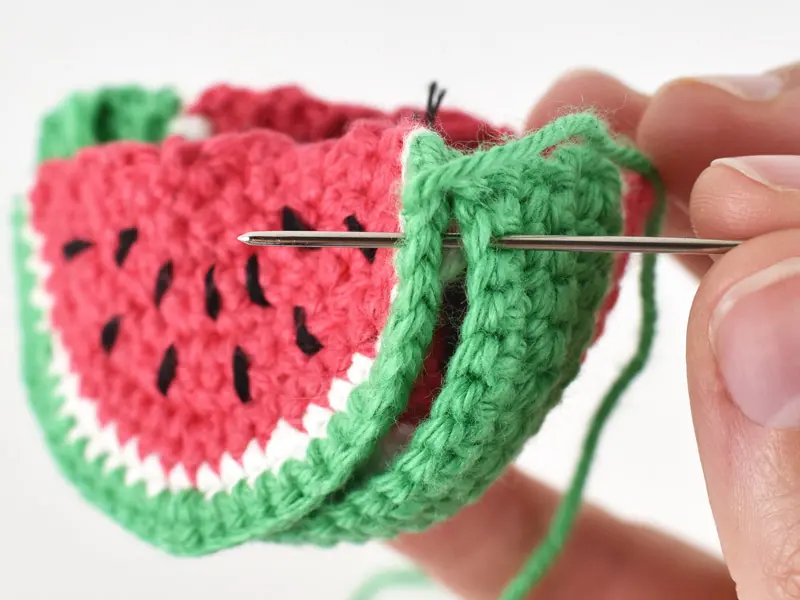
EMBROIDER SEEDS & ASSEMBLE WATERMELON HAT
• FOR WATERMELON GIRL ONLY •
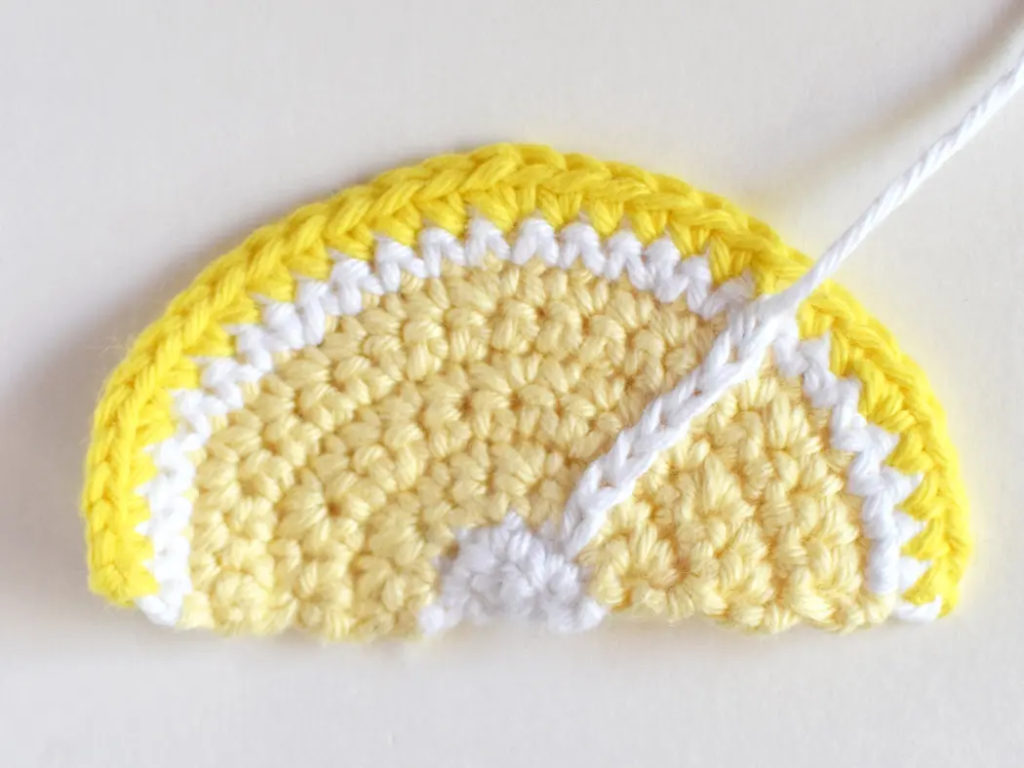
SURFACE CROCHET LEMON PITH & ASSEMBLE LEMON HAT
• FOR LEMON GIRL ONLY •
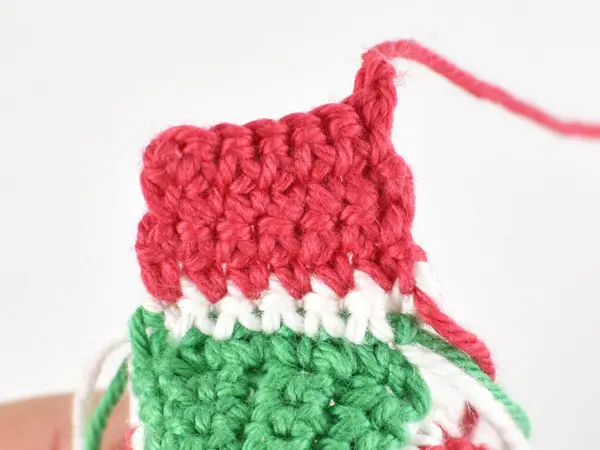
BOTTOM PANEL OF HAT (MAKE 2)
row 1 (RS): using color D, make a standing sc in a space between rows of the rind, sc 5 down rind, change to color E, ch 1, turn (6 sts)
row 2: sc across, change to color C, ch 1, turn (6 sts)
rows 3-6: sc across, ch 1, turn (6 sts for 4 rows)
Fasten off and use corresponding colored yarn tails to sew bottom panel to sides. Repeat for other side.
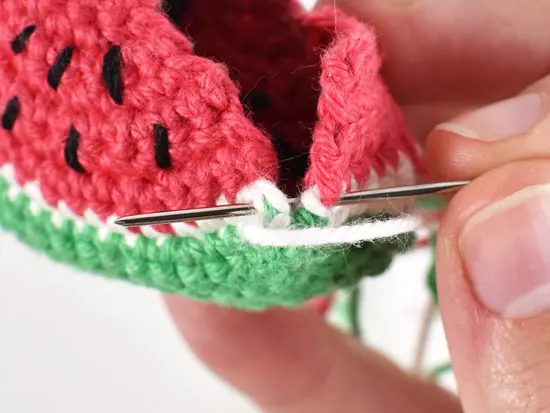

ATTACH HAT
APPLY BLUSH
Optional – Using pink blush and cotton bud or paintbrush, press blush onto doll’s cheeks.
AMIGURUMI PINEAPPLE GIRL PATTERN
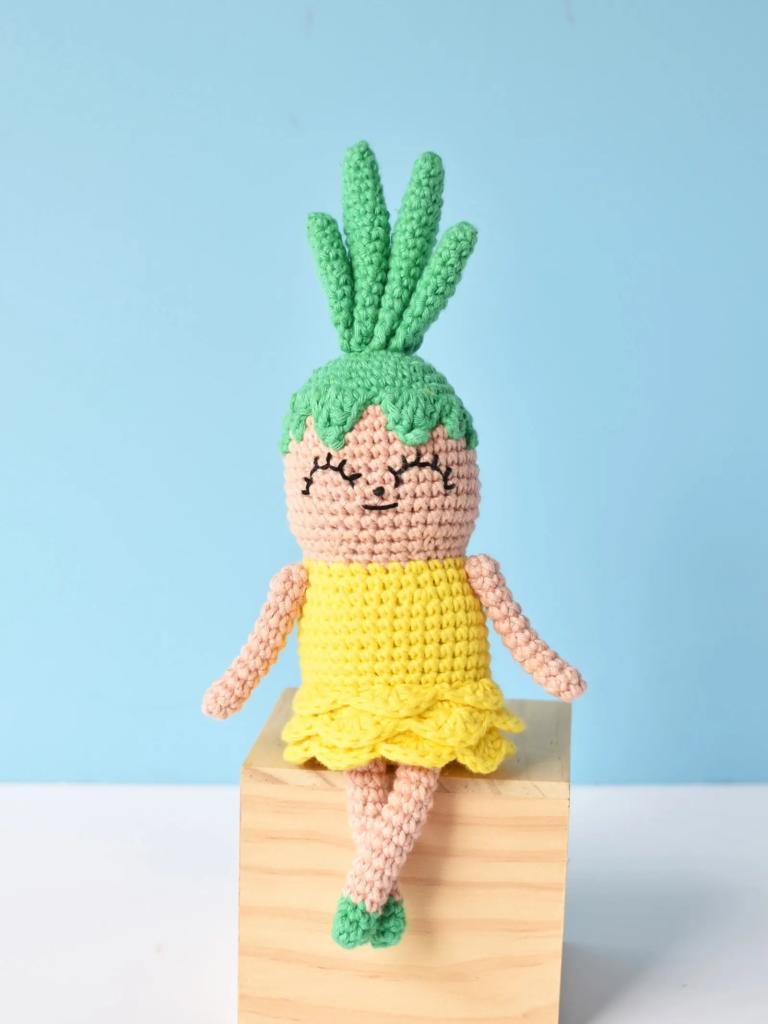
HAIR BASE
rnd 1: with color A, sc 6 into a magic ring (6 sts)
rnd 2: inc 6 (12 sts)
rnd 3: [sc 1, inc 1] 6x (18 sts)
rnd 4: [sc 1, inc 1, sc 1] 6x (24 sts)
rnd 5: [sc 3, inc 1] 6x (30 sts)
rnd 6: sc around (30 sts)
rnd 7: [sc 4, inc 1] 6x (36 sts)
rnd 8: sc around (36 sts)
rnd 9: sl st 1, all in next st *sc 1, dc 1, ch 3, sl st 1 in 3rd ch from hook, dc 1, sc 1*, [sl st 1, sc 1, all in next st *dc 1, tr 1, ch 3, sl st 1 in 3rd ch from hook, tr 1, dc 1*, sc 1, sl st 1] 2 times, all in next st *sc 1, dc 1, ch 3, sl st 1 in 3rd ch from hook, dc 1, sc 1*, sc 22, ch 1, turn
••• The following will be crocheted in rows •••
rows 10-12: sc 22, ch 1, turn (22 sts for 3 rows)
Fasten off, leaving a 22-inch tail for attaching. Weave in beginning yarn tail. Set aside. You’ll crochet and attach the Pineapple Leaves after you’ve finished the rest of the doll.
HEAD
rnd 1: with color B, sc 6 into a magic ring (6 sts)
rnd 2: inc 6 (12 sts)
rnd 3: [sc 1, inc 1] 6x (18 sts)
rnd 4: [sc 1, inc 1, sc 1] 6x (24 sts)
rnd 5: sc around (30 sts)
rnd 6: [sc 3, inc 1] 6x (30 sts)
rnd 7: [sc 2, inc 1, sc 2] 6x (36 sts)
rnds 8-16: sc around (36 sts for 9 rnds)
rnd 17: [sc 4, inv dec 1] 6x (30 sts)
rnd 18: [sc 3, inv dec 1] 6x (24 sts).
Sl st 1 into next st. Fasten off and cut yarn. Weave in ends.
ATTACHING HAIR & EMBROIDERING FACE
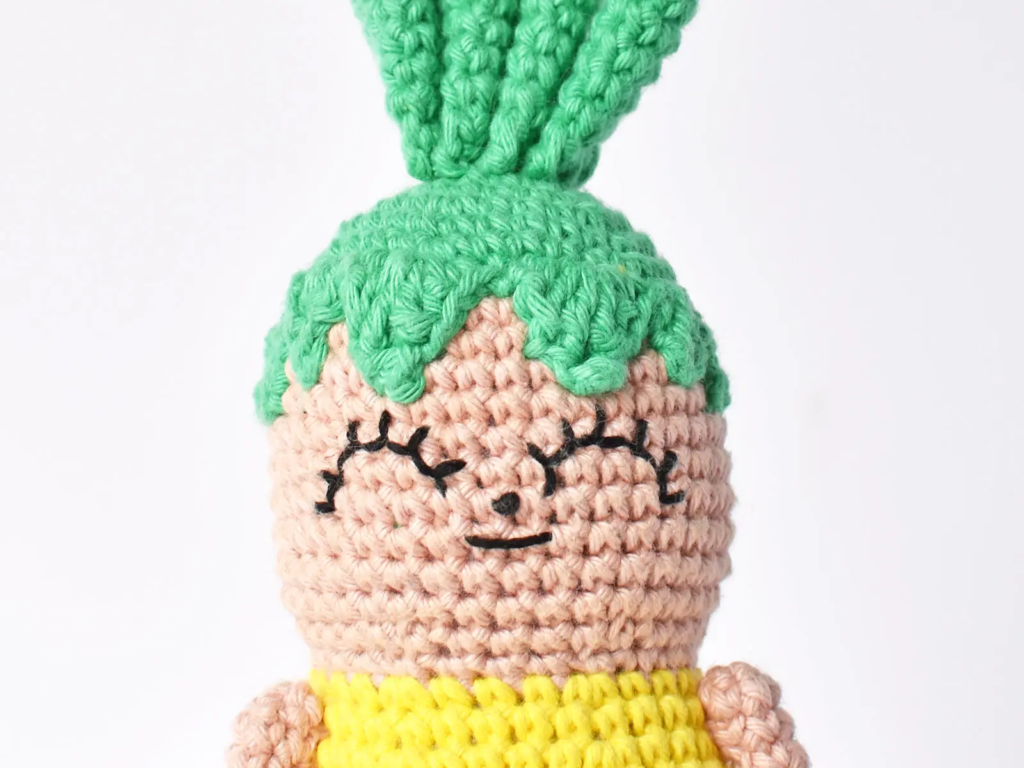
With stitch marker at the back, use yarn tail to sew hair base to head using a running stitch along entire edge of hair (use the same attaching technique as used for Watermelon and Lemon Girls). To embroider face, thread embroidery needle with 6 strands of embroidery floss. Make a French knot for nose at center of rnd 13, a backstitch with some slack for smile on rnd 14, and backstitches to make upturned eyes 4 sts wide over rnds 11-13. After you finish the face, take your needle and gently pull on the mouth to create slack for the smile.
DRESS (CONTINUED FROM HEAD)
rnd 1: in color C, make a standing sc (see special techniques) in last rnd of head, sc 2, inc 1, [sc 3, inc 1] 5x (30 sts)
rnd 2: sc around (30 sts)
rnd 3: [sc 4, inc 1] 6x (36 sts)
rnds 4-9: sc around (36 sts for 6 rnds)
••• In the next rnds, you’ll be crocheting scallop stitches for the ruffled skirt. Follow the FLO and BLO instructions carefully. •••
rnd 10: in FLO, [sc 1, skip 2 sts, dc 5 into next st, skip 2 sts] 6x, sl st 1 in 1st st of rnd. (6 scallops)
rnd 11: Flip scallops up to reveal back loop of rnd 9. In BLO of rnd 9, [sc 17, inc 1] 2x (38 sts)
rnd 12: in FLO, [sc 5, inc 1] 6x, sc 2 (44 sts)
rnd 13: in FLO, [sc 1, skip 2 sts, dc 5 into next st, skip 2 sts] 6x, sl st in 1st st of this rnd (makes 7 scallops)
rnd 14: Flip scallops up to reveal back loop of rnd 12. In BLO of rnd 12, sc around (44 sts)
rnd 15: [sc 6, inc 1] 6x, sc 2 (50 sts)
rnd 16: [sl st 1, skip 2 sts, dc 5 into next st, skip 2 sts] 8x, skip 1 st, sl st 1 (makes 8 scallops)
Fasten off and weave in ends.
BOTTOM
Flip doll’s skirt up to reveal back loop of rnd 11. Begin rnd 1 of bottom on this rnd.
rnd 1: with color C, in BLO of first st of rnd 11, make a standing sc. Sc around (38 sts)
rnd 2: [sc 4, inv dec 1] 6 times, inv dec 1 (31 sts)
••• Begin stuffing now and continue stuffing until closed. •••
rnd 3: [sc 3, inv dec 1] 5x, sc 2, inv dec 2 (24 sts)
rnd 4: [sc 2, inv dec 1] 6x (18 sts)
rnd 5: [sc 1, inv dec 1] 6x(12 sts)
rnd 6: inv dec 6 (6 sts)
Sl st 1 in next st. Fasten off and finish off. Weave in ends.
LEG (MAKE 2)
rnd 1: with color D, sc 6 into a magic ring (6 sts)
rnd 2: inc 1, sc 6 (7 sts)
rnd 3: sc around (7 sts)
rnds 4-14: change to color B, sc around (7 sts for 11 rnds)
Sl st 1 into next st. Fasten off, leaving a 12-inch tail for attaching. Don’t stuff. Attach legs to bottom of doll over rnds 3 and 4. Space legs 1 stitch apart.
ARM (MAKE 2)
rnd 1: with color B, sc 6 into a magic ring (6 sts)
rnds 2-11: sc around (6 sts for 10 rnds)
Fasten off, leaving a 12-inch tail. Don’t stuff. Weave yarn tail through sts of last rnd to sew closed and leave tail for attaching. Attach arms to left and right side of dress between rnds 2 and 3. See the attaching photos from the pattern above.
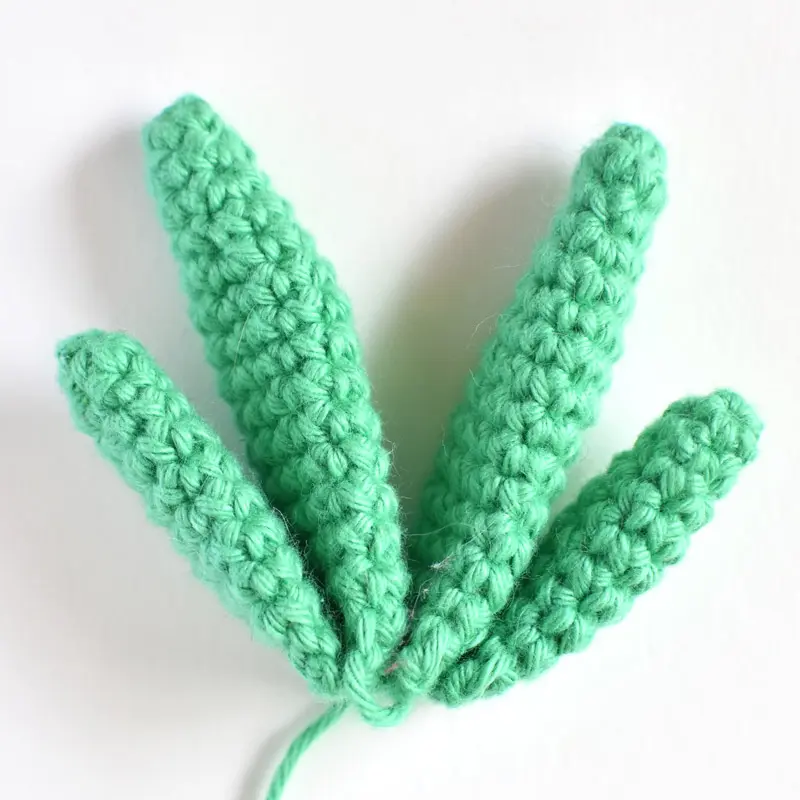
INNER PINEAPPLE LEAF (MAKE 2)
rnd 1: with color A, sc 4 into a magic ring (4 sts)
rnd 2: [inc 1, sc 1] 2x (6 sts)
rnd 3: sc around (6 sts)
rnd 4: [inc 1, sc 2] 2x (8 sts)
rnd 5: sc around (8 sts)
rnd 6: [inc 1, sc 3] 2x (10 sts)
rnds 7-15: sc around (10 sts for 9 rnds)
row 16: ch 1, fold leaf opening in half, sc 5 across through both front and back sts (5 sts)
Fasten off and weave in ends. Set aside.
OUTER PINEAPPLE LEAF (MAKE 2)
rnds 1-10: same as outer leaf above.
row 11: ch 1, fold leaf opening in half, sc 5 across through both front and back sts (5 sts)
Fasten off and weave in end for 1 leaf. For last leaf, leave an 18-inch tail for assembling. Set aside.
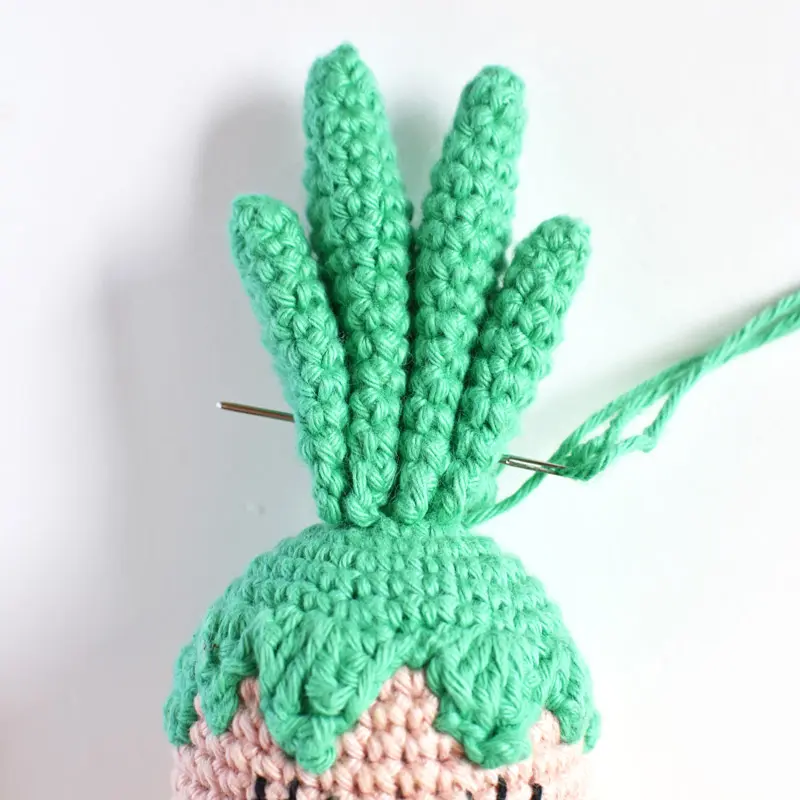
ASSEMBLE & ATTACH LEAVES
APPLY BLUSH
Optional – Using pink blush and cotton bud or paintbrush, press blush onto doll’s cheeks.
