Hello dear Amigurumi Followers
Today we share Amigurumi Sweet Crochet Owls Free Pattern for you. As you know we share new free amigurumi pattern every day. The main crochets are gazelle, amigurumi bear, pola, crochet panda, penguin, giraffe, llama, pig, bunny, clown, lamb, bee, crochet unicorn, amigurumi doll, fox, penguin, dinosaur, crochet elephant, hippo, monkey, crochet cat, crochet dog and more …
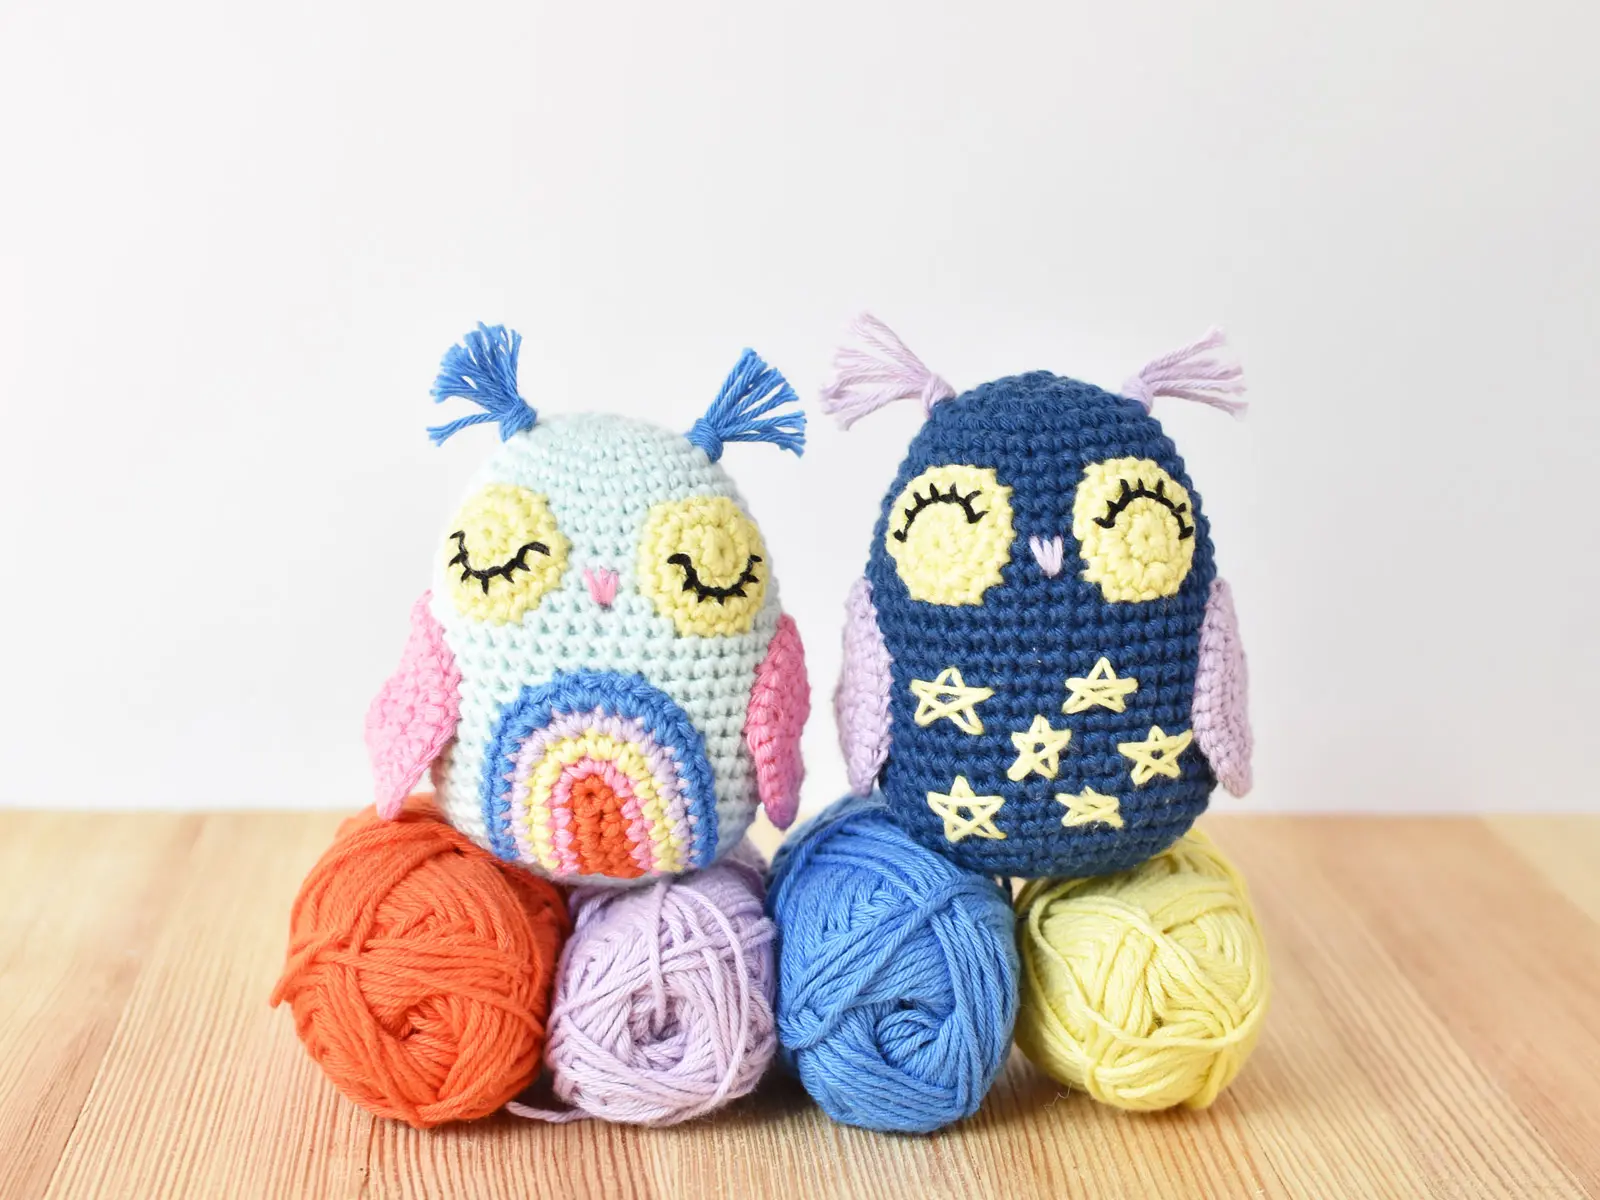
Todays daily new amigurumi free crochet pattern is Amigurumi Sweet Crochet Owls.
I want to give you some informations about this amigurumi free pattern ; Sweet Crochet Owls.
MATERIALS (WHAT I RECOMMEND IN PARENTHESES)
- Yarn: Lightweight yarn (light worsted, DK weight, or 8-ply) (Rico Ricorumi Cotton DK yarn or Patons Grace Yarn)
- Night Owl colors – eyes & stars (Ricorumi in Pastel Yellow), body (Ricorumi in Midnight Blue), and wings & head feathers (Ricorumi in Lilac)
- Day Owl colors – eyes & rainbow (Ricorumi in Pastel Yellow), body (Rico Design Baby Cotton Soft DK in Mint), wings & rainbow (Ricorumi in Candy Pink), rainbow (Ricorumi in Orange), rainbow (Ricorumi in Lilac), rainbow & head feathers (Ricorumi in Blue)
- Hook: 2.75mm (C) hook (Clover Amour)
- Toy stuffing (Fairfield Poly-Fil)
- Stitch markers (Clover Quick Locking Stitch Markers Small – I LOVE these, they don’t leave big holes in your work!)
- Embroidery floss in black for face (DMC Embroidery Floss in black)
- Embroidery needle (DMC Embroidery Needles)
- Tapestry needle (DMC Tapestry Needle Size 16)
- Scissors (Gingher Stork Scissors)
- Sewing pins to help attach pieces
- Optional: water soluble marking pen for drawing on your face before embroidering (Wrights Water Soluble Marking Pen)
AMIGURUMI OWL FINISHED SIZES
The finished height of the owls is 4 inches. Keep your tension tight and consistent to avoid stuffing showing through.
STITCHES & ABBREVIATIONS
US TERMINOLOGY
ch – chain
inc – increase
inv dec – invisible decrease
rnd(s) – round(s)
RS – right side
sc – single crochet
sl st – slip stitch
st(s) – stitch(es)
WS – wrong side
[ ] or { } – repeat steps between brackets for the specified number of times
( ) – the number of stitches you should have at the end of each round
SPECIAL TECHNIQUES
- Embroidering on crochet
- Finish off
- Invisible decrease
- Magic ring
- Standing sc – Start with a slipknot on your hook. Insert hook into stitch and make a single crochet as normal.
NOTES
- Body & eye circle worked in a continuous round, wing & rainbow worked in rows.
- Mark the beginning of each round with a stitch marker.
- All stitches are written in US terminology.
- Demonstration photos are shown using right-handed crochet.
Amigurumi Sweet Crochet Owls
BODY
rnd 1: In body color, start with a magic ring, sc 6 into ring (6 sts)
rnd 2: Inc 6 (12 sts)
rnd 3: [sc 1, inc 1] 6 times (18 sts)
rnd 4: [sc 1, inc 1, sc 1] 6 times (24 sts)
rnd 5: [sc 3, inc 1] 6 times (30 sts)
rnd 6: Sc around (30 sts)
rnd 7: [sc 2, inc 1, sc 2] 6 times (36 sts)
rnds 8-9: Sc around (36 sts for 2 rnds)
rnd 10: [sc 9, {inc 1, sc 2} 3 times] 2 times (42 sts)
rnds 11-24: Sc around (42 sts for 14 rnds)
rnd 25: [sc 5, inv dec 1] 6 times (36 sts)
• • • Body continues after star embroidery tutorial.• • •
EMBROIDER STARS • NIGHT OWL ONLY
Embroider the stars using lightweight yellow yarn. I’m using the same yarn as the eye circles. Thread your embroidery needle with 30 inches of yarn. Double knot end. To embroider stars, remember how to draw a five point star and mimic it with your embroidery needle.


BODY CONTINUED
rnd 26: [sc 4, inv dec 1] 6 times (30 sts)
• • • Start stuffing body now & continue stuffing firmly until closed. • • •
rnd 27: [sc 3, inv dec 1] 6 times (24 sts)
rnd 28: [sc 2, inv dec 1] 6 times (18 sts)
rnd 29: [sc 1, inv dec 1] 6 times (12 sts)
rnd 30: Inv dec 6 (6 sts)
Sl st 1 into next st. Fasten off & finish off.
EYE CIRCLE
rnd 1: In eye color, start with a magic ring, sc 7 into ring (7 sts)
rnd 2: Inc 7 (14 sts)
rnd 3 (partial rnd): [sc 1, inc 1] 4 times, sl st 1 (18 sts)
Fasten off, leaving a 10-inch tail for attaching. See embroidery photos and attaching tutorial below.
EMBROIDERING & ATTACHING EYES
You’ll now be embroidering and attaching the owl’s eyes. The key to embroidering on crochet is to make sure to insert your needle through your stitches and not in a hole between stitches so your thread remains secure. With black embroidery thread and needle, embroider eyes on eye circles. For sleepy eyes, make sure eye circle’s yarn tail is on the right and for happy eyes the tail is on the left. Embroider eyes on rnd 2 and eyelashes on rnd 3 of eye circle.


WING • MAKE 2
row 1: (WS) Using wing color, start with a magic ring, sc 4 into ring (4 sts)
row 2: (RS) Ch 1, turn, inc 4 (8 sts)
row 3: Ch 1, turn, [inc 1, sc 1] 4 times (12 sts)
row 4: Ch 1, turn, [sc 1, inc 1, sc 1] 4 times (16 sts)
row 5: Ch 1, turn, [sc 3, inc 1] 4 times (20 sts)
row 6: Ch 1, turn to work down straight edge, sc 1 in same st as last inc of row 5, sc 8, ch 1, sl st 1 into 1st st of row 5. (9 sts). See photos A & B below.
Fasten off, leaving a 15-inch tail for attaching to body. See attaching tutorial below.


ATTACHING WINGS


EMBROIDERING THE BEAK


RAINBOW • DAY OWL ONLY
row 1: In orange, ch 6, sc 4 starting in 2nd ch from hook, sc 3 in next ch st, turn to work down other side of chain, sc 4, fasten off (11 sts)
• • • Start rows 2-5 in first st of previous row. • • •
row 2: Standing sc 1, sc 3, inc 3, sc 4, fasten off (14 sts)
row 3: Standing sc 1, sc 4, inc 4, sc 5, fasten off (18 sts)
row 4: Standing sc 1, sc 4, [inc 1, sc 1] 4 times, sc 5, fasten off (22 sts)
row 5: Standing sc 1, sc 6, [inc 1, sc 1] 4 times, sc 7 (26 sts)
Fasten off, leaving a 20-inch tail for attaching. Weave in all tails except for long tail. See attaching tutorial on page 8.


ATTACHING THE RAINBOW


I hope you enjoyed this crochet owl pattern! If you have any questions about this pattern, leave a comment below!