Hello dear Amigurumi Followers
Today we share Amigurumi Pumpkin Snail Free Pattern for you. As you know we share new free amigurumi pattern every day. The main crochets are gazelle, amigurumi bear, pola, crochet panda, penguin, giraffe, llama, pig, bunny, clown, lamb, bee, crochet unicorn, amigurumi doll, fox, penguin, dinosaur, crochet elephant, hippo, monkey, crochet cat, crochet dog and more …
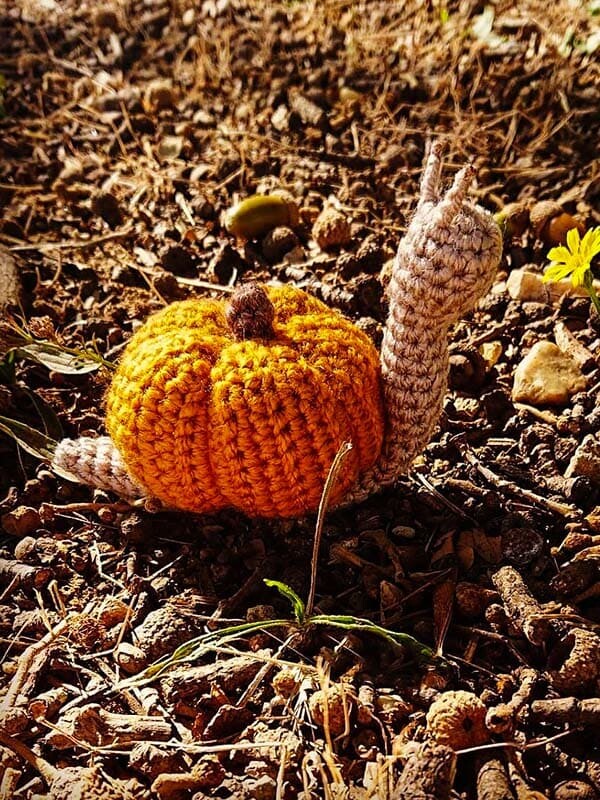
Todays daily new amigurumi free crochet pattern is Amigurumi Pumpkin Snail.
I want to give you some informations about this amigurumi free pattern ; Pumpkin Snail.
MATERIALS
. Yarn of your choice is Crochet hook
. Yarn needle
. Scissors
. Fiberfill for stuffing
. Stitch marker
ABBREVIATIONS
MR = magic ring st = stitch
ch = chain
sc = single crochet
inc = increase
dec = decrease
hdc = half double crochet
is (00) = number of stitchs at the end of the round
(00)x0 = repeat the stitches between (]x time
Let’s start crocheting the amigurumi snail pattern.
Let’s start with the body and head of the amigurumi snail pattern.
Amigurumi Pumpkin Snail Free Pattern
HEAD AND BODY
Work in a spiral.
Rd 1 – 6 sc dans MR (6)
Rd 2 – 6 inc (12)
Rds 3 to 5 – 12 sc (12)
Rd 6 – 6 sc, 3 dec (9)
Stuff the head.
Rds 7 to 18 – 9 Sc (9)
Stuff the body leaving a space inside at round 6 so that the neck can be fold.
Rd 19 – [2 sc, 1 inc]x3 (12)
Rd 20 – [2sc, 1 inc]x4 (16)
Rds 21 to 33 – 16 sc (16)
Rd 34 – [2sc, 1 dec]x4 (12)
Rd 35 – 12 sc (12)
Finish stuffing the body but not too much so that this part can stay quite thin.
Rd 36 – [2sc, 1 dec]x3 (9)
Rd 37 – 9 Sc (9)
Rd 38 – [2 sc, 1 dec]x2,1 sc (7)
Rd 39 – 1 dec, 5 sc (6)
Rd 40 – 3 dec (3)
Fasten off and cut the yarn.
FEELERS
Put the yarn through a stitch on the head where the first feeler will be. Chain 4 and tie a knot firmly. Cut the yarn just after the knot. Put the other end of the yarn through, 2 st further on the head and make the second feeler in the same way.

We are going to crochet the pumpkin part of the amigurumi snail pattern. Orange floss is preferred for pumpkin.
PUMPKIN
Work in rows.
Chain 21
Rows 1 to 25 – starting in 2nd ch from hook, 20 hdc, ch 1. turn.
Don’t cut the yarn and start the assembly.

STEM
Work in a spiral.
Rd 1-5 sc in MR
Rds 2 to 4-5 sc (5)
Cut the yarn leaving a long tail to sew.
ASSEMBLY
Fold the rectangle in half making sure it’s inside out and joining the little sides together (row 1 and 25).
Slip stitch across both sides. You can also sew it with the yarn needle if you prefer.
Cut the yarn leaving a long tail to sew the first side of the pumpkin.
With yarn needle, weave tail along one edge around. Put the tail tight and cinch this end closed. Tie a knot and cut yarn.
Turn the pumpkin right side out and stuff.
With a long tail, close the other side in the same way you closed the first one.
With the remainder of tail, go through the middle of the pumpkin from one side to the other and tug tight to create the ridges. Secure yarn, tie off and cut yarn.
Sew the stem to the middle of the top of the pumpkin.
Sew the pumpkin to the middle of the body of the snail.
Use a brown pen or eye shadow to draw the eyes on the top of feelers.
Congratulations, your pumpkinsnail is all done!
Congratulations, you have completed the amigurumi pumpkin snail pattern.
More Amigurumi Snail Ideas:


